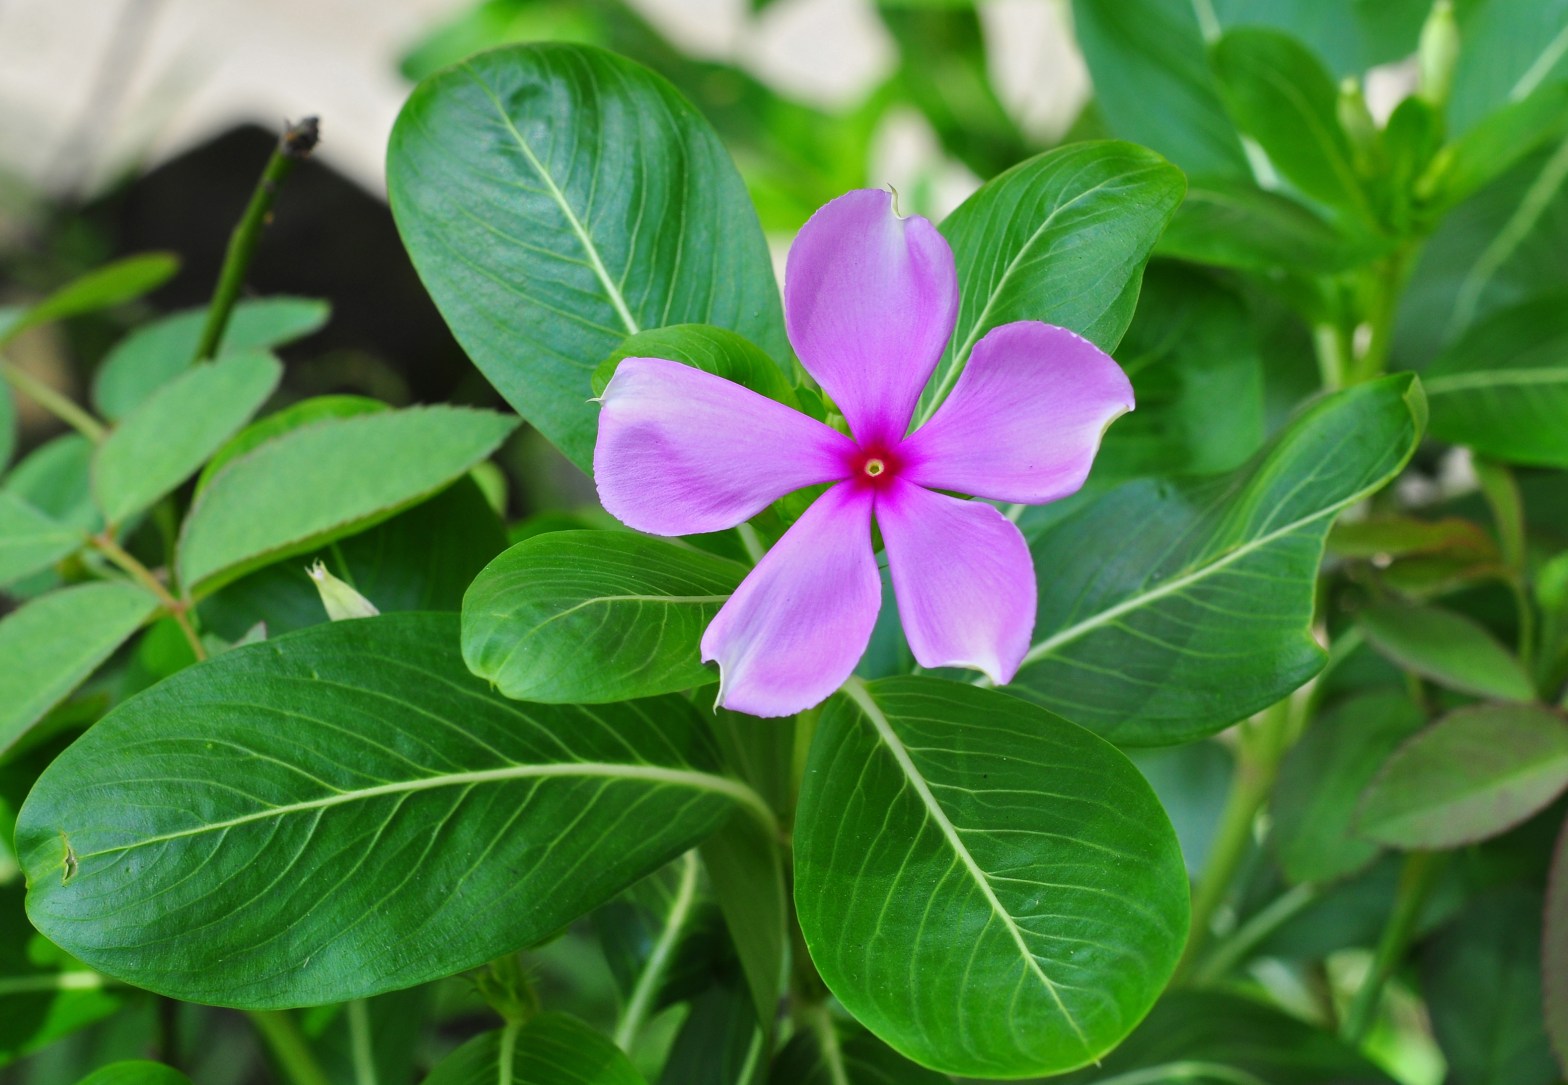
Taking care of a terrace garden during the scorching summer months requires special attention. We need to focus on watering, shading, soil health, and pest control.
கொளுத்தும் கோடை மாதங்களில் மாடித் தோட்டத்தைப் பராமரிப்பதில் சிறப்பு கவனம் தேவை. நீர்ப்பாசனம், நிழல், மண் ஆரோக்கியம் மற்றும் பூச்சி கட்டுப்பாடு ஆகியவற்றில் நாம் கவனம் செலுத்த வேண்டும்.
1. Watering Tips
Water early morning or late evening to reduce evaporation. Deep watering is better than frequent shallow watering (encourages deep root growth). Use drip irrigation or self-watering systems to keep consistent moisture. Mulch (with straw, dried leaves, or coco peat) to keep soil moisture.
நீர்ப்பாசன குறிப்புகள்: நீர் ஆவியாவதைக் குறைக்க அதிகாலை அல்லது மாலையில் தண்ணீர் பாய்ச்ச வேண்டும். அடிக்கடி ஆழமற்ற நீர்ப்பாசனம் செய்வதை விட ஆழமான நீர்ப்பாசனம் சிறந்தது (ஆழமான நீர்ப்பாசனம் வேர் வளர்ச்சியை ஊக்குவிக்கிறது). சீரான ஈரப்பதத்தை பராமரிக்க சொட்டு நீர்ப்பாசனம் அல்லது சுய நீர்ப்பாசன முறைகளைப் பயன்படுத்தவும். மண்ணின் ஈரப்பதத்தை பராமரிக்க தழைக்கூளம் (வைக்கோல், உலர்ந்த இலைகள் அல்லது தென்னை நார்கழிவு).
2. Shade & Heat Protection
Use shade nets(50-70%) to protect delicate plants from harsh sunlight. Move potted plants to a partially shaded area during peak heat (11 AM–4 PM). Use light-colored containers (they absorb less heat than dark ones). Install temporary pergolas or green nets to diffuse sunlight.
நிழல் மற்றும் வெப்ப பாதுகாப்பு: மென்மையான தாவரங்களை கடுமையான சூரிய ஒளியிலிருந்து பாதுகாக்க நிழல் வலைகளை (50-70%) பயன்படுத்தவும். உச்ச வெப்பத்தின் போது (காலை 11 மணி முதல் மாலை 4 மணி வரை) தொட்டிகளில் வளர்க்கப்படும் தாவரங்களை ஓரளவு நிழலாடிய பகுதிக்கு நகர்த்தவும். வெளிர் நிற கொள்கலன்களைப் பயன்படுத்தவும் (அவை இருண்டவற்றை விட குறைந்த வெப்பத்தை உறிஞ்சும்). சூரிய ஒளியைப் பரப்ப தற்காலிக பெர்கோலாக்கள் அல்லது பச்சை வலைகளை நிறுவவும்.
3. Soil & Fertilization
Add organic compost (vermicompost, cow dung) to improve water retention. Avoid chemical fertilizers in extreme heat (can burn roots); use liquid organic fertilizers (like Panchakavya or Jeevamirtham or seaweed or fish emulsion). Check soil moisture daily—terrace gardens dry out faster than ground soil.
மண் & உரமிடுதல்: நீர் தேக்கத்தை மேம்படுத்த கரிம உரம் (மண்புழு உரம், மாட்டு சாணம்) சேர்க்கவும். அதிக வெப்பத்தில் (வேர்களை எரிக்கக்கூடிய) ரசாயன உரங்களைத் தவிர்க்கவும்; திரவ கரிம உரங்களைப் பயன்படுத்தவும் (பஞ்சகவ்யா அல்லது ஜீவாமிர்தம் அல்லது கடற்பாசி போன்றவை). தினமும் மண்ணின் ஈரப்பதத்தைச் சரிபார்க்கவும் - மாடித் தோட்டங்கள் தரை மண்ணை விட வேகமாக வறண்டு போகும்.
4. Pest & Disease Control
Spray neem oil solution (1 tsp neem oil + 1 liter water + few drops of liquid soap) to deter pests. Remove dead leaves to prevent fungal infections. Encourage beneficial insects (ladybugs, bees) by planting marigolds or basil.
பூச்சி மற்றும் நோய் கட்டுப்பாடு: பூச்சிகளைத் தடுக்க வேப்ப எண்ணெய் கரைசலை (1 தேக்கரண்டி வேப்ப எண்ணெய் + 1 லிட்டர் தண்ணீர் + சில துளிகள் திரவ சோப்பு) தெளிக்கவும். பூஞ்சை தொற்றுகளைத் தடுக்க இறந்த இலைகளை அகற்றவும். சாமந்தி அல்லது துளசியை நடுவதன் மூலம் நன்மை பயக்கும் பூச்சிகளை (லேடிபக்ஸ், தேனீக்கள்) ஊக்குவிக்கவும்.
5. Wind Protection
Install windbreaks (trellis, bamboo screens) if your terrace is windy. Heavy pots should be secured to avoid toppling in strong winds.
காற்று பாதுகாப்பு: மாடியில் காற்று அதிகமாக இருந்தால், காற்றுத் தடுப்புகளை (வலைகள், மூங்கில் திரைகள்) அமைக்கவும். பலத்த காற்றில் கவிழ்வதைத் தவிர்க்க கனமான தொட்டிகளைப் பாதுகாக்க வேண்டும்.
Check for wilting, yellowing, or sunburn (brown patches on leaves). Prune damaged leaves to encourage new growth. Frequent weeding is a must.
வழக்கமான கண்காணிப்பு: வாடல், மஞ்சள் அல்லது வெயிலில் எரிதல் (இலைகளில் பழுப்பு நிற திட்டுகள்) உள்ளதா என சரிபார்க்கவும். புதிய வளர்ச்சியை ஊக்குவிக்க சேதமடைந்த இலைகளை கத்தரிக்கவும். அடிக்கடி களையெடுப்பது அவசியம்.
By adhering to these steps, your terrace garden can survive and even flourish during the hot summer months!
இந்த வழிமுறைகளைப் பின்பற்றுவதன் மூலம், உங்கள் மாடித் தோட்டம் வெப்பமான கோடை மாதங்களில் செழிக்க முடியும்!
✅ Check the official notification for the latest syllabus and exam pattern. ✅ Know the marking scheme (negative marking, sectional cutoffs). ✅ Focus on high-weightage topics first.
Create a Realistic Study Plan
📅 Daily/Weekly Targets: Allocate time for each subject. ⏳ Time Management: Divide time for concepts, revision, and mock tests. 📌 Prioritize Weak Areas: Spend extra time on difficult topics.
Study Smart – Focus on Important Topics
📚 General Studies (TNPSC/UPSC):
History, Polity, Geography, Economy, Science & Current Affairs.
Use NCERT books (6th-12th) for basics. 🔢 Aptitude & Reasoning (SSC/Banking):
Practice Quantitative Aptitude, Logical Reasoning, Data Interpretation.
Learn shortcut tricks for faster calculations.
Use the Right Study Materials
✔ Standard Books . ✔ Previous Year Papers – Identify repeated questions. ✔ Online Resources (Video lessons).
Practice Mock Tests & Previous Papers
📝 Take timed tests to improve speed & accuracy. 📊 Analyze mistakes and revise weak areas. 🎯 Simulate exam conditions to reduce exam-day stress.
Stay Updated with Current Affairs
🗞 Daily News: Read The Hindu, Indian Express, PIB. 📱 Apps & Websites: Use INSIGHTS IAS, GKToday, AffairsCloud. 📅 Monthly Magazines: Pratiyogita Darpan, Yojana.
Revision is Key
🔄 Weekly Revision: Make short notes/flashcards. 📖 Last-Month Focus: Only revise important formulas, facts, and current affairs.
Stay Healthy & Motivated
🧘 Avoid Burnout: Take short breaks, exercise, meditate. 💪 Stay Positive: Believe in your preparation. 🚫 Avoid Distractions: Limit social media, focus on goals.
Final Tip:
“Consistency beats last-minute cramming!” Stick to your plan, track progress, and stay confident.
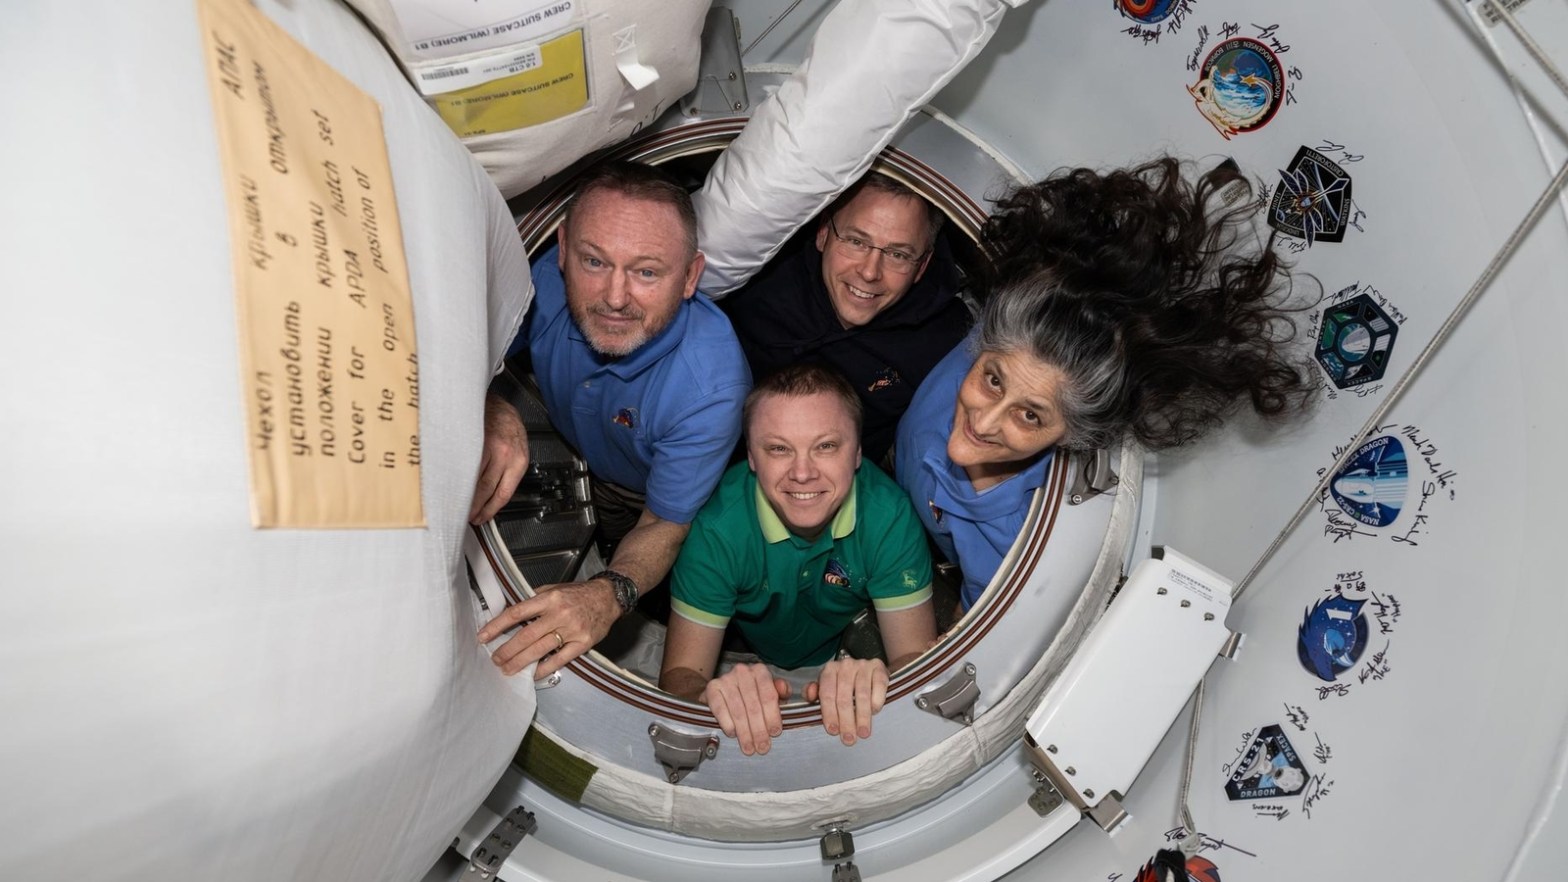
சுனிதா வில்லியம்ஸின் விண்வெளிப் பயணம் பற்றிய தகவல்கள்
Two Space Missions – Sunita Williams has been to space twice:
Expedition 14/15 (December 9, 2006 – June 22, 2007) on Space Shuttle Discovery (STS-116)
Expedition 32/33 (July 14, 2012 – November 18, 2012) on Soyuz TMA-05M
இரண்டு விண்வெளி பயணங்கள் – சுனிதா வில்லியம்ஸ் இரண்டு முறை விண்வெளிக்குச் சென்றுள்ளார்:
-விண்வெளி விண்கலம் டிஸ்கவரி (STS-116) இல் பயணம் 14/15 (டிசம்பர் 9, 2006 – ஜூன் 22, 2007)
சோயுஸ் TMA-05M இல் பயணம் 32/33 (ஜூலை 14, 2012 – நவம்பர் 18, 2012)
Total Time in Space – She has spent a total of 322 days in space across both missions.
விண்வெளியில் மொத்த நேரம் – இரண்டு பயணங்களிலும் அவர் மொத்தம் 322 நாட்கள் விண்வெளியில் செலவிட்டார்.
Record for Female Spacewalking – At one point, she held the record for the most spacewalks by a woman (7 spacewalks, totaling 50 hours and 40 minutes).
பெண் விண்வெளி நடைப்பயணத்திற்கான சாதனை – ஒரு கட்டத்தில், அதிக விண்வெளி நடைப்பயணங்கள் செய்த பெண் என்ற சாதனையை (7 விண்வெளி நடைப்பயணங்கள், மொத்தம் 50 மணி நேரம் 40 நிமிடங்கள்) அவர் வைத்திருந்தார்.
First Indian-Origin Woman in Space – Although she is an American astronaut, she is of Indian origin and became one of the most prominent women in space exploration.
விண்வெளியில் முதல் இந்திய வம்சாவளி பெண் – அவர் ஒரு அமெரிக்க விண்வெளி வீரர் என்றாலும், அவர் இந்திய வம்சாவளியைச் சேர்ந்தவர் மற்றும் விண்வெளி ஆராய்ச்சியில் மிகவும் பிரபலமான பெண்களில் ஒருவரானார்.
First Woman to Run a Marathon in Space – While aboard the International Space Station (ISS) in 2007, she ran the Boston Marathon on a treadmill in 4 hours, 24 minutes.
விண்வெளியில் மராத்தான் ஓட்டம் நடத்திய முதல் பெண் – 2007 ஆம் ஆண்டு சர்வதேச விண்வெளி நிலையத்தில் (ISS) இருந்தபோது, பாஸ்டன் மராத்தானை 4 மணி நேரம் 24 நிமிடங்களில் ஓடினார்.
First Female Commander of ISS – She became the Commander of the ISS during Expedition 33 in September 2012, making her one of the first women to hold this position.
ISS இன் முதல் பெண் தளபதி – செப்டம்பர் 2012 இல் எக்ஸ்பெடிஷன் 33 இன் போது அவர் ISS இன் தளபதியானார், இந்தப் பதவியை வகித்த முதல் பெண்களில் ஒருவரானார்.
Selected for Boeing Starliner Mission – Sunita Williams is part of NASA’s Commercial Crew Program and has been selected to fly on Boeing’s CST-100 Starliner spacecraft for its first crewed mission, planned for 2024-2025.
போயிங் ஸ்டார்லைனர் மிஷனுக்குத் தேர்ந்தெடுக்கப்பட்டார் – சுனிதா வில்லியம்ஸ் நாசாவின் வணிகக் குழுத் திட்டத்தின் ஒரு பகுதியாக உள்ளார், மேலும் 2024-2025 இல் திட்டமிடப்பட்ட அதன் முதல் குழுவுடன் கூடிய பணிக்காக போயிங்கின் CST-100 ஸ்டார்லைனர் விண்கலத்தில் பறக்கத் தேர்ந்தெடுக்கப்பட்டுள்ளார்.
Diverse Background – She is a former U.S. Navy officer and helicopter pilot, logging over 3,000 flight hours in more than 30 aircraft.
மாறுபட்ட பின்னணி – அவர் ஒரு முன்னாள் அமெரிக்க கடற்படை அதிகாரி மற்றும் ஹெலிகாப்டர் விமானி, 30 க்கும் மேற்பட்ட விமானங்களில் 3,000 க்கும் மேற்பட்ட விமான மணிநேரங்களை பதிவு செய்தார்.
As of March 19, 2025, NASA astronauts Sunita Williams and Barry “Butch” Wilmore have safely returned to Earth after an extended mission aboard the International Space Station (ISS). They were initially launched on June 5, 2024, aboard Boeing’s Starliner spacecraft for an eight-day demonstration mission. However, due to technical issues with the Starliner’s thrusters, their stay was unexpectedly prolonged. NASA decided to return the Starliner uncrewed and awaited the availability of SpaceX’s Crew Dragon for the astronauts’ return
மார்ச் 19, 2025 நிலவரப்படி, நாசா விண்வெளி வீரர்கள் சுனிதா வில்லியம்ஸ் மற்றும் பாரி "புட்ச்" வில்மோர் ஆகியோர் சர்வதேச விண்வெளி நிலையத்தில் (ISS) நீட்டிக்கப்பட்ட பயணத்திற்குப் பிறகு பாதுகாப்பாக பூமிக்குத் திரும்பியுள்ளனர். அவர்கள் முதலில் ஜூன் 5, 2024 அன்று போயிங்கின் ஸ்டார்லைனர் விண்கலத்தில் எட்டு நாள் செயல் விளக்கப் பணிக்காக ஏவப்பட்டனர். இருப்பினும், ஸ்டார்லைனரின் த்ரஸ்டர்களில் ஏற்பட்ட தொழில்நுட்ப சிக்கல்கள் காரணமாக, அவர்களின் தங்குதல் எதிர்பாராத விதமாக நீடித்தது. நாசா ஸ்டார்லைனரை பணியாளர்கள் இல்லாமல் திருப்பி அனுப்ப முடிவு செய்தது மற்றும் விண்வெளி வீரர்கள் திரும்புவதற்கு ஸ்பேஸ்எக்ஸின் க்ரூ டிராகன் கிடைக்கும் வரை காத்திருந்தது.
The astronauts departed the ISS aboard SpaceX’s Crew Dragon capsule early Tuesday, alongside NASA astronaut Nick Hague and Russian cosmonaut Aleksandr Gorbunov. After a 12-hour journey, they safely splashed down in the Gulf of Mexico at 5:57 p.m. ET.
செவ்வாய்க்கிழமை அதிகாலை, நாசா விண்வெளி வீரர் நிக் ஹேக் மற்றும் ரஷ்ய விண்வெளி வீரர் அலெக்சாண்டர் கோர்புனோவ் ஆகியோருடன், விண்வெளி வீரர்கள் ஸ்பேஸ்எக்ஸின் க்ரூ டிராகன் காப்ஸ்யூலில் ஐஎஸ்எஸ்ஸிலிருந்து புறப்பட்டனர். 12 மணி நேர பயணத்திற்குப் பிறகு, அவர்கள் மாலை 5:57 ET மணிக்கு மெக்சிகோ வளைகுடாவில் பாதுகாப்பாக தரையிறங்கினர்.
பல்லாண்டு பயிர்களுக்கு பானை மாற்றி நடவு செய்தல் – அவசியம் மற்றும் வழிமுறைகள்
Repotting perennial plants is essential for their health and longevity. It Prevents Root Binding, Refreshes Soil Nutrients, Improves Drainage, Controls Pests, Diseases and Encourages Healthy Growth. Key signs that indicate it’s time to repot are yield loss, Roots Growing Out of Drainage Holes, Root-Bound Plant (Circling Roots), Roots Visible on the Soil Surface, Stunted Growth, Soil Dries Out Too Quickly, Water Not Absorbing Well, and Nutrient Deficiency Signs.
பல்லாண்டு தாவரங்களை மீண்டும் மறுநடவு செய்வது அவற்றின் ஆரோக்கியத்திற்கும் நீண்ட ஆயுளுக்கும் அவசியம். இது வேர் பிணைப்பைத் தடுக்கிறது, மண் ஊட்டச்சத்துக்களை புதுப்பிக்கிறது, வடிகால் மேம்படுத்துகிறது, பூச்சிகள், நோய்களைக் கட்டுப்படுத்துகிறது மற்றும் ஆரோக்கியமான வளர்ச்சியை ஊக்குவிக்கிறது. மகசூல் இழப்பு, வடிகால் துளைகளுக்கு வெளியே வளரும் வேர்கள், வேருடன் கூடிய தாவரம் (வட்டமிடும் வேர்கள்), மண்ணின் மேற்பரப்பில் தெரியும் வேர்கள், வளர்ச்சி குன்றியது, மண் மிக விரைவாக காய்ந்துவிடும், நீரை நன்றாக உறிஞ்சாதது மற்றும் ஊட்டச்சத்து குறைபாடு அறிகுறிகள் ஆகியவை மீண்டும் நடவு செய்ய வேண்டிய நேரம் என்பதைக் குறிக்கும் முக்கிய அறிகுறிகள்.
Repotting Frequency: பானைமாற்றுதல் காலஅவகாசம்
📆 Fast-Growing Plants: Every 10 – 18 months (e.g., Roses, Hibiscus, Moringa, Curry leaves etc.,). வேகமாக வளரும் தாவரங்கள்: ஒவ்வொரு 10 – 18 மாதங்களுக்கு ஒருமுறை (எ.கா., ரோஜா, செம்பருத்தி, முருங்கை, கறிவேப்பிலை போன்றவை).
📆 Slow-Growing Plants: Every 2–3 years (e.g., succulents, cacti). மெதுவாக வளரும் தாவரங்கள்: ஒவ்வொரு 2-3 வருடங்களுக்கு ஒருமுறை (எ.கா., சதைப்பற்றுள்ள, வறட்சியை தாங்கும் தாவரங்கள், கற்றாழை).
📆 Large, Established Plants: Every 3–5 years, or top-up with fresh soil annually instead of full repotting. பெரிய, வளர்ந்த தாவரங்கள்: ஒவ்வொரு 3-5 வருடங்களுக்கு ஒருமுறை, அல்லது முழுமையாக மாற்றுவதற்கு பதிலாக ஆண்டுதோறும் மேல்மணலை கிளறி விட்டு புதிய மண் கலவையினை இடவும். (எ.கா., மா, சப்போட்டா, எலுமிச்சை)
Best Time to Repot: 🌿 Spring and Early Summer – Ideal because plants are entering their active growth phase. 🍂 Fall (for certain plants) – Some perennials can be repotted in fall, but avoid doing it before dormancy.
செய்ய சிறந்த நேரம்: 🌿 வசந்த காலம் மற்றும் கோடையின் ஆரம்பம் - தாவரங்கள் அவற்றின் சுறுசுறுப்பான வளர்ச்சிக் கட்டத்தில் நுழைவதால் சிறந்தது. 🍂 இலையுதிர் காலம் சில பல்லாண்டு பழங்களை இலையுதிர் காலத்தில் மீண்டும் நடலாம்.
Steps to Repot Perennial Plants
பல்லாண்டு தாவரங்களை மீண்டும் நடவு செய்வதற்கான படிகள்
1. Choose the Right Time: Early spring or fall is ideal, as plants experience less stress during these seasons.
1. சரியான நேரத்தை தேர்ந்தெடுங்கள்: இந்த பருவங்களில் தாவரங்கள் குறைவான அழுத்தத்தை அனுபவிப்பதால், வசந்த காலத்தின் துவக்கம் அல்லது இலையுதிர் காலம் சிறந்தது.
2. Select a Suitable Pot: Choose a pot 1–2 inches larger in diameter than the current one. Ensure it has drainage holes to prevent waterlogging.
2. பொருத்தமான பானையைத் தேர்ந்தெடுங்கள்: தற்போதையதை விட 1-2 அங்குல விட்டம் கொண்ட பானையைத் தேர்ந்தெடுக்கவும். நீர் தேங்குவதைத் தடுக்க வடிகால் துளைகள் இருப்பதை உறுதிப்படுத்திக் கொள்ளுங்கள்.
3. Prepare Fresh Potting Mix: Use a well-draining, nutrient-rich potting mix suitable for the plant type. Mix in organic compost for added fertility.
3. புதிய பாட்டிங் கலவையை தயார் செய்யவும்: தாவர வகைக்கு ஏற்ற, நன்கு வடிகட்டும், ஊட்டச்சத்து நிறைந்த பாட்டிங் கலவையைப் பயன்படுத்தவும்.
4. Remove the Plant from the Old Pot: Water the plant a few hours before repotting. This can also be done during the night to ease removal. Gently tap or squeeze the pot’s sides and tilt the plant out. If the pot is large, lay it on the ground or terrace. Apply gentle pressure to the sides to loosen the root ball. If the pot is small to medium-sized, put it on a raised platform. Turn the pot upside down. Gently tap the rim against the platform. Seek assistance from others to safely handle and collect the depotted plant. Loosen the root ball carefully and remove excess old soil.
4. பழைய தொட்டியில் இருந்து செடியை அகற்றவும்: செடியை மீண்டும் நடவு செய்வதற்கு சில மணிநேரங்களுக்கு முன்பு தண்ணீர் பாய்ச்சவும். அகற்றுவதை எளிதாக்க, இரவு நேரத்திலும் நீர் விடலாம். பானையின் பக்கங்களை மெதுவாக தட்டவும் அல்லது அழுத்தவும் மற்றும் செடியை வெளியே எடுக்கவும். பானை பெரியதாக இருந்தால், தரையில் அல்லது மொட்டை மாடியில் செடியுடன் பானையினை சாய்த்து வைக்கவும். வேர் பந்தைத் தளர்த்த பக்கங்களுக்கு மென்மையான அழுத்தத்தைப் பயன்படுத்துங்கள். பானை சிறியதாகவும் நடுத்தரமாகவும் இருந்தால், அதை உயர்த்தப்பட்ட மேடையில் வைக்கவும். பானையை தலைகீழாக திருப்பவும். மேடைக்கு எதிராக விளிம்பை மெதுவாகத் தட்டவும். டிபோட் செய்யப்பட்ட செடியை பாதுகாப்பாக கையாளவும் சேகரிக்கவும் மற்றவர்களின் உதவியை நாடுங்கள். வேர் பந்தை கவனமாக தளர்த்தவும், அதிகப்படியான பழைய மண்ணை அகற்றவும்.
5. Trim the Roots (If Necessary): Cut away any dead or overly tangled roots to encourage fresh growth. Avoid cutting too much—leave a healthy root system intact.
5. வேர்களை ஒழுங்கமைக்கவும் (தேவைப்பட்டால்): புதிய வளர்ச்சியை ஊக்குவிக்க, இறந்த அல்லது அதிகமாக சிக்கியுள்ள வேர்களை வெட்டி விடுங்கள். அதிகமாக வெட்டுவதைத் தவிர்க்கவும் - ஆரோக்கியமான வேர் அமைப்பை அப்படியே விட்டு விடுங்கள்.
6. Place the Plant in the New Pot: Use a sliced coconut shell as the bottom layer. You can also use a broken mud pot slice or small stones. These will help avoid the drainage hole block. Add a layer of fresh soil with other nutrients as next layer. Position the plant so the root crown sits just below the rim. Fill around the roots with soil, pressing lightly to eliminate air pockets.
6. புதிய தொட்டியில் செடியை வைக்கவும்: கீழ் அடுக்காக உடைந்த தேங்காய் ஓடு பயன்படுத்தவும். நீங்கள் உடைந்த மண் பானை துண்டு அல்லது சிறிய கற்களைப் பயன்படுத்தலாம். இவை வடிகால் துளை அடைப்பைத் தவிர்க்க உதவும். அடுத்த அடுக்காக மற்ற ஊட்டச்சத்துக்களுடன் புதிய மண்ணின் ஒரு அடுக்கைச் சேர்க்கவும். வேர் பகுதி பானை விளிம்பிற்குக் கீழே அமர்ந்திருக்கும் வகையில் தாவரத்தை நிலைநிறுத்தவும். தேவையற்ற காற்று துளைகளை அகற்ற சிறிது அழுத்தி, வேர்களைச் சுற்றி மண்ணை நிரப்பவும்.
7. Water and Settle the Plant: Water thoroughly to help the soil settle around the roots. Allow excess water to drain out.
7. செடிக்கு தண்ணீர் ஊற்றவும்: வேர்களைச் சுற்றி மண் குடியேற உதவும். அதிகப்படியான தண்ணீரை வெளியேற்ற அனுமதிக்கவும்.
8. Provide Proper Aftercare: Keep the plant in a shaded area for a few days to reduce transplant shock. Resume normal watering and fertilizing after about a week.
8. முறையான பின் பராமரிப்பை வழங்கவும்: மாற்று அதிர்ச்சியைக் குறைக்க ஒரு சில நாட்களுக்கு ஒரு நிழல் பகுதியில் தாவரத்தை வைக்கவும். ஒரு வாரத்திற்குப் பிறகு சாதாரண நீர்ப்பாசனம் மற்றும் உரமிடுதலைத் தொடரவும்.
Happy Greening… P. Dheivanai, M.Sc.(Ag.), 9382132593
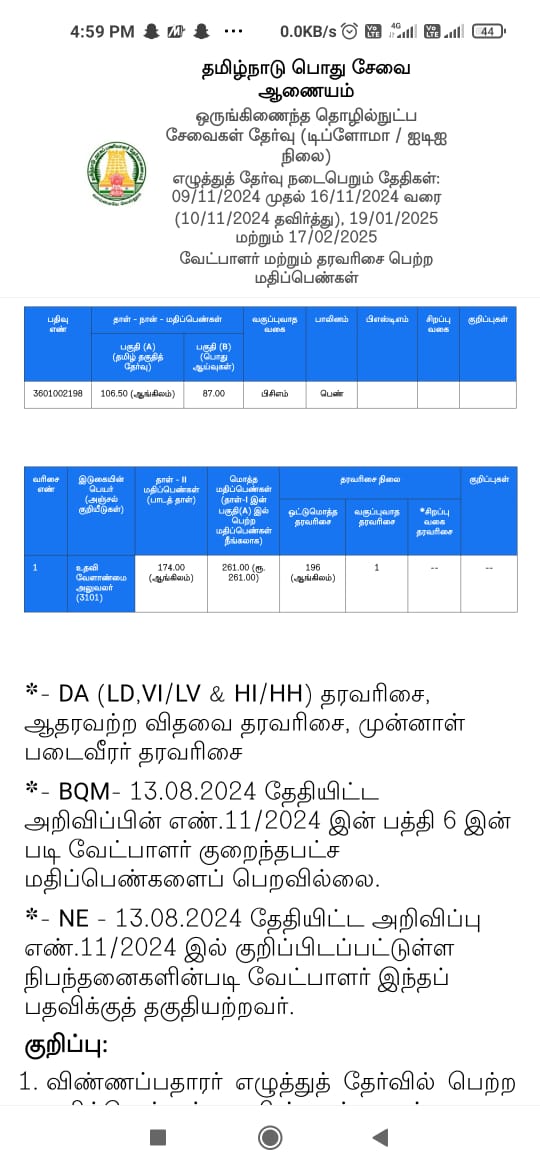
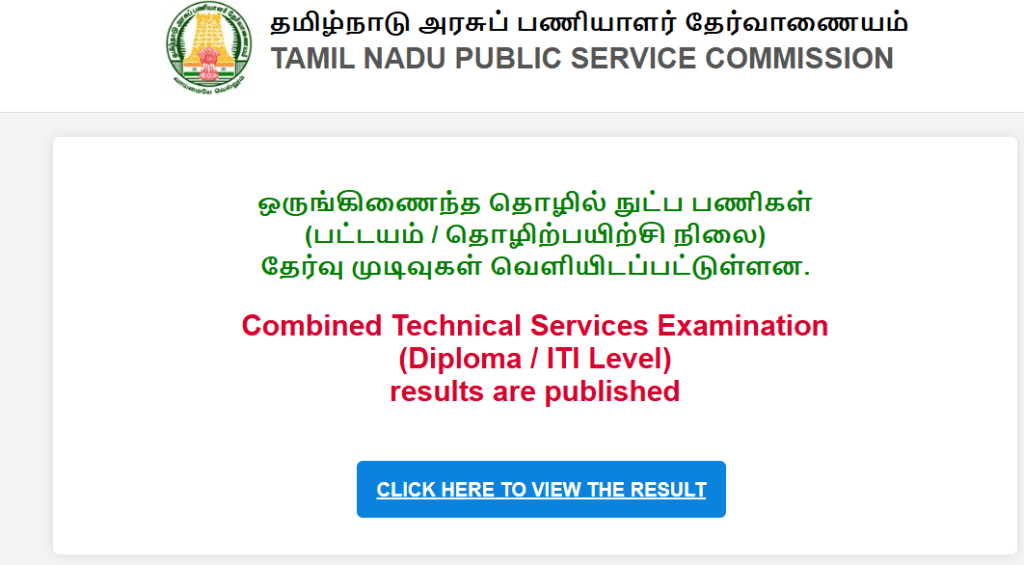
The Tamil Nadu Public Service Commission (TNPSC) conducts examinations for various positions, including those in Agricultural Engineering. The syllabus for the Agricultural Engineering (Degree Standard) exam is comprehensive, covering multiple units.
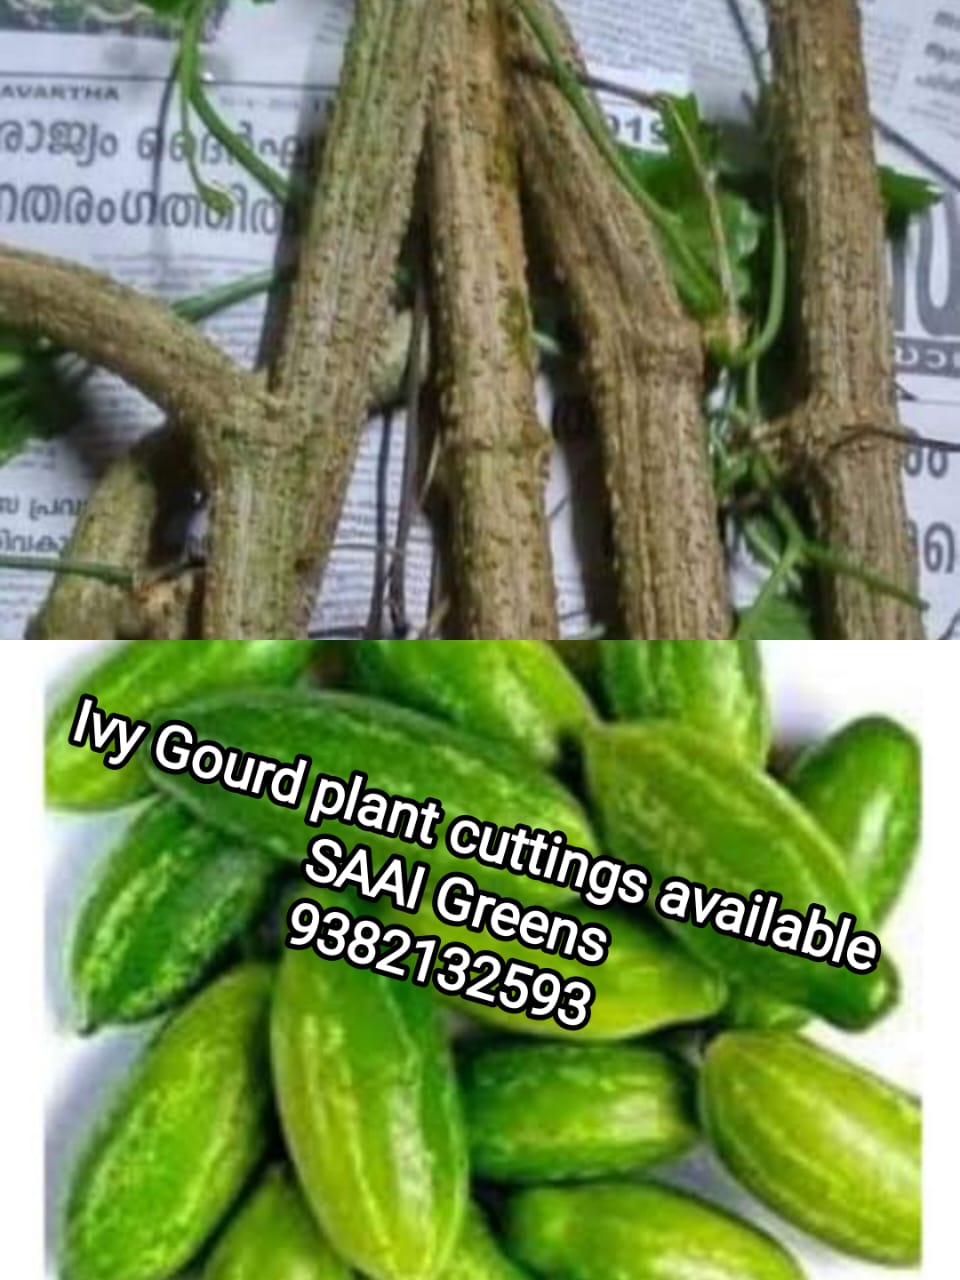
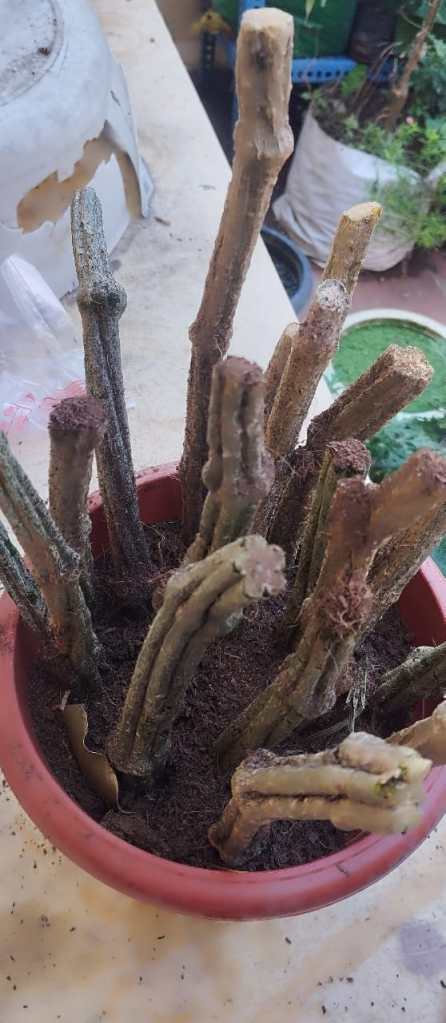
தாவர துண்டுகள் மூலம் புதிய தாவரம் உருவாக்கும் முறை
1. Choose the Right Cuttings
Select healthy, disease-free plants.
Use semi-hardwood or softwood cuttings for most plants. Eg. Portulaca, Purslane, Hibiscus, Cassava, Ivygourd, etc.,
Ensure each cutting is 4-6 inches (10-15 cm) long with at least 2-3 nodes.
சரியான தாவர துண்டுகள் தேர்வு செய்யவும்: ஆரோக்கியமான, நோயற்ற தாவரங்களைத் தேர்ந்தெடுக்கவும். பெரும்பாலான தாவரங்களுக்கு அரை-கடின மரம் அல்லது மென்மையான மர துண்டுகளை பயன்படுத்தவும். உதாரணம் போர்ட்லகா, பர்ஸ்லேன், செம்பருத்தி, மரவள்ளிக்கிழங்கு, கோவைக்காய். ஒவ்வொரு துண்டும் குறைந்தது 2-3 வளர் முனைகளுடன் 4-6 அங்குலங்கள் (10-15 செமீ) நீளமாக இருப்பதை உறுதிசெய்யவும்.
2. Use Sharp, Clean Tools
Use sterilized pruners or scissors to avoid infections.
Make a clean diagonal cut below a node to improve water absorption.
Upside of the cuttings should be flat and bottom i.e. rooting side should be slanting.
கூர்மையான, சுத்தமான கருவிகளைப்பயன்படுத்தவும்: தொற்றுநோயைத் தவிர்க்க, கிருமி நீக்கம் செய்யப்பட்ட கத்தரிக்கோல் பயன்படுத்தவும். நீர் உறிஞ்சுதலை மேம்படுத்த ஒரு முனைக்கு கீழே வெட்டவும். வெட்டப்பட்ட பகுதியின் மேற்புறம் தட்டையாகவும், அடிப்பாகம் அதாவது வேர்விடும் பக்கம் சாய்வாகவும் இருக்க வேண்டும்
3. Remove Excess Leaves & Trim Large Ones
Remove lower leaves to prevent rot.
Trim large leaves to reduce moisture loss.
அதிகப்படியான இலைகளை அகற்றவும்: அழுகுவதைத் தடுக்க கீழ் இலைகளை அகற்றவும். ஈரப்பதம் இழப்பைக் குறைக்க பெரிய இலைகளை வெட்டுங்கள்.
4. Use Rooting Hormone
Dip the cut end in rooting hormone powder or gel (auxins like IBA or NAA).
This speeds up root formation and prevents fungal infections.
வேர்விடும் ஹார்மோனைப் பயன்படுத்தவும்: வெட்டப்பட்ட முனையை வேர்விடும் ஹார்மோன் பவுடர் அல்லது ஜெல்லில் (IBA அல்லது NAA போன்ற ஆக்சின்கள்) நனைக்கவும். இது வேர் உருவாவதை துரிதப்படுத்துகிறது மற்றும் பூஞ்சை தொற்றுகளைத் தடுக்கிறது. வெர்மி, இளநீர், தேன், ஹ்யூமிக் அமிலம், கற்றாழை, கடற்பாசி, இலவங்கப்பட்டை தூள் ஆகியவை இயற்கையாகவே வேர்விடும் தன்மையை அதிகரிக்கின்றன
5. Choose the Right Growing Medium
Use a well-draining mix like perlite, vermiculite, cocopeat, or a peat-based mix.
Avoid heavy soil as it can lead to rotting.
Water can also used as growing medium. Every 2-3 days once change the water to avoid rotting.
சரியான வளரும் ஊடகத்தைத் தேர்ந்தெடுக்கவும்: பெர்லைட், வெர்மிகுலைட், கோகோபீட் அல்லது பீட் அடிப்படையிலான கலவை போன்ற நன்கு நீர் வடியும் கலவையைப் பயன்படுத்தவும். கனமான மண்ணைத் தவிர்க்கவும், ஏனெனில் அது அழுகுவதற்கு வழிவகுக்கும்.நீரை வளரும் ஊடகமாகவும் பயன்படுத்தலாம். தாவர துண்டுகள் அழுகாமல் இருக்க 2-3 நாட்களுக்கு ஒருமுறை தண்ணீர் அடிக்கடி மாற்றவும்.
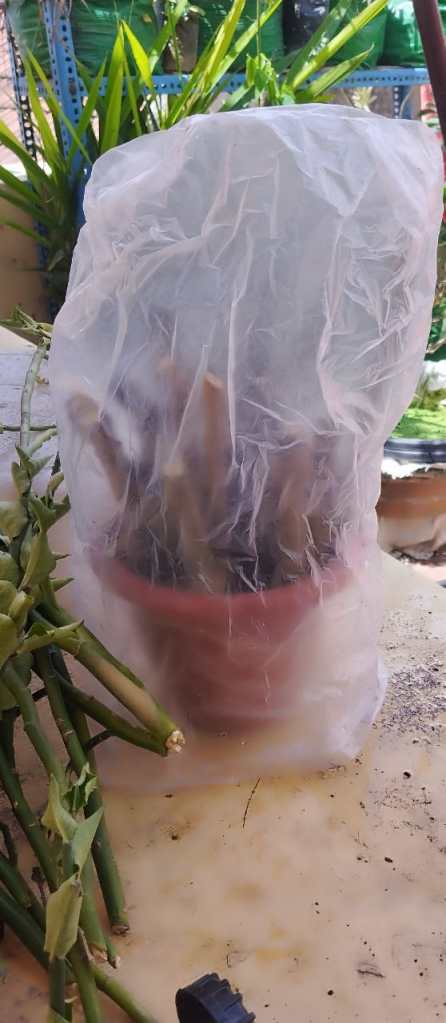
6. Provide Optimal Moisture & Humidity
Water the medium lightly; it should be moist, not soggy.
Cover cuttings with a plastic bag or humidity dome to maintain 80-90% humidity.
Mist occasionally to keep moisture levels high.
உகந்த ஈரப்பதம் வழங்கவும்:சிறிது தண்ணீர் வளர்ப்பு ஊடகத்தில் விடவும்; அது ஈரமாக இருக்க வேண்டும், ஆனால் நீர் தேங்கி இருக்கக்கூடாது.80-90% ஈரப்பதத்தை பராமரிக்க ஒரு பிளாஸ்டிக் பை அல்லது ஈரப்பதம் குவிமாடம் கொண்டு தாவர துண்டுகளை மூடவும்.ஈரப்பதத்தை அதிகமாக வைத்திருக்க அவ்வப்போது நீர் தெளிக்கவும்.
7. Ensure Proper Temperature & Light
Maintain a temperature of 20-25°C (68-77°F).
Provide indirect bright light (not direct sunlight).
சரியான வெப்பநிலை மற்றும் ஒளியை உறுதிப்படுத்தவும்: 20-25°C (68-77°F) வெப்பநிலையை பராமரிக்கவும். மறைமுக பிரகாசமான ஒளியை வழங்கவும் (நேரடி சூரிய ஒளி அல்ல).
8. Avoid Overwatering & Fungal Infections
Use a well-draining pot with holes.
Water only when the medium starts to dry.
Use a fungicide / neem leaves / Neem cake powder if needed to prevent damping-off disease.
அதிகப்படியான நீர் மற்றும் பூஞ்சை தொற்றுகளைத் தவிர்க்கவும்: துளைகளுடன் நன்கு வடிகால் வசதியுடைய பானையைப் பயன்படுத்தவும். மண் கலவை காய தொடங்கும் போது நீர் விடவும். வேர் அழுகல் நோயைத் தடுக்க தேவைப்பட்டால் பூஞ்சைக் கொல்லி / வேப்ப இலை / வேப்பம் பிண்ணாக்கு தூள் பயன்படுத்தவும்.
9. Be Patient & Transplant Carefully
Check for roots in 2-6 weeks, depending on the plant type.
Once roots are 1-2 inches long, transplant carefully into pots.
பொறுமையாக வேர் விட்ட புதிய தாவரங்களை மாற்றவும்: தாவர வகையைப் பொறுத்து 2-6 வாரங்களில் வேர்களை சரிபார்க்கவும். வேர்கள் 1-2 அங்குல நீளத்திற்கு வந்தவுடன், கவனமாக தொட்டிகளில் இடமாற்றம் செய்யவும்.
10.Place the transplanted new plants into semi-shaded area
Transplanted plants can be placed under semi-shaded area for a week to avoid transplantation shock.
Biotic or abiotic mulching can be used in field condition to avoid direct sunlight for a week.
இடமாற்றம் செய்யப்பட்ட புதிய தாவரங்களை அரை நிழலான இடத்தில் வைக்கவும்: இடமாற்ற அதிர்ச்சியைத் தவிர்க்க, இடமாற்றப்பட்ட செடிகளை ஒரு வாரத்திற்கு அரை நிழலிடப்பட்ட இடத்தில் வைக்கலாம். ஒரு வாரத்திற்கு நேரடி சூரிய ஒளியைத் தவிர்க்க, இலை தழைகள், கூளங்கள் அல்லது பிளாஸ்டிக் போன்ற மூடாக்குகளை வயல்களில் பயன்படுத்தலாம்.
Happy Greening … P. Dheivanai, M.Sc. (Ag.), 9382132593
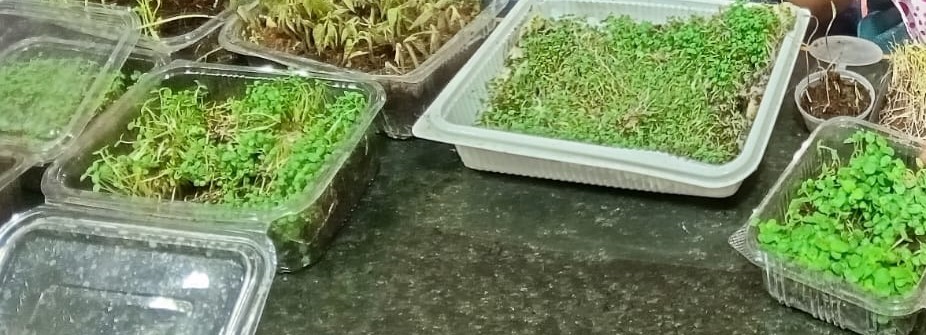
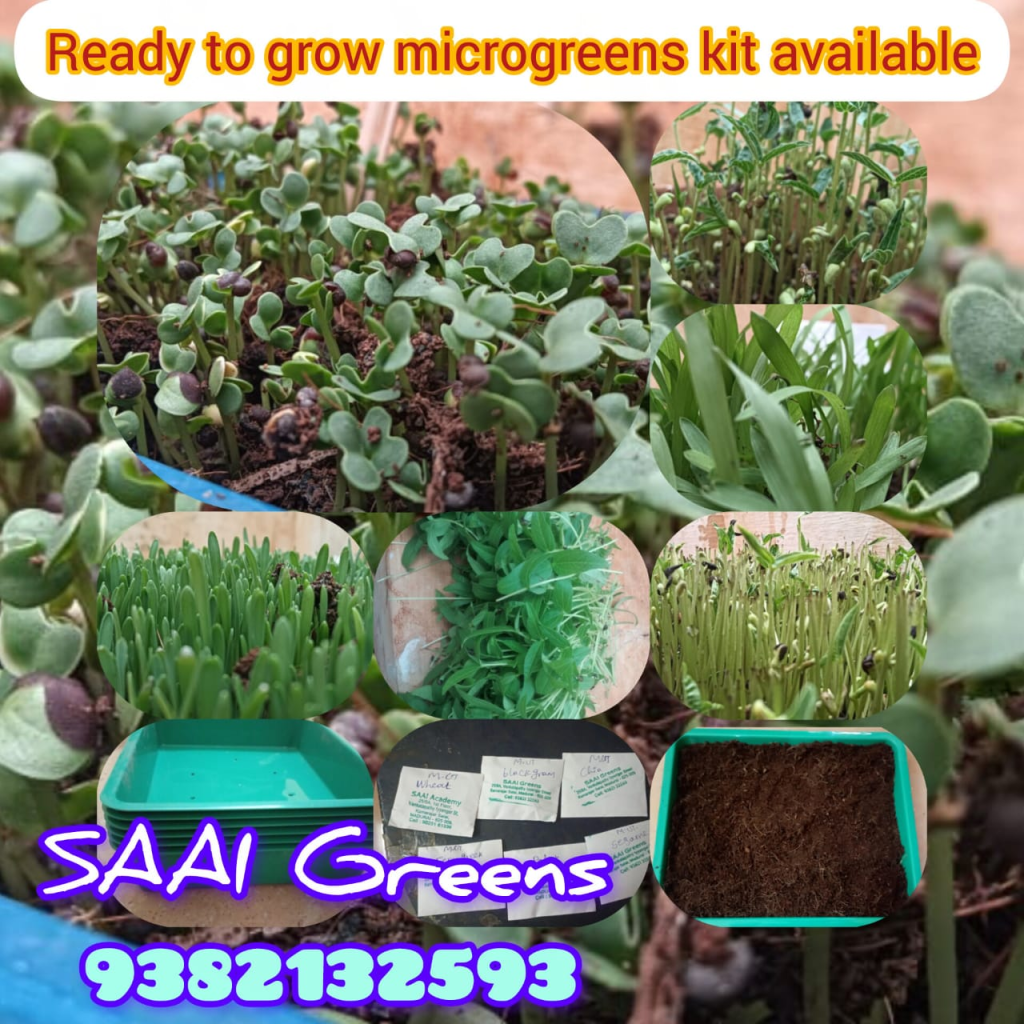
Step 1: Choose a Microgreen Variety மைக்ரோகிரீன் வகையைத் தேர்வு செய்யவும்
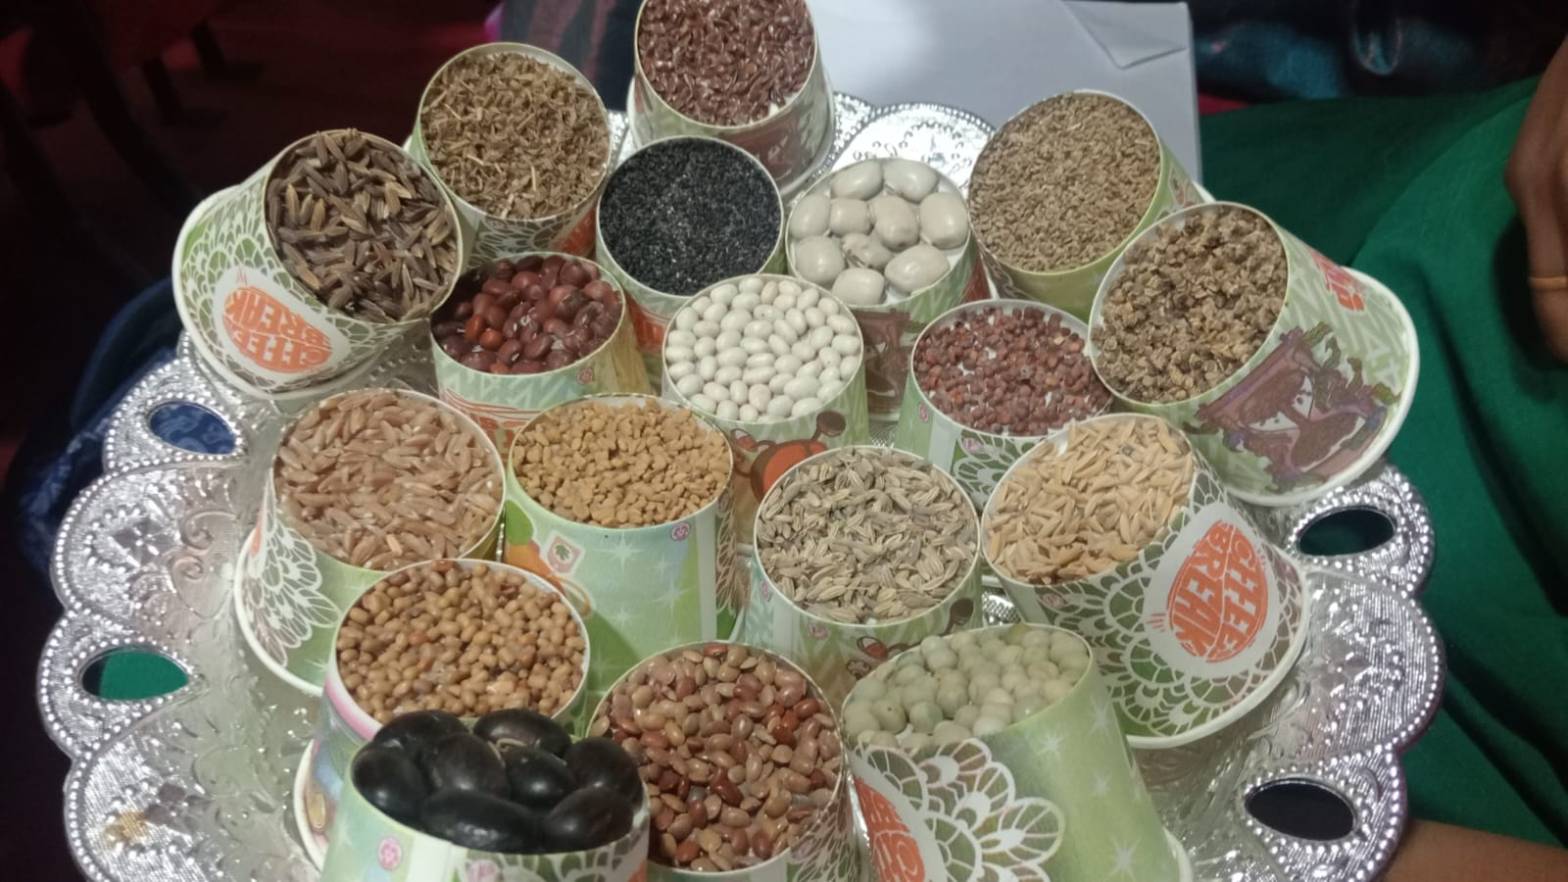
Decide which microgreens to grow. Popular options include: Vegetable greens: Radish, broccoli, spinach. Herbs: Chia, basil, Sabja. Legumes and grains: Pea shoots, wheatgrass, Grams, sunflower. Consider your taste preferences and growth requirements. Around 120 types of microgreen seeds are available. Soaking and allowing soaked seeds for sprouting is important step in microgreen cultivation. No need to soak seeds like Chia, Sabja, onion and Lemon.
Procedure for sprouting: Drain the soaked seeds and place them in a white cotton cloth. Tie the edges of the cloth to form a ball. Place the tied seeds in a clay pot and cover the pot with a lid.
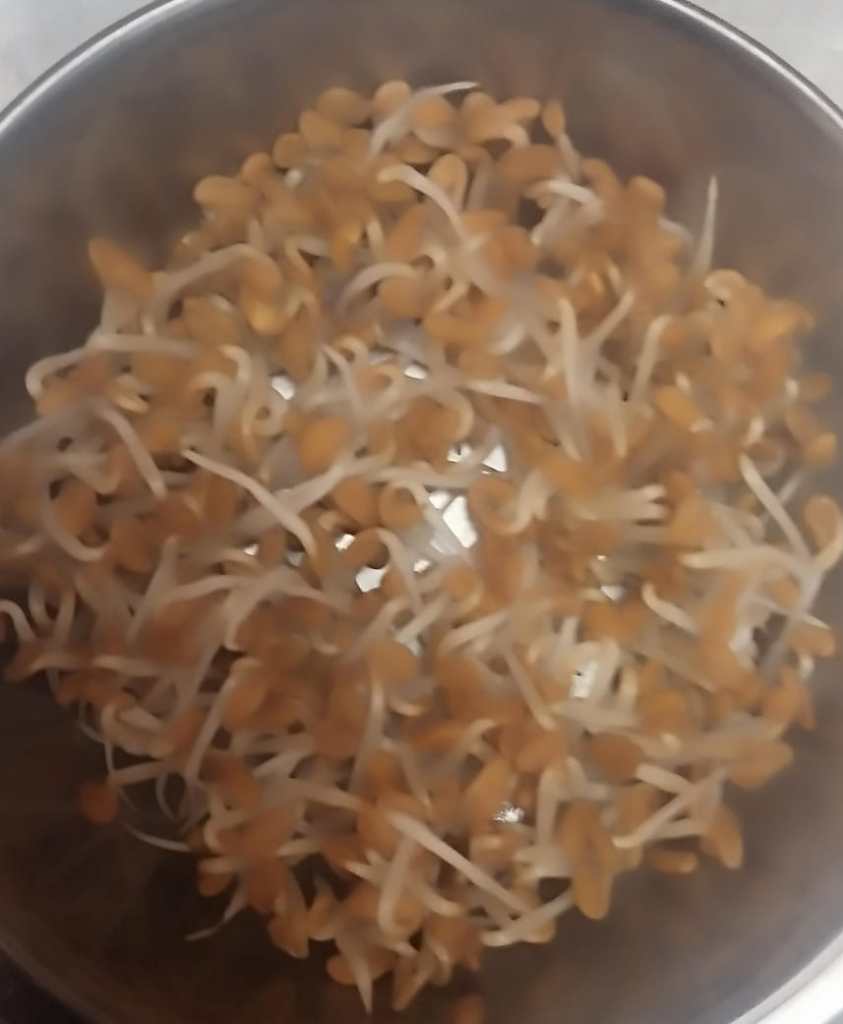
Soaking and sprouting time depends on the size of the seeds: Small size seeds (Mustard, Fenugreek, Radish, Cumin) – 5 – 8 hours soaking and 12 hours for Sprouting. Medium size seeds (Blackgram, Palak, Cowpea, etc.,) – 5 – 8 hours soaking and 18-24 hours for Sprouting. Big size seeds (Peas, Chickpea, Groundnut, etc.,) – 12 hours soaking and 18-24 hours for Sprouting.
எந்த மைக்ரோகிரீன்கள் வளர்க்க வேண்டும் என்பதை முடிவு செய்யுங்கள். பிரபலமான விருப்பங்கள் பின்வருமாறு:காய்கறி கீரைகள்: முள்ளங்கி, ப்ரோக்கோலி, கீரை. மூலிகைகள்: சியா, துளசி, சப்ஜா. பருப்பு வகைகள் மற்றும் தானியங்கள்: பட்டாணி, கோதுமை புல், சூரியகாந்தி. உங்கள் சுவை விருப்பத்தேர்வுகள் மற்றும் வளர்ச்சித் தேவைகளைக் கவனியுங்கள். சுமார் 120 வகையான மைக்ரோகிரீன் விதைகள் கிடைக்கின்றன. ஊறவைத்த விதைகளை முளைப்பதற்கு அனுமதிப்பது மைக்ரோகிரீன் சாகுபடியில் முக்கியமான படியாகும். சியா, சப்ஜா, வெங்காயம் மற்றும் எலுமிச்சை போன்ற விதைகளை ஊறவைக்க தேவையில்லை.நேரிடையாக பயிர் செய்யலாம்.
முளை கட்டுதல்செயல்முறை: ஊறவைத்த விதைகளை வடிகட்டி வெள்ளை பருத்தி துணியில் பந்து போல் கட்டவும். கட்டப்பட்ட விதைகளை ஒரு மண் பானையில் வைக்கவும், பானையை ஒரு மூடியால் மூடவும்.
ஊறவைக்கும் மற்றும் முளைக்கும் நேரம் விதைகளின் அளவைப் பொறுத்தது: சிறிய அளவிலான விதைகள் (கடுகு, வெந்தயம், முள்ளங்கி, சீரகம்) - 5 - 8 மணி நேரம் ஊறவைத்தல் மற்றும் முளைப்பதற்கு 12 மணிநேரம். நடுத்தர அளவு விதைகள் (உளுந்து, பலாக், கோதுமை போன்றவை) - 5 - 8 மணி நேரம் ஊறவைத்து, முளைப்பதற்கு 18-24 மணி நேரம். பெரிய அளவிலான விதைகள் (பட்டாணி, கொண்டைக்கடலை, நிலக்கடலை போன்றவை) - 12 மணி நேரம் ஊறவைத்து, முளைப்பதற்கு 18-24 மணி நேரம்
Step 2: Gather Materials பொருட்களை சேகரிக்கவும்
Seeds: Select untreated, Non GMO or organic seeds for microgreen cultivation. Seeds are selling in shop usually treated with chemical preservatives. It is harmful. So use only untreated seeds.
விதைகள்: மைக்ரோகிரீன் சாகுபடிக்கு சிகிச்சையளிக்கப்படாத, GMO அல்லாத கரிம விதைகளைத் தேர்ந்தெடுக்கவும். விதைகள் பொதுவாக இரசாயன பதப்படுத்தப்பட்ட கடைகளில் விற்கப்படுகின்றன. இது தீங்கு விளைவிக்கும். எனவே பதப்படுத்தப்படாத விதைகளையே பயன்படுத்தவும்.
Growing Medium: Options include: Soil (well-drained, organic potting soil) or Soilless mediums (coco coir, Coir mat, peat moss, or vermiculite) or Hydroponic mats or fiber pads. Surface of mud pot will be used for Chia and Sabja seeds growing. Soil is best medium for Soyabean microgreen instead of cocopeat.
வளர்ப்பு ஊடகம்: வடிகால் வசதி உள்ள மண் / தென்னை நார் கழிவு / பீட் மாஸ் / ஹைட்ரோபோனிக் பாய்கள். சியா மற்றும் சப்ஜா விதைகளை வளர்ப்பதற்கு மண் பானையின் மேற்பரப்பு பயன்படுத்தப்படும். கோகோபீட்டுக்கு பதிலாக சோயாபீன் மைக்ரோகிரீனுக்கு மண் சிறந்த ஊடகம்.
Trays/Containers: Use shallow trays (1–2 inches deep), ideally with drainage holes.
Watering Tools: Shallow trays (1–2 inches deep) filled with water
நீர்ப்பாசன கருவிகள்: ஆழமற்ற தட்டுகள் (1-2 அங்குல ஆழம்) தண்ணீர் நிரப்பப்பட்டிருக்கும்
Light Source: Natural sunlight in semi shaded area or grow lights (LEDs are ideal).
Optional: A cover or second tray to maintain humidity during germination.
ஒளி: இயற்கையான சூரிய ஒளி அரை நிழலாடிய பகுதியில் அல்லது வளரும் விளக்குகள் (எல்.ஈ.டி சிறந்தவை).

தேவைப்பட்டால்: முளைக்கும் போது ஈரப்பதத்தை பராமரிக்க ஒரு கவர் அல்லது இரண்டாவது தட்டு.
Step 3: Prepare the Growing Tray வளரும் தட்டு தயார்
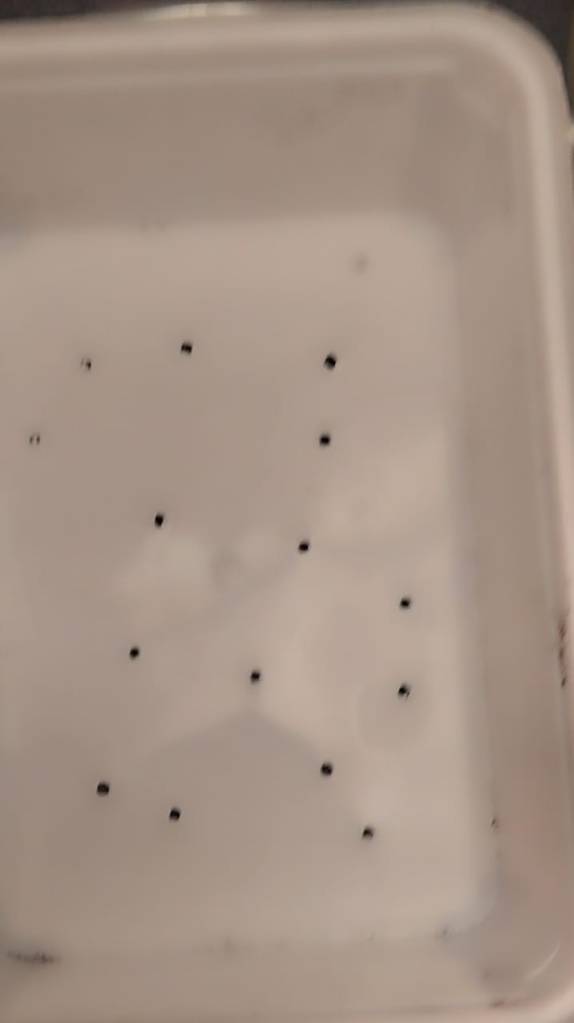
Fill the tray with 1–2 inches of pre-moistened soil or place the hydroponic mat in the tray. Level the surface to ensure even seed distribution. Ensure the growing medium is damp but not waterlogged. Cocopeat should be properly washed and sun dried before seeding.
தட்டில் 1-2 அங்குல முன் ஈரமாக்கப்பட்ட மண்ணை நிரப்பவும் அல்லது ஹைட்ரோபோனிக் பாயை தட்டில் வைக்கவும். சீரான விதை விநியோகத்தை உறுதி செய்ய மேற்பரப்பை சமன் செய்யவும். வளரும் ஊடகம் ஈரமாக இருந்தாலும் நீர் தேங்காமல் இருப்பதை உறுதி செய்யவும். விதைப்பதற்கு முன் கோகோபீட்டை சரியாகக் கழுவி வெயிலில் உலர்த்த வேண்டும்.
Step 4: Sow the Seeds விதைகளை விதைக்கவும்
Spread the sprouted seeds evenly across the surface of the growing medium. Avoid overlapping too much to prevent overcrowding. Gently press the seeds onto the soil or mat for better contact but do not bury them. Mist the growing tray with water tray to keep them moist.
முளைத்த விதைகளை வளரும் ஊடகத்தின் மேற்பரப்பில் சமமாக பரப்பவும். நெரிசலைத் தடுக்க அதிகமாக ஒன்றுடன் ஒன்று சேர்வதைத் தவிர்க்கவும். சிறந்த தொடர்புக்காக விதைகளை மண் அல்லது பாயின் மீது மெதுவாக அழுத்தவும் ஆனால் அவற்றை புதைக்க வேண்டாம். வளரும் தட்டில் ஈரமாக இருக்க, தண்ணீர் தட்டு கொண்டு மிஸ்ட் செய்யவும்.
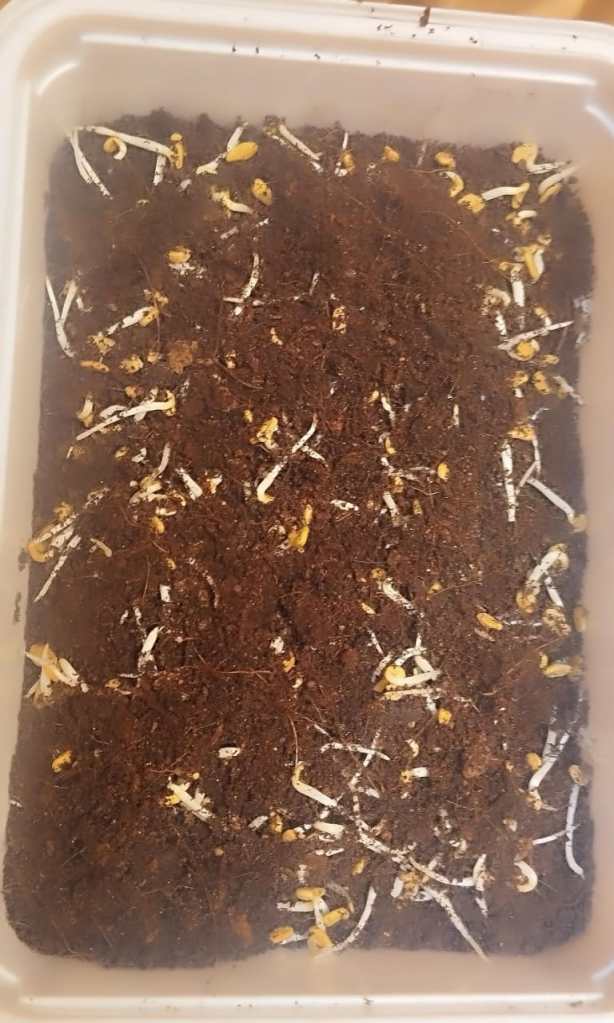
Step 5: Cover for Germination முளைப்பதற்கான கவர்s
Cover the tray with a lid or another tray to block light and maintain humidity. Place the tray in a warm, dark location (18–24°C or 65–75°F) for 2–3 days (varies by seed type). Check daily to ensure the medium remains moist.
ஒளியைத் தடுக்கவும் ஈரப்பதத்தை பராமரிக்கவும் ஒரு மூடி அல்லது மற்றொரு தட்டில் தட்டை மூடி வைக்கவும். தட்டை ஒரு சூடான, இருண்ட இடத்தில் (18-24°C அல்லது 65-75°F) 2-3 நாட்களுக்கு வைக்கவும் (விதை வகையைப் பொறுத்து மாறுபடும்). ஈரமாக இருப்பதை உறுதி செய்ய தினமும் சரிபார்க்கவும்.
Step 6: Expose to Lightவெளிச்சம்
Once the seeds sprout and develop tiny shoots (typically 2–5 days), remove the cover. Place the tray in bright, indirect sunlight or under grow lights for 10–16 hours daily. Rotate the tray if using natural sunlight to ensure even growth.
விதைகள் முளைத்து, சிறிய தளிர்கள் (பொதுவாக 2-5 நாட்கள்) வளர்ந்தவுடன், மூடியை அகற்றவும். தினசரி 10-16 மணி நேரம் பிரகாசமான, மறைமுக சூரிய ஒளியில் அல்லது வளரும் விளக்குகளின் கீழ் தட்டு வைக்கவும். சீரான வளர்ச்சியை உறுதி செய்ய இயற்கையான சூரிய ஒளியைப் பயன்படுத்துங்கள்.
Step 7: Water Carefullyகவனமாக தண்ணீர் விடவும்
Use shallow trays that are 1–2 inches deep. Fill these trays with water and place the seeded tray on top of the watering tray. Keep it there for 15–30 minutes. Watering every 2–3 days is sufficient. Regularly check the moisture content of the seeded pot, as maintaining proper moisture is essential. Avoid overwatering, which can lead to mold or root rot. Ensure good air circulation to prevent fungal issues.
1-2 அங்குல ஆழத்தில் ஆழமற்ற தட்டுகளைப் பயன்படுத்தவும். இந்த தட்டுகளில் தண்ணீர் நிரப்பி, விதைத்தட்டை தண்ணீர் தட்டுக்கு மேல் வைக்கவும். 15-30 நிமிடங்கள் அங்கேயே வைக்கவும். ஒவ்வொரு 2-3 நாட்களுக்கு ஒருமுறை நீர்ப்பாசனம் போதுமானது. சரியான ஈரப்பதத்தை பராமரிப்பது அவசியம். அதிகப்படியான நீர்ப்பாசனத்தைத் தவிர்க்கவும், இது வேர் அழுகலுக்கு வழிவகுக்கும். பூஞ்சை பிரச்சனைகளை தடுக்க நல்ல காற்று சுழற்சியை உறுதி செய்யவும்.
Step 8: Monitor Growth வளர்ச்சியை கண்காணிக்கவும்
Microgreens grow quickly and are typically ready for harvest in 7–21 days, depending on the variety. Look for the first set of true leaves (second leaves after cotyledons) as a sign of readiness.
மைக்ரோகிரீன்கள் விரைவாக வளரும் மற்றும் பொதுவாக வகையைப் பொறுத்து 7-21 நாட்களில் அறுவடைக்கு தயாராக இருக்கும்.
Step 9: Harvestஅறுவடை
Use clean scissors or a sharp knife to cut the microgreens just above the soil or growing mat. Harvest in the morning for the best flavor and texture. Rinse the microgreens in cold water to remove debris or soil, if needed. Pat dry gently with a paper towel. One time harvest: Sabja, Cumin, Beetroot, Wheat, etc., Ratooning (4-5 times harvest in a cultivation): Chickpea (5-6 nodes stage harvesting period – Creeper type), Moringa, peas, Ground nut etc., Harvesting period for Papaya – 12-15 days, Lemon – 6-7 days, Cabbage – 7 – 10 days, Sunflower – 8 – 10 days, Carrot – 12-14 days.
சுத்தமான கத்தரிக்கோல் அல்லது கூர்மையான கத்தியைப் பயன்படுத்தி மைக்ரோகிரீன்களை மண்ணின் மேல் அல்லது வளரும் பாயின் மேலே வெட்டவும். சிறந்த சுவை மற்றும் அமைப்புக்காக காலையில் அறுவடை செய்யுங்கள். தேவைப்பட்டால், குப்பைகள் அல்லது மண்ணை அகற்ற மைக்ரோகிரீன்களை குளிர்ந்த நீரில் அலசவும். மெதுவாக உலர வைக்கவும். ஒரு முறை அறுவடை: சப்ஜா, சீரகம், பீட்ரூட், கோதுமை போன்றவை, ரட்டூனிங் (ஒரு சாகுபடியில் 4-5 முறை அறுவடை): கொண்டைக்கடலை (5-6 முறை அறுவடை காலம் - கொடி வகை), முருங்கை, பட்டாணி, நிலக்கடலை போன்றவை. பப்பாளி அறுவடை காலம் - 12-15 நாட்கள், எலுமிச்சை - 6-7 நாட்கள், முட்டைக்கோஸ் - 7 - 10 நாட்கள், சூரியகாந்தி - 8 - 10 நாட்கள், கேரட் - 12-14 நாட்கள்.
Step 10: Store or Use சேமிக்கவும் அல்லது பயன்படுத்தவும்
Use microgreens fresh for the best taste and nutrition. If storing, place them in an airtight container lined with a slightly damp paper towel in the refrigerator. They typically last 5–7 days.
சிறந்த சுவை மற்றும் ஊட்டச்சத்துக்காக மைக்ரோகிரீன்களை புதியதாகப் பயன்படுத்தவும். சேமித்து வைத்தால், குளிர்சாதன பெட்டியில் சற்று ஈரமான காகித துண்டுடன் மூடப்பட்ட காற்று புகாத கொள்கலனில் வைக்கவும். அவை பொதுவாக 5-7 நாட்கள் நீடிக்கும்.
Tips for Success:
Maintain cleanliness to avoid contamination.
Experiment with different varieties to discover flavors and growth patterns.
Avoid overwatering and ensure proper ventilation to prevent mold growth.
Excellent Entrepreneurial opportunity for youngsters and homemakers with minimum investment starts with Rs.5000 – Rs.10000. Ensuring marketing is vital process in entrepreneurial journey success.
குறைந்த முதலீட்டில் இளைஞர்கள் மற்றும் இல்லத்தரசிகளுக்கான சிறந்த தொழில் முனைவோர் வாய்ப்பு ரூ.5000 - ரூ.10000 இல் தொடங்குகிறது. தொழில் முனைவோர் பயண வெற்றியில் சந்தைப்படுத்துதலை உறுதி செய்வது ஒரு முக்கிய செயலாகும்.
The University Grants Commission (UGC) has introduced several significant guidelines in 2025 to enhance flexibility, inclusivity, and excellence in India’s higher education system. Key developments include:
Draft Regulations for Faculty Recruitment and Promotion
In January 2025, the UGC released the draft of the “Minimum Qualifications for Appointment & Promotion of Teachers and Academic Staff in Universities and Colleges and Measures for Maintenance of Standards in Higher Education) Regulations, 2025.” These proposed regulations aim to transform faculty recruitment and career progression by:
Academic Flexibility: Allowing candidates to qualify for faculty positions based on their performance in a subject of their choice in UGC-NET, even if their undergraduate and postgraduate degrees are in different disciplines. The subject of the Ph.D. degree will take precedence in faculty selections, promoting multidisciplinary transitions.
Holistic Evaluation: Discontinuing the Academic Performance Indicator (API) system, which heavily relied on quantitative metrics, and adopting a more qualitative approach. Selection committees will assess candidates based on notable contributions and broader academic impact, such as innovation in teaching methodologies, technology development, and community engagement.
Inclusivity: Introducing specialized recruitment pathways to attract talent in fields like Yoga, Music, Performing Arts, Visual Arts, Sculpture, and Drama. Recognizing professional accomplishments and national or international achievements, these provisions ensure that practitioners with exceptional skills can contribute to academia. Additionally, accomplished sportspersons, including those with disabilities, are provided opportunities to join the teaching profession.
Vice-Chancellor Selection: Revising the selection process for vice-chancellors by expanding eligibility criteria to include professionals from academia, research institutions, public policy, public administration, and industry. The regulations provide clear guidelines on the composition of the search-cum-selection committee, tenure, age limits, and eligibility for reappointment.
Flexible Undergraduate Degree Completion
In November 2024, the UGC announced a new flexible approach in higher education, set to commence from the 2025–26 academic year. This system allows students to:
Accelerated Completion: Complete a four-year undergraduate degree in three years, or a three-year degree in as little as two and a half years, by managing a higher workload.
Extended Duration: Extend a standard three-year degree to four years, and a four-year degree to five years, accommodating students who prefer a slower pace or need to balance personal commitments.
Multiple Entry and Exit Points: Aligning with the National Education Policy (NEP) 2020, this approach offers personalized learning timelines, allowing students to pause and resume their studies without losing previously acquired credits.
These initiatives reflect the UGC’s commitment to implementing the NEP 2020’s vision of a more flexible, inclusive, and student-centric higher education system in India.
Microgreens have gained significant importance due to their nutritional value, culinary versatility, and environmental benefits. Overview of microgreens importance:
மைக்ரோகிரீன்கள் அவற்றின் ஊட்டச்சத்து மதிப்பு, சமையல் பல்துறை மற்றும் சுற்றுச்சூழல் நன்மைகள் காரணமாக குறிப்பிடத்தக்க முக்கியத்துவத்தைப் பெற்றுள்ளன. மைக்ரோகிரீன்களின் முக்கியத்துவத்தின் கண்ணோட்டம்:
Importance of Microgreens
Nutritional Benefits
High Nutrient Density – Microgreens are packed with vitamins (A, C, E, K), minerals (calcium, iron, potassium), and antioxidants. Studies show they contain up to 40 times more nutrients than mature plants.
Rich in Phytochemicals: These compounds help combat oxidative stress, reduce inflammation, and support overall health.
Support Immune Health: Their nutrient-rich profile helps boost immunity and prevent chronic diseases.
ஊட்டச்சத்து நன்மை: அதிக ஊட்டச்சத்து அடர்த்தி – மைக்ரோகிரீன்கள் வைட்டமின்கள் (A, C, E, K), தாதுக்கள் (கால்சியம், இரும்பு, பொட்டாசியம்) மற்றும் ஆக்ஸிஜனேற்றங்களால் நிரம்பியுள்ளன. அவை முதிர்ந்த தாவரங்களை விட 40 மடங்கு அதிக ஊட்டச்சத்துக்களைக் கொண்டிருப்பதாக ஆய்வுகள் காட்டுகின்றன.
பைட்டோ கெமிக்கல்கள் நிறைந்தவை: இந்த கலவைகள் ஆக்ஸிஜனேற்ற அழுத்தத்தை எதிர்த்துப் போராடவும், வீக்கத்தைக் குறைக்கவும், ஒட்டுமொத்த ஆரோக்கியத்தை ஆதரிக்கவும் உதவுகின்றன.
நோயெதிர்ப்பு ஆரோக்கியத்தை ஆதரிக்கவும்: இந்த ஊட்டச்சத்து நோய் எதிர்ப்பு சக்தியை அதிகரிக்க உதவுகிறது மற்றும் நாள்பட்ட நோய்களைத் தடுக்கிறது.
2. Culinary Versatility
Flavorful Enhancements: Microgreens come in various flavors, from mild and sweet (pea shoots) to spicy (radish and mustard greens), making them ideal for enhancing dishes.
Aesthetic Appeal: Their vibrant colors and delicate appearance make them a popular garnish in fine dining and home cooking.
Wide Applications: They can be used in salads, smoothies, sandwiches, soups, and as toppings for various dishes.
சமையல் பன்முகத்தன்மை : சுவை மேம்பாடுகள்: மைக்ரோகிரீன்கள் லேசான மற்றும் இனிப்பு (பட்டாணி தளிர்கள்) முதல் காரமான (முள்ளங்கி மற்றும் கடுகு கீரைகள்) வரை பல்வேறு சுவைகளில் வருகின்றன, அவை உணவுகளை மேம்படுத்துவதற்கு ஏற்றதாக அமைகிறது.

அழகியல்: துடிப்பான நிறங்கள் மற்றும் மென்மையான தோற்றம் அவற்றை சிறந்த உணவு மற்றும் வீட்டு சமையலில் பிரபலமான அலங்காரமாக ஆக்குகிறது.

பரந்த பயன்பாடுகள்: அவை சாலடுகள், மிருதுவாக்கிகள், சாண்ட்விச்கள், சூப்கள் மற்றும் பல்வேறு உணவுகளுக்கான மேல்புறங்களில் பயன்படுத்தப்படலாம்.
3. Environmental Sustainability
Efficient Growing: Microgreens require minimal space, water, and time compared to traditional crops, making them eco-friendly.
Reduced Food Miles: They can be grown locally, reducing the environmental impact associated with transporting fresh produce.
Low Waste: Their short growth cycle and high yield per area minimize resource wastage.
சுற்றுச்சூழல் நிலைத்தன்மை:
திறமையான வளர்ச்சி: பாரம்பரிய பயிர்களுடன் ஒப்பிடும்போது மைக்ரோகிரீன்களுக்கு குறைந்தபட்ச இடம், தண்ணீர் மற்றும் நேரம் தேவைப்படுகிறது, அவை சுற்றுச்சூழலுக்கு உகந்ததாக இருக்கும்.

குறைக்கப்பட்ட உணவு மைல்கள்: அவை தற்போதைய இடத்தில் வளர்க்கலாம், புதிய விளைபொருட்களைக் கொண்டு செல்வதால் ஏற்படும் சுற்றுச்சூழல் பாதிப்பைக் குறைக்கிறது.

குறைந்த கழிவு: அவற்றின் குறுகிய வளர்ச்சி சுழற்சி மற்றும் ஒரு பகுதிக்கு அதிக மகசூல் வள விரயத்தை குறைக்கிறது.
4. Economic Potential
Home and Urban Farming: Microgreens can be cultivated at home or in urban spaces, offering an accessible way to grow fresh produce.
Business Opportunities: With increasing demand from restaurants and health-conscious consumers, microgreens are a lucrative niche in agriculture.
பொருளாதார திறன்
வீடு மற்றும் நகர்ப்புற விவசாயம்: மைக்ரோகிரீன்களை வீட்டில் அல்லது நகர்ப்புறங்களில் பயிரிடலாம், இது புதிய விளைபொருட்களை வளர்க்க அணுகக்கூடிய வழியை வழங்குகிறது.

வணிக வாய்ப்புகள்: உணவகங்கள் மற்றும் சுகாதார உணர்வுள்ள நுகர்வோரின் தேவை அதிகரித்து வருவதால், மைக்ரோகிரீன்கள் விவசாயத்தில் லாபகரமான முக்கிய இடமாகும்.
5. Health Benefits
Chronic Disease Prevention: Rich in antioxidants and anti-inflammatory compounds, microgreens may reduce the risk of heart disease, diabetes, and certain cancers.
Digestive Health: Their fiber content supports a healthy gut microbiome.
Weight Management: Low in calories and high in nutrients, they are ideal for weight-conscious individuals.
ஆரோக்கிய நன்மைகள்:
நாள்பட்ட நோய் தடுப்பு: ஆக்ஸிஜனேற்றிகள் மற்றும் அழற்சி எதிர்ப்பு கலவைகள் நிறைந்த மைக்ரோகிரீன்கள் இதய நோய், நீரிழிவு மற்றும் சில புற்றுநோய்களின் அபாயத்தைக் குறைக்கலாம்.

செரிமான ஆரோக்கியம்: அவற்றின் நார்ச்சத்து ஆரோக்கியமான குடல் நுண்ணுயிரியை ஆதரிக்கிறது.

எடை மேலாண்மை: குறைந்த கலோரிகள் மற்றும் அதிக ஊட்டச்சத்துக்கள், அவை எடை உணர்வுள்ள நபர்களுக்கு ஏற்றது.
6. Educational and Recreational Value
Learning Tool: Growing microgreens teaches children and adults about plant life cycles and sustainable farming.
Therapeutic Activity: Gardening is known to reduce stress and promote mental well-being.
கல்வி மற்றும் பொழுதுபோக்கு மதிப்பு: கற்றல் கருவி: மைக்ரோகிரீன்களை வளர்ப்பது குழந்தைகள் மற்றும் பெரியவர்களுக்கு தாவர வாழ்க்கை சுழற்சிகள் மற்றும் நிலையான விவசாயம் பற்றி கற்றுக்கொடுக்கிறது.

சிகிச்சை நடவடிக்கை: தோட்டக்கலை மன அழுத்தத்தைக் குறைப்பதோடு மனநலத்தையும் மேம்படுத்துவதாக அறியப்படுகிறது
7. Food Security
Microgreens offer a quick and reliable way to produce nutritious food. Microgreens are especially beneficial in urban areas or regions with limited arable land.
உணவுப் பாதுகாப்பு:
சத்தான உணவை உற்பத்தி செய்ய மைக்ரோகிரீன்கள் விரைவான மற்றும் நம்பகமான வழியை வழங்குகின்றன. மைக்ரோகிரீன்கள் குறிப்பாக நகர்ப்புறங்களில் அல்லது குறைந்த விளை நிலங்களைக் கொண்ட பகுதிகளில் பயனுள்ளதாக இருக்கும்.
Microgreens are a powerhouse of nutrients. It is a sustainable food source. It is also a versatile addition to any diet. These qualities make an important part of modern agriculture and healthy living.
மைக்ரோகிரீன்கள் ஊட்டச்சத்துக்களின் ஆற்றல் மையமாகும். இது ஒரு நிலையான உணவு ஆதாரமாகும். எந்தவொரு உணவிற்கும் இது ஒரு சுவை தூண்டியாகும். இந்த குணங்கள் நவீன விவசாயம் மற்றும் ஆரோக்கியமான வாழ்க்கையின் முக்கிய அங்கமாகும்.