Best Wishes….
Happy Learning…


மூலிகை செடி வளர்ப்பு பற்றிய ஒரு பார்வை
| S. No. | Name | Usage | Mode of Propagation | Image |
| 1. | Kalanchoe pinnata ரணகள்ளி Cathedral bells | சிறுநீரக கல் குணமாகும் Cure Kidney stone | இலைகள் Leaves | 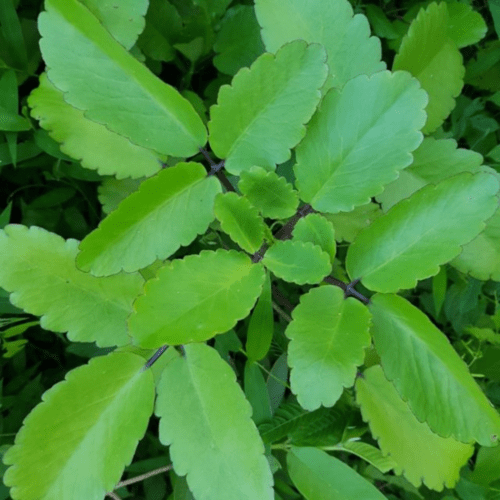 |
| 2. | Coleus amboinicus கற்பூரவள்ளி Indian borage | ஜலதோஷம் குணமாகும் Cure common cold | தாவர தண்டு துண்டு Plant cuttings | 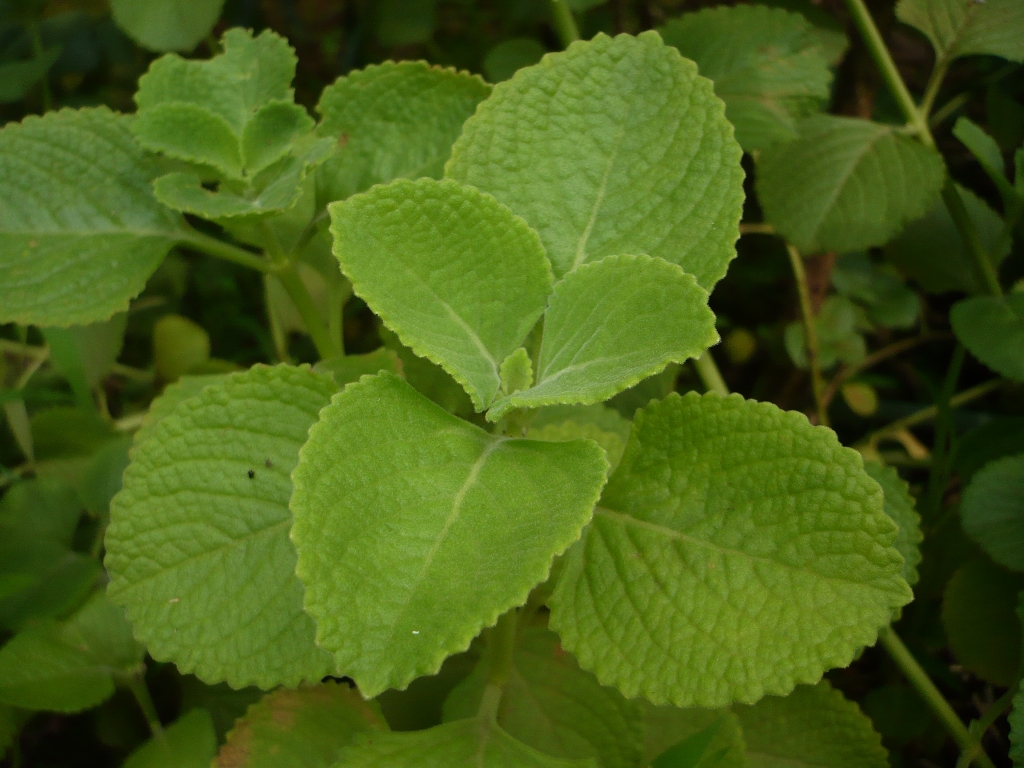 |
| 3. | Chamaecostus cuspidatus இன்சுலின் Insulin | சர்க்கரை நோயாளிகளைக் குணப்படுத்தும் Cure diabetics | பக்க கன்றுகள் Suckers |  |
| 4. | Caribbean Oregano மெக்சிகன் புதினா Variegated Mexican mint Vicks Plant | ஜலதோஷம் குணமாகும் Cure common cold | தாவர தண்டு துண்டு Plant cuttings | 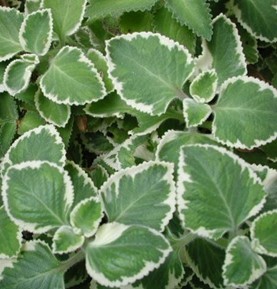 |
| 5. | Bacopa monnieri நீர் பிராமி Waterhyssop | ஞாபக சக்தியை மேம்படுத்துகிறது Improves memory power | தாவர தண்டு துண்டு Plant cuttings | 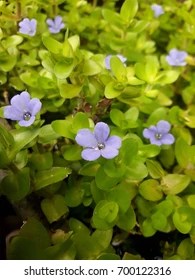 |
| 6. | Alpinia galanga சித்தரத்தை Galangal | ஜலதோஷம் குணமாகும் Cure common cold | பக்க கன்றுகள் Suckers | 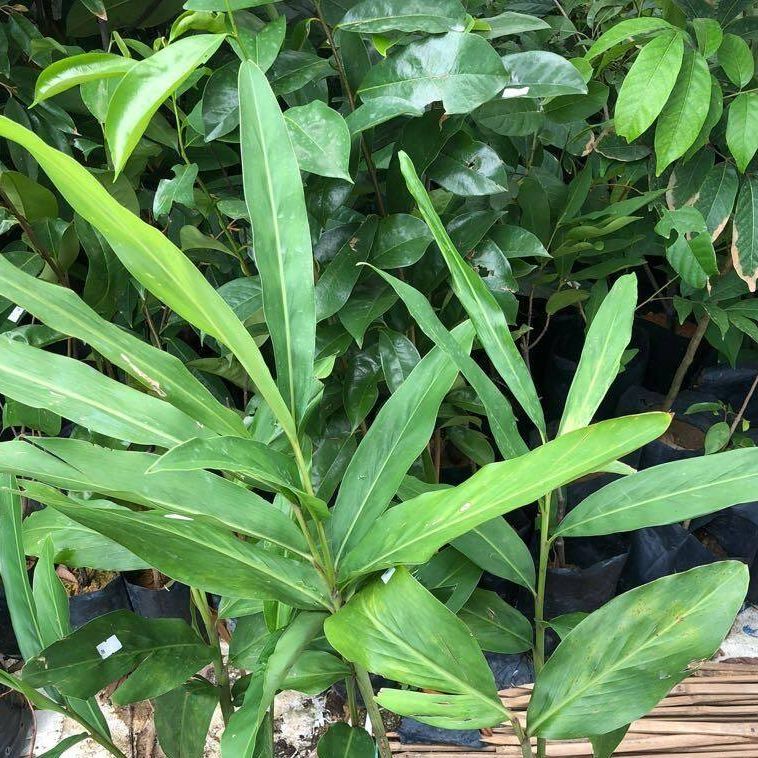 |
| 7. | Anacyclus pyrethrum அக்கரகாரம் Spanish Chamomile | பல் வலி குணமாகும் Cure teeth pain | தாவர தண்டு துண்டு Plant cuttings |  |
| 8. | Cymbopogon citratus எலுமிச்சைப்புல் Lemongrass | இரத்த அழுத்தத்தை சீராக்கும் Regulate blood pressure | பக்க கன்றுகள் Suckers | 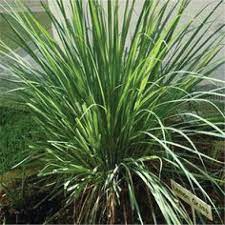 |
| 9. | Catharanthus roseus நித்யகல்யாணி Cape periwinkle | சர்க்கரை நோய், புற்றுநோய்க்கு பயன்படுகிறது Used for diabetes, cancer | விதை Seeds | 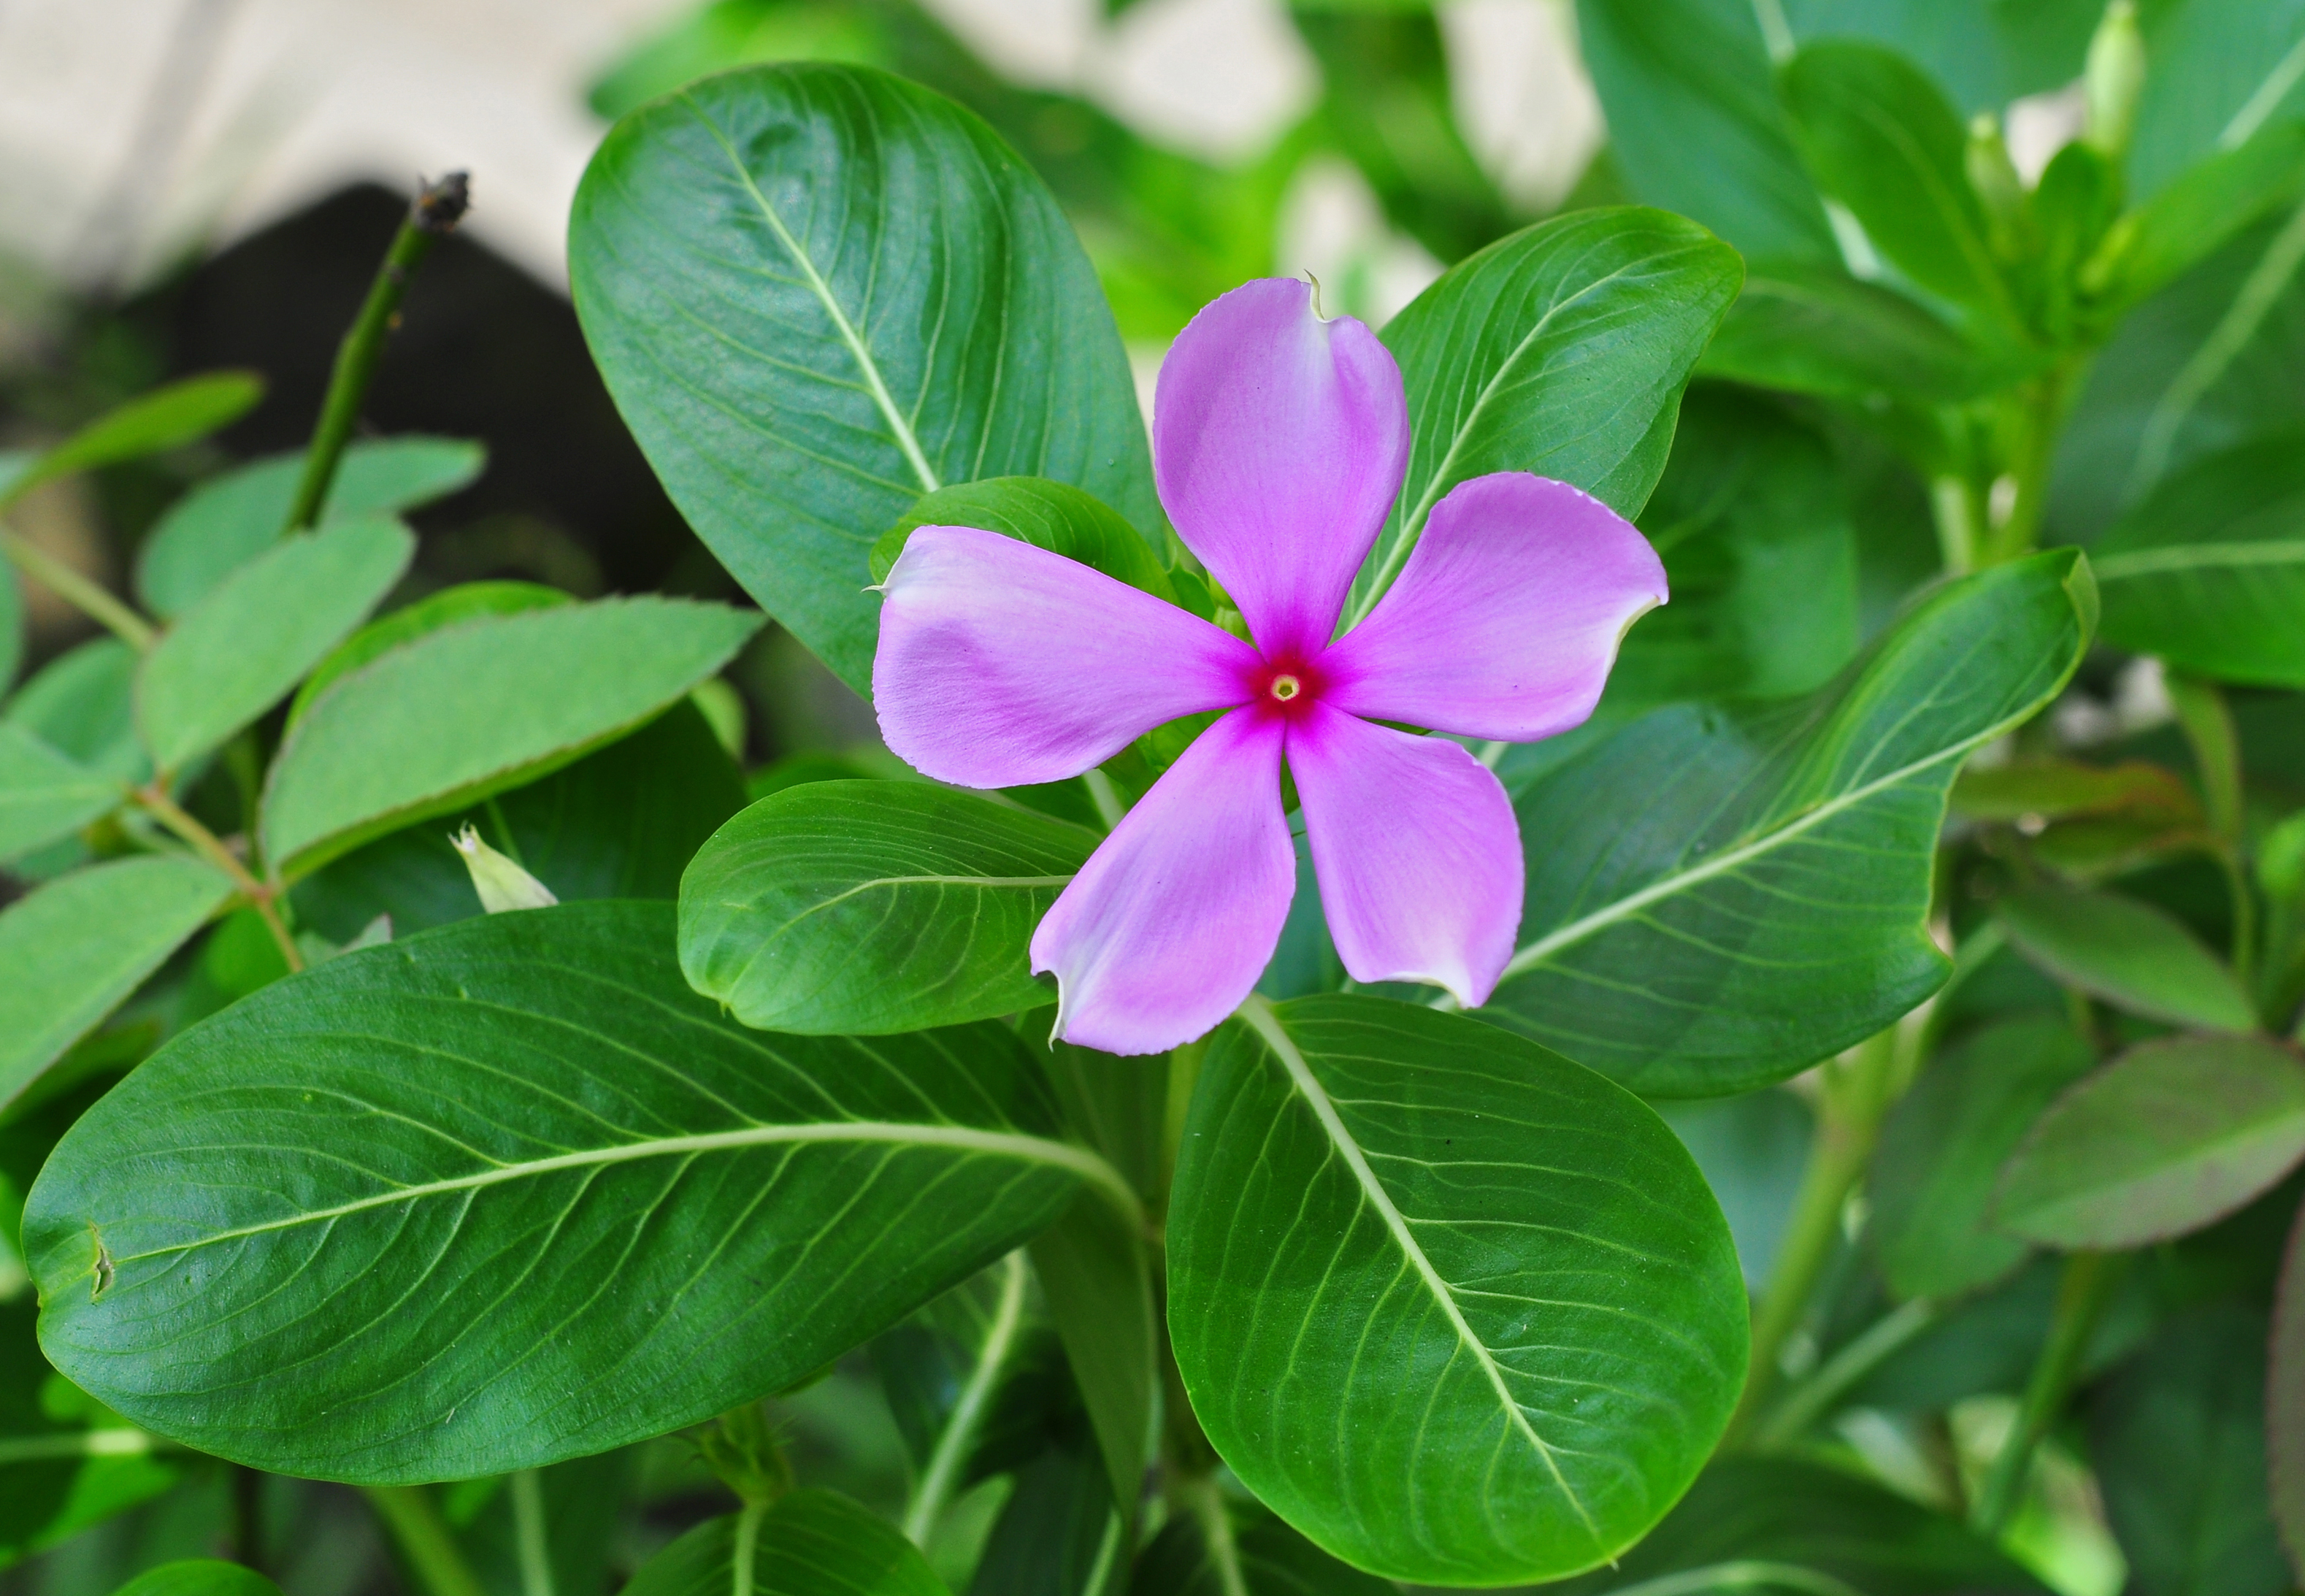 |
| 10. | Justicia adhatoda ஆடாதோடை Malabar nut | ஜலதோஷம் குணமாகும் Cure common cold | தாவர தண்டு துண்டு Plant cuttings | 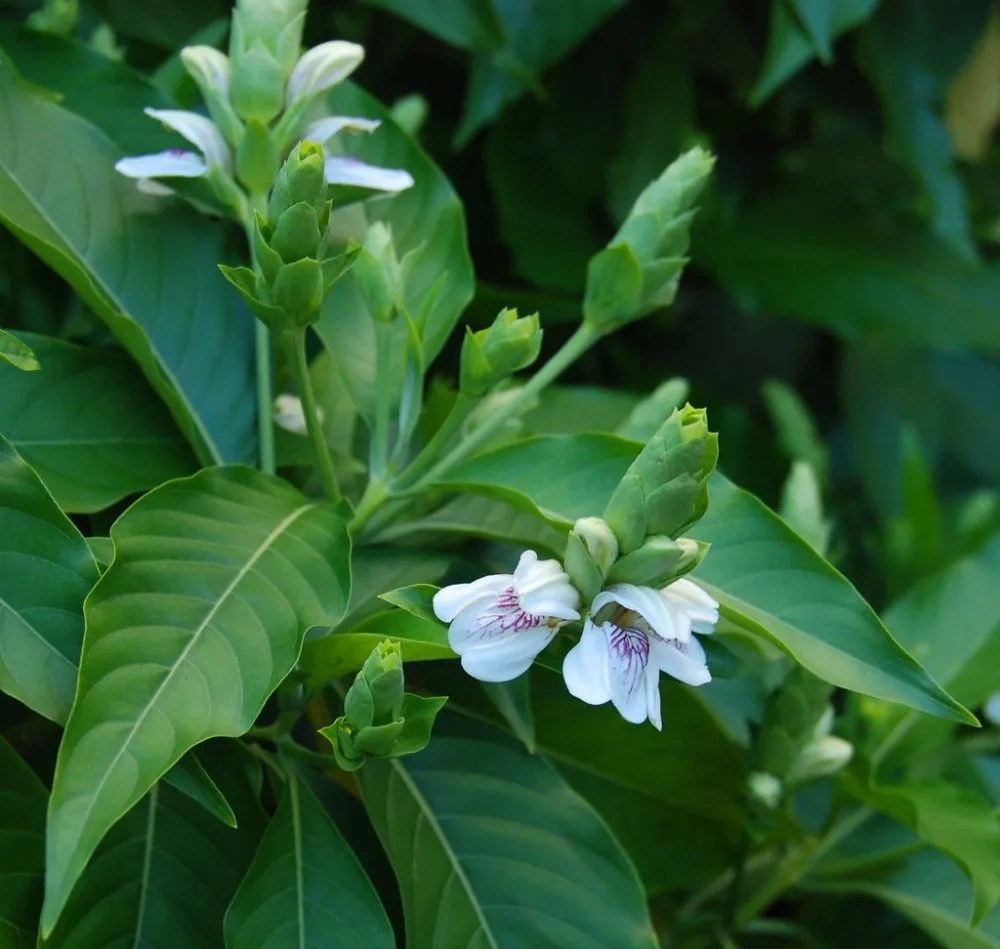 |
| 11. | Euphorbia hirta அம்மான் பச்சரிசி Asthma plant | சுவாச பிரச்சனைகளை குணப்படுத்தும் Cure respiratory issues | விதை Seeds | 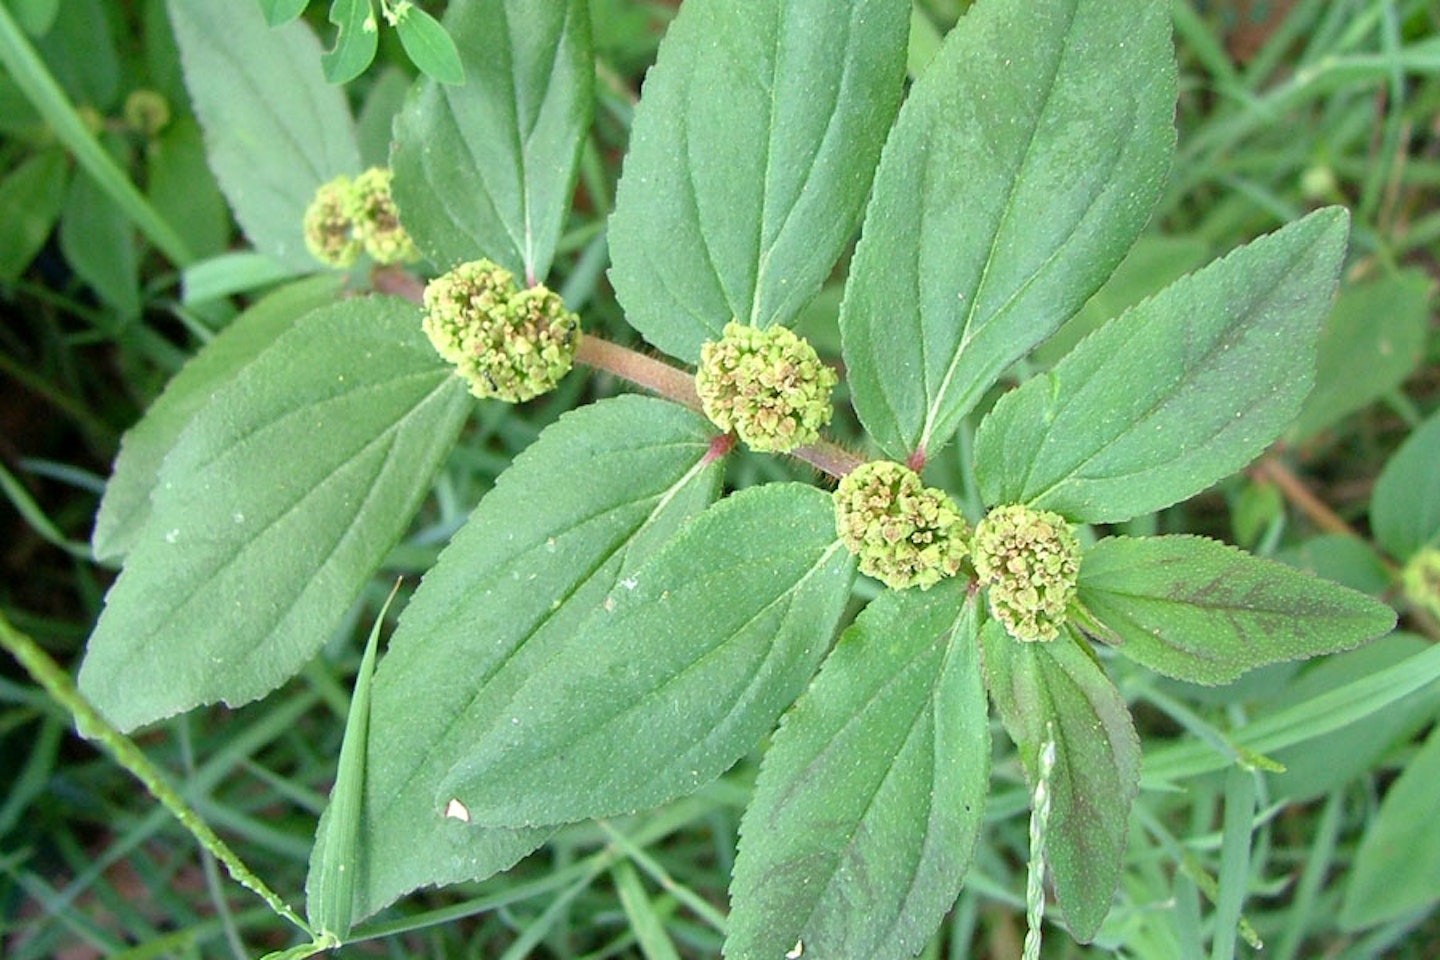 |
| 12. | Phyllanthus niruri கீழாநெல்லி Stone breaker | மஞ்சள் காமாலை குணமாகும் Cure Hepatitis B | விதை Seeds |  |
| 13. | Ocimum basilicum திருநீற்றுப்பச்சிலை Sabja | இயற்கை உடல் குளிரூட்டி Natural Body Coolant | விதை Seeds | 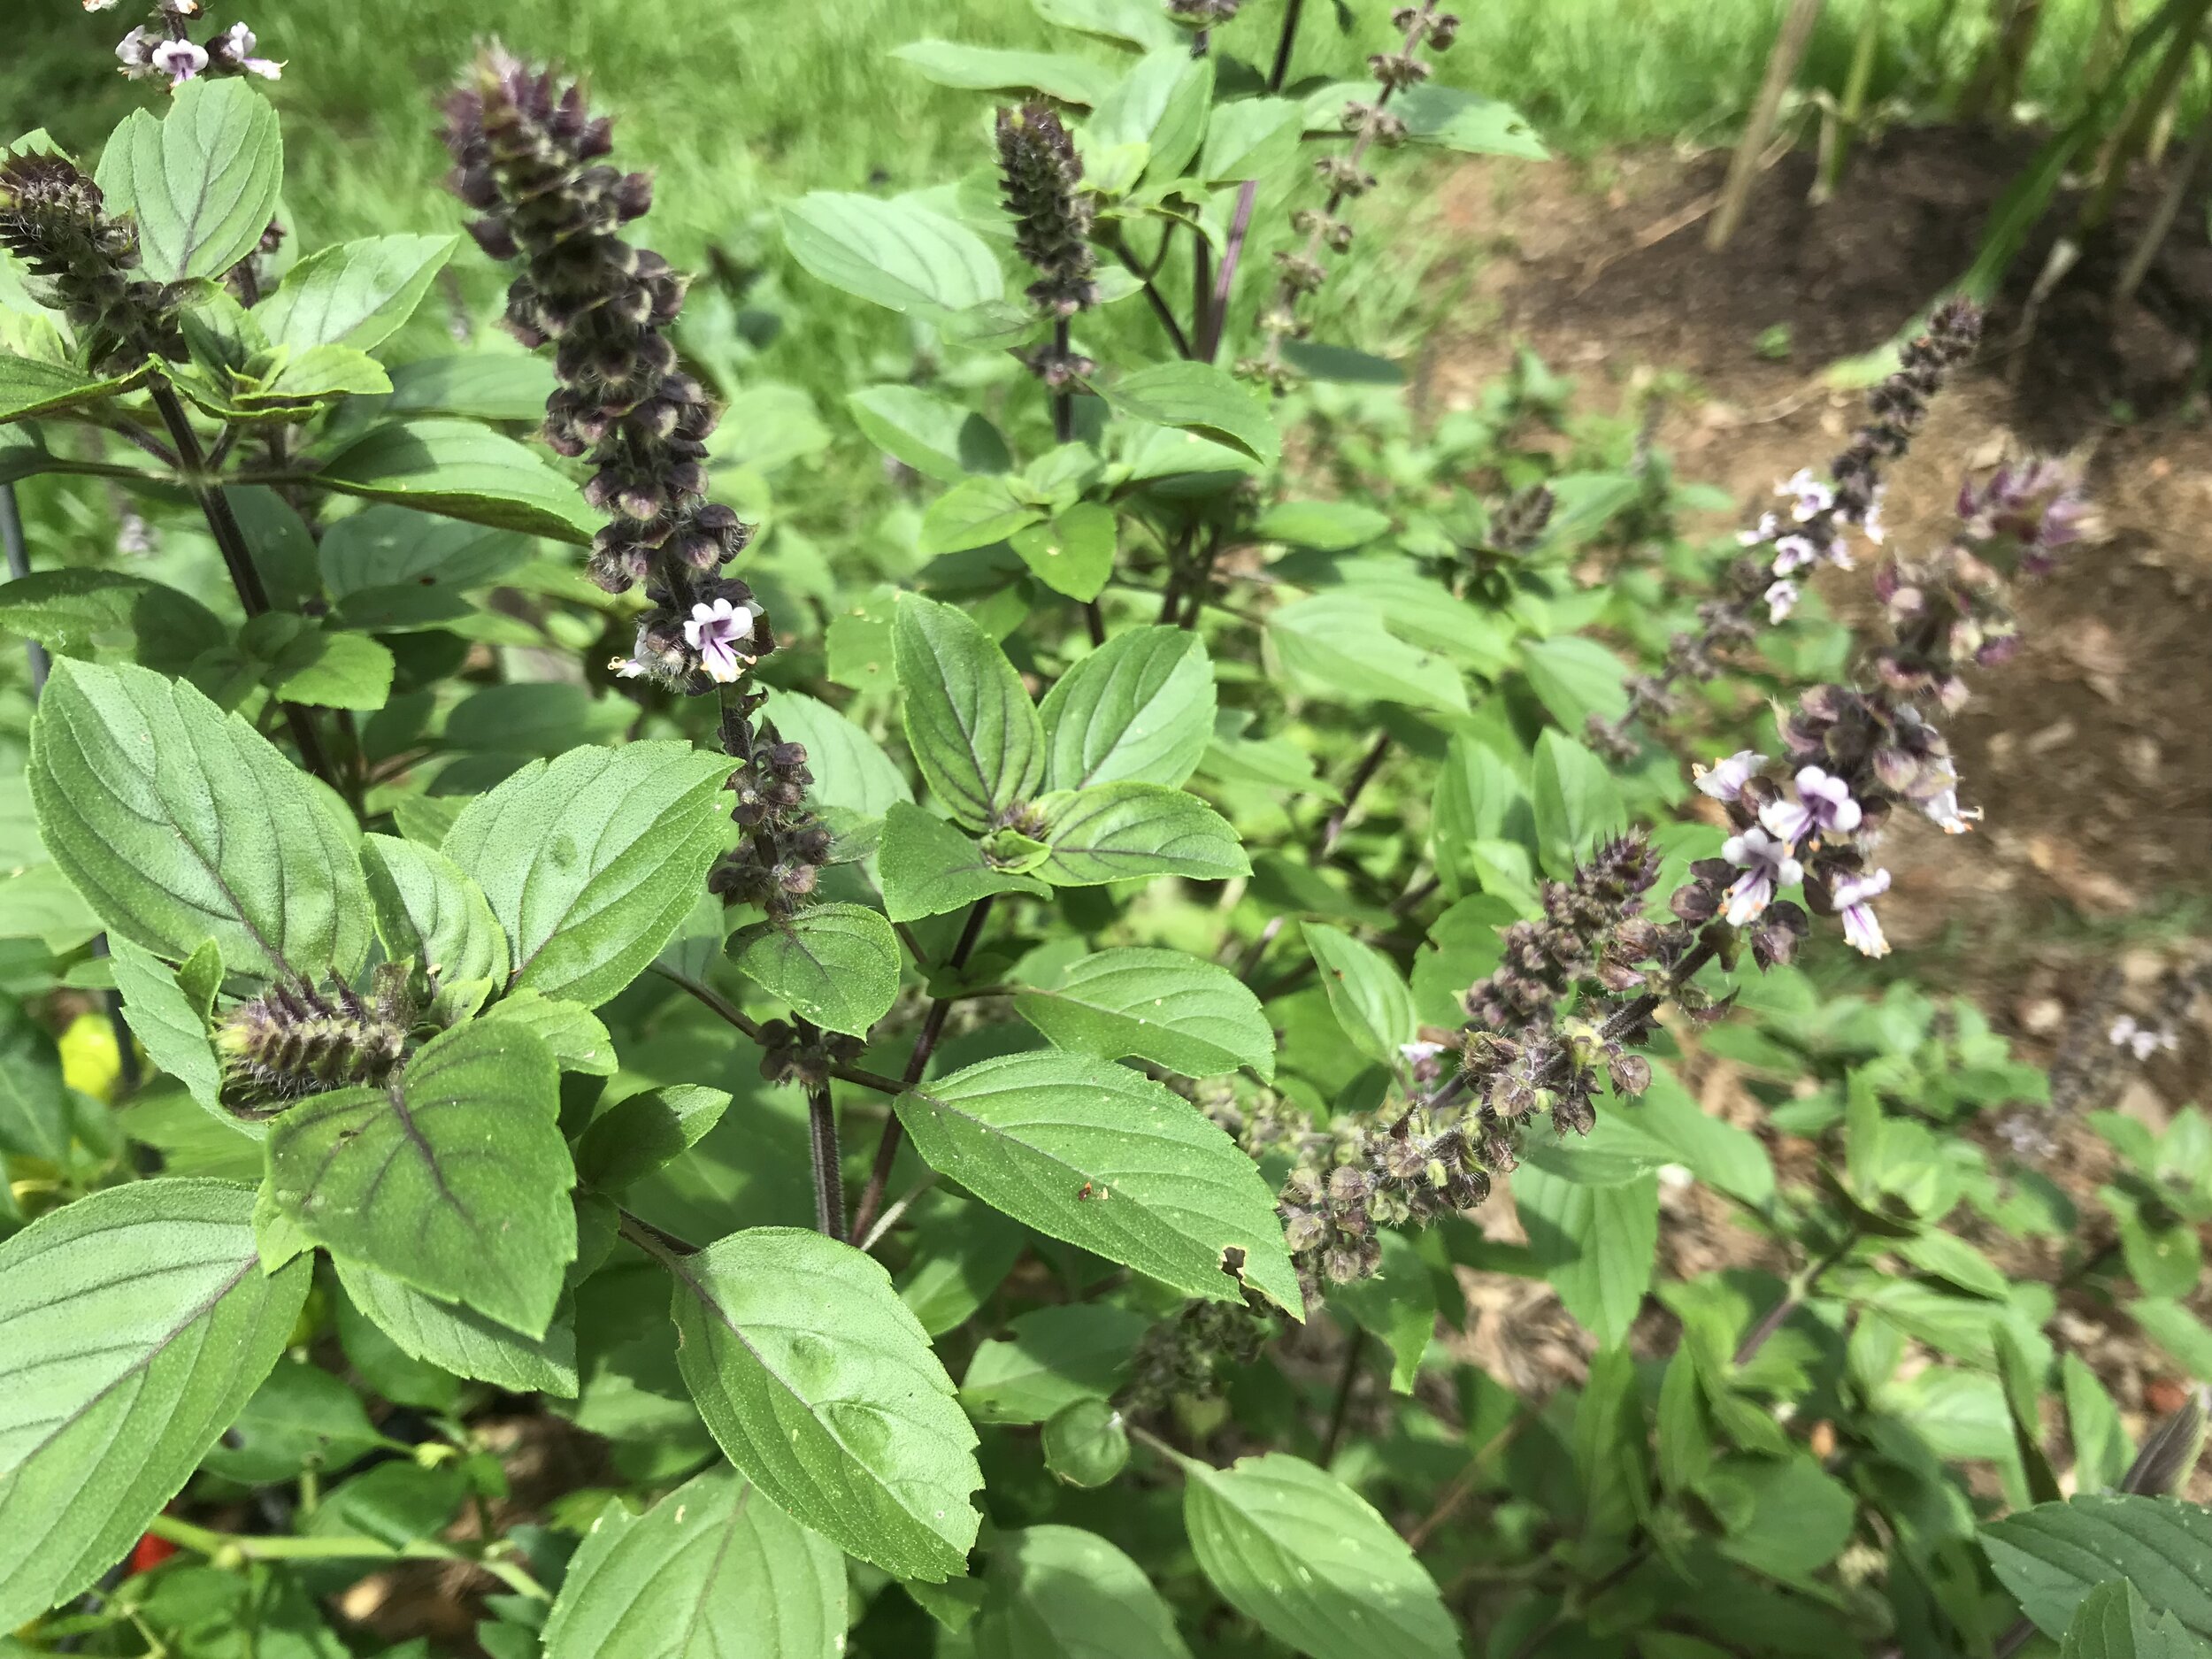 |
| 14. | Strobilanthes alternata முறிக்குட்டி Red Ivy | வெட்டு காயத்தை குணப்படுத்தும் Cure cut wound | தாவர தண்டு துண்டு Plant cuttings | 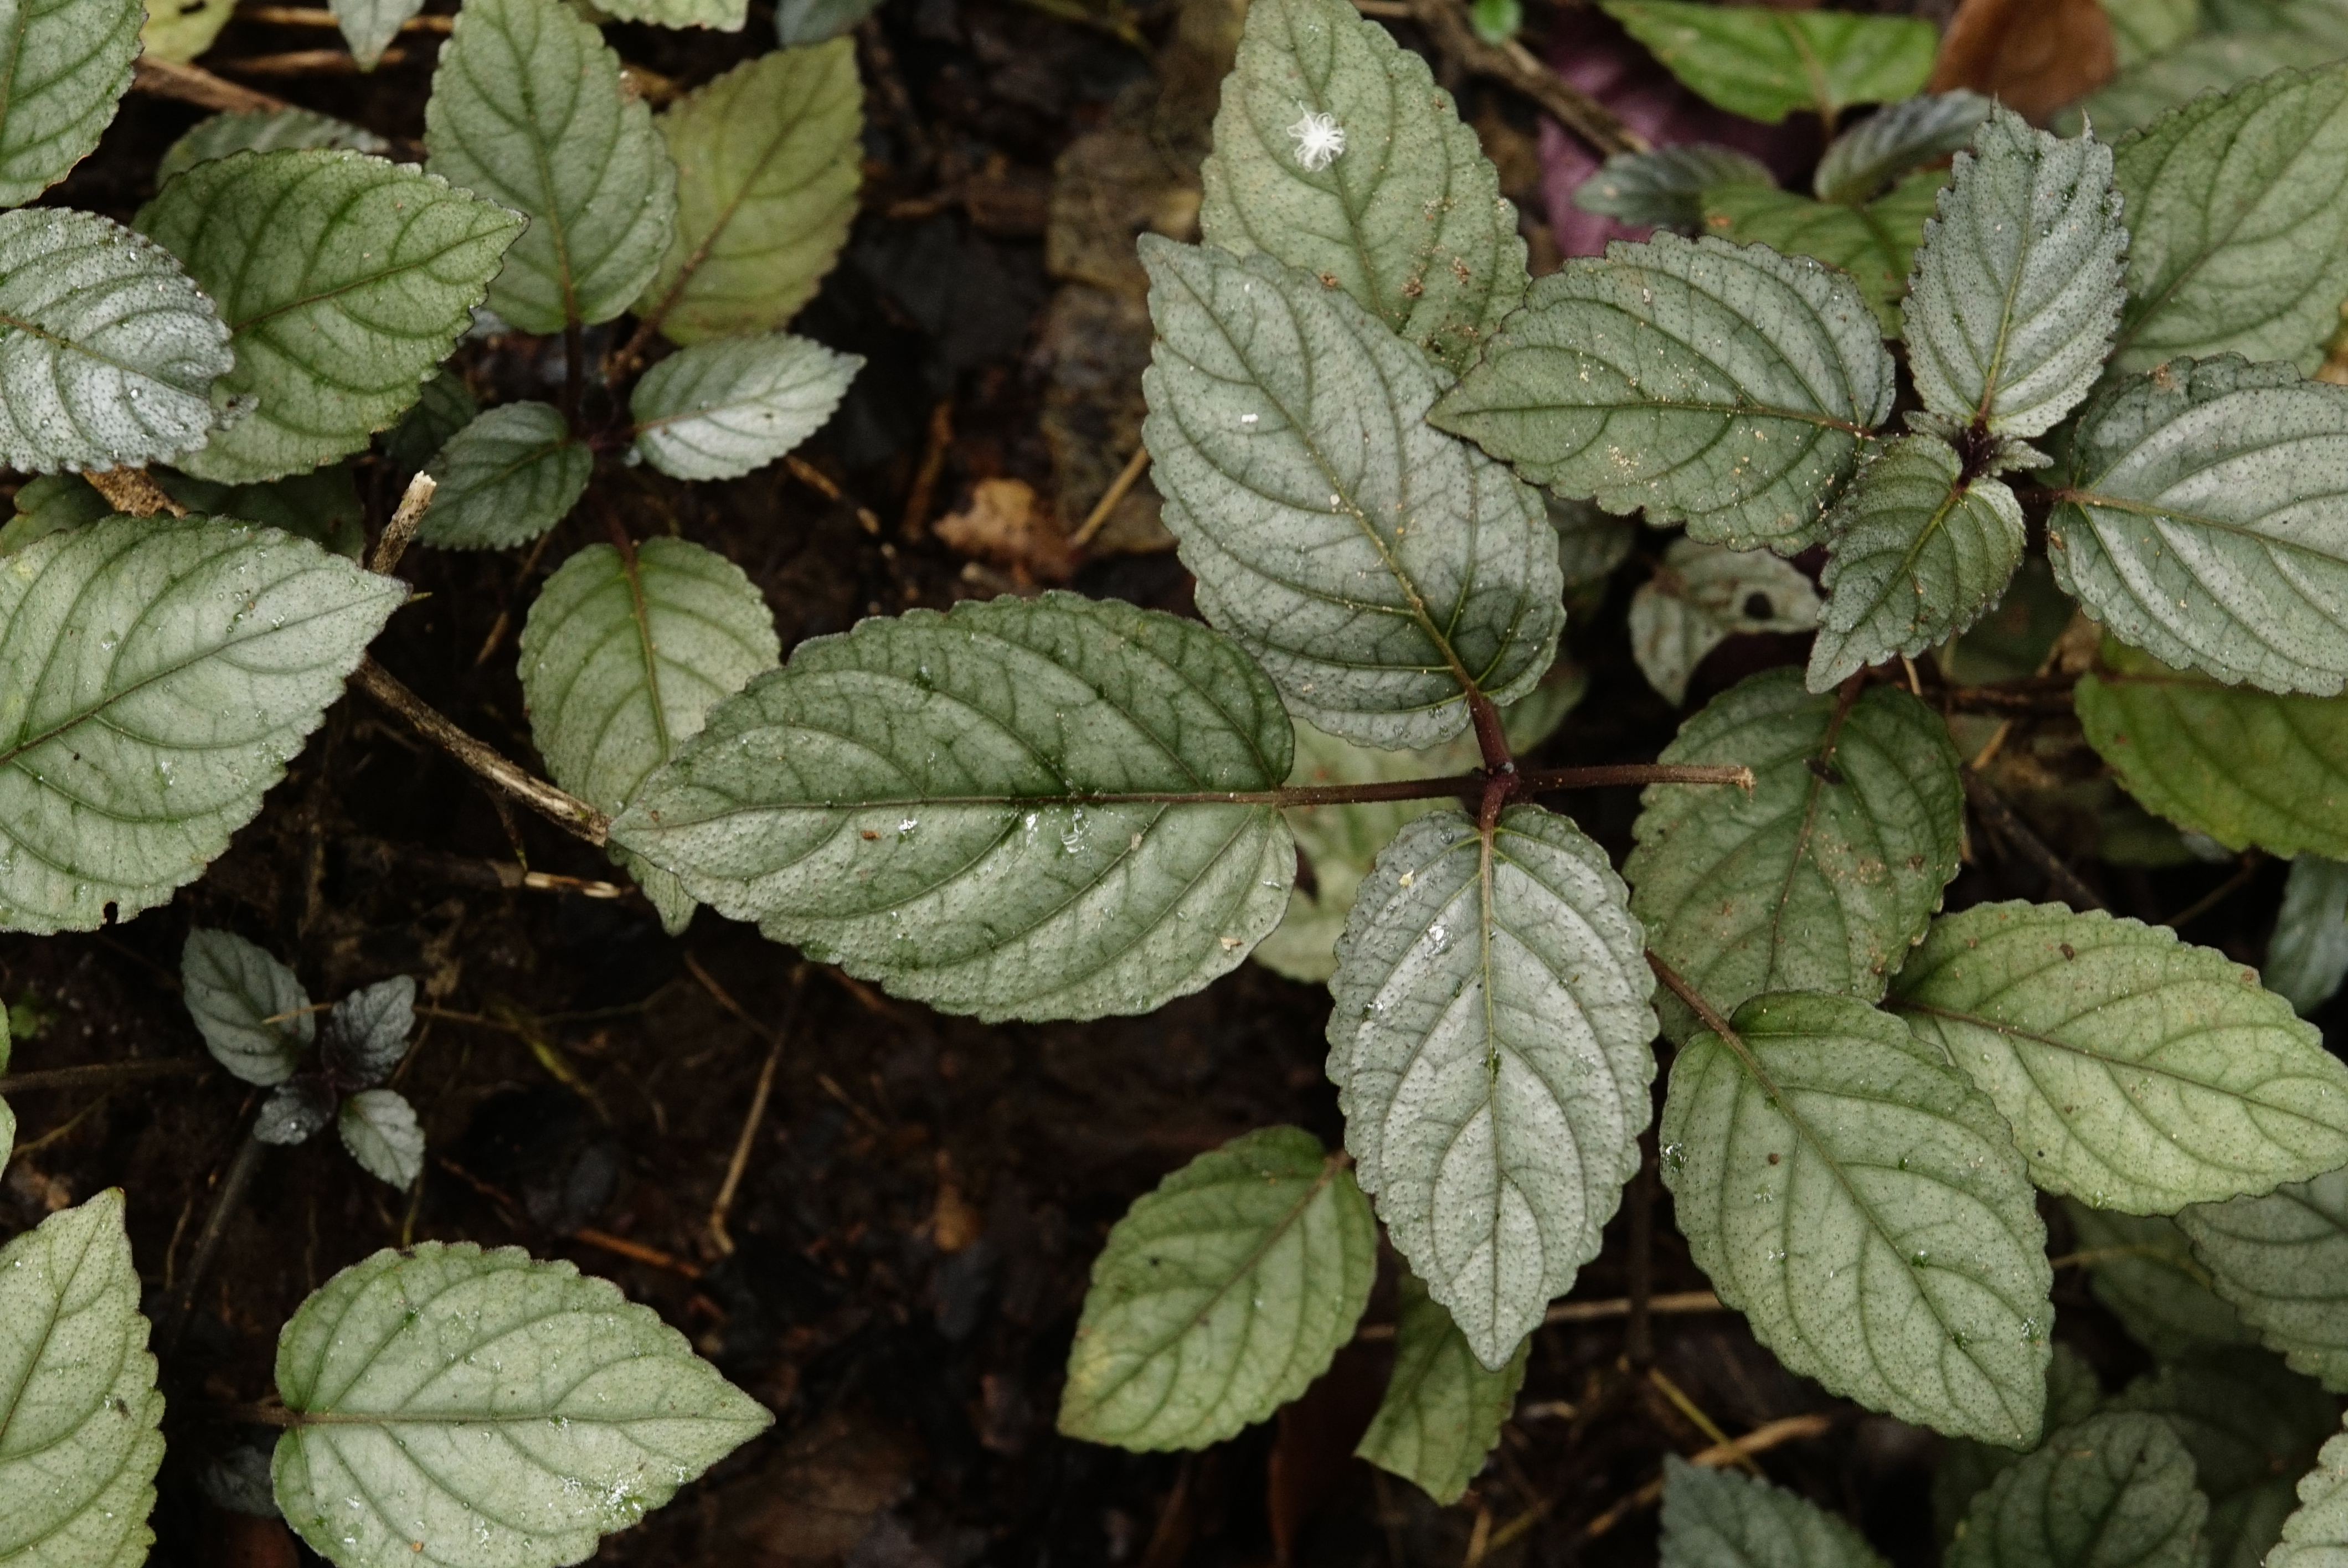 |
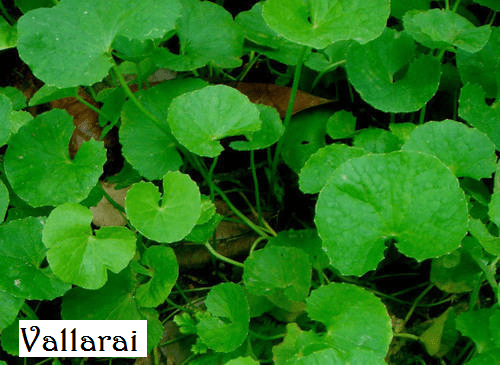
| 15. | Centella asiatica வல்லாரை Indian pennywort | ஞாபக சக்தியை மேம்படுத்துகிறது Improves memory power | பக்க கன்றுகள் Suckers | 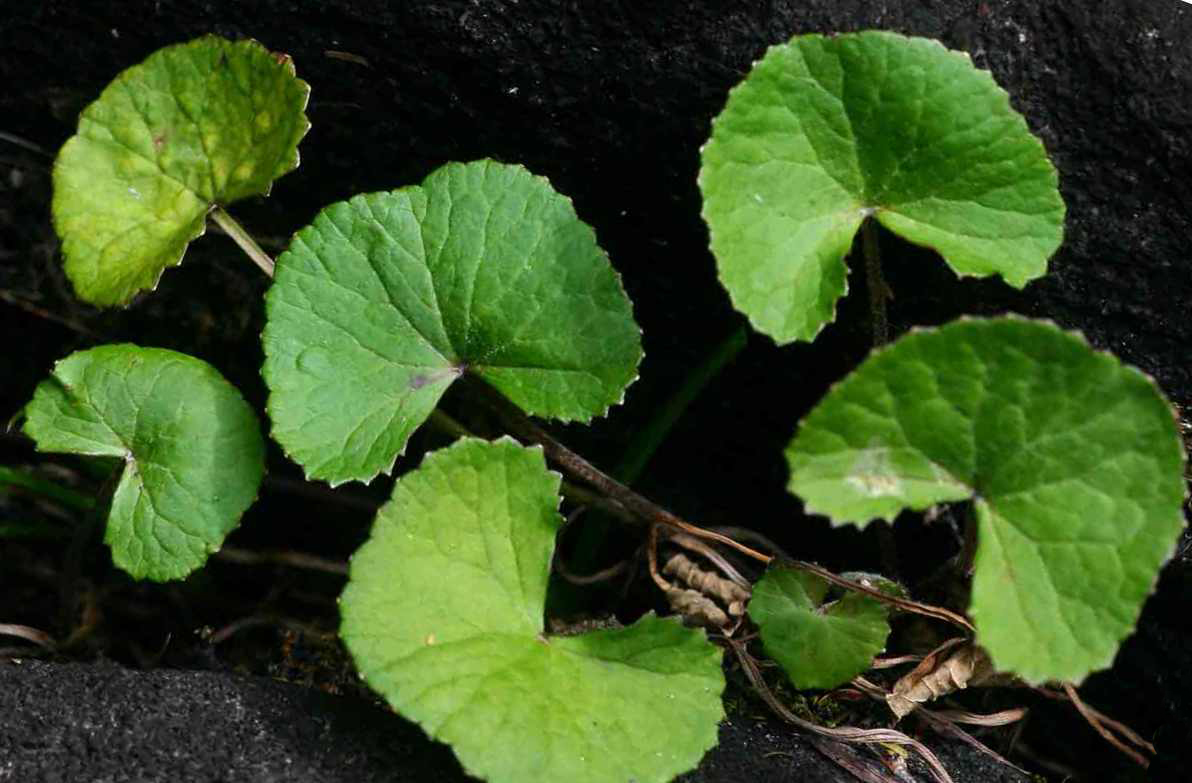 |
| 16. | Ocimum sanctum துளசி Basil | ஜலதோஷம் குணமாகும் Cure common cold | விதை Seeds |  |
| 17. | Solanum trilobatum தூதுவளை Red Pea Eggplant | ஜலதோஷம் குணமாகும் Cure common cold | விதை Seeds | 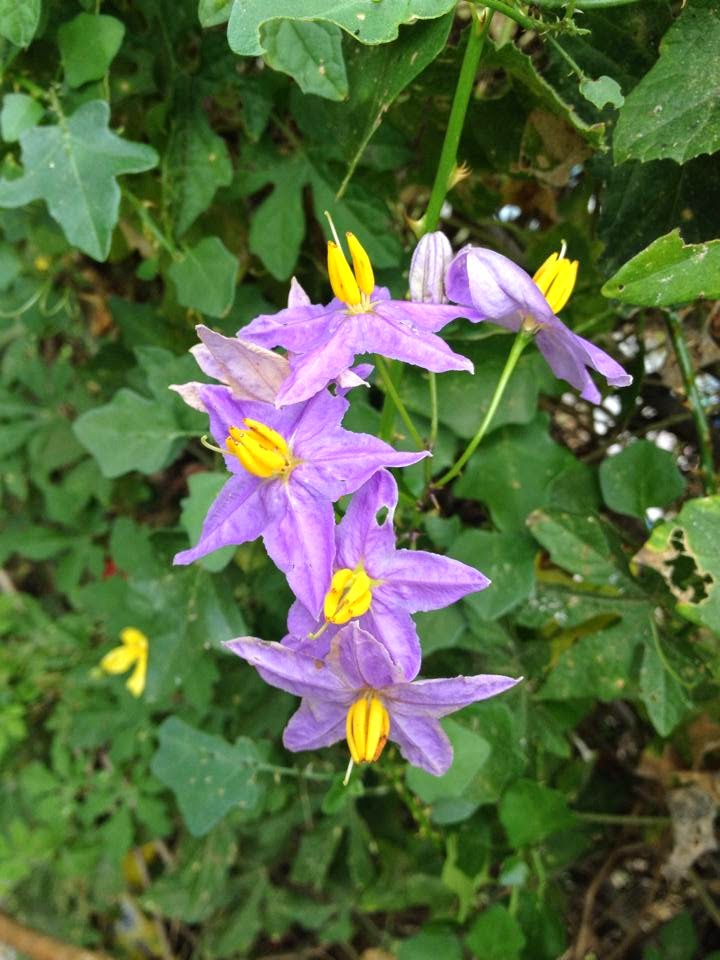 |
| 18. | Momordica cymbalaria அதலை Tiny bitter gourd | இரத்த சர்க்கரை அளவை பராமரிக்க Maintain Blood sugar level | Tubers கிழங்கு | 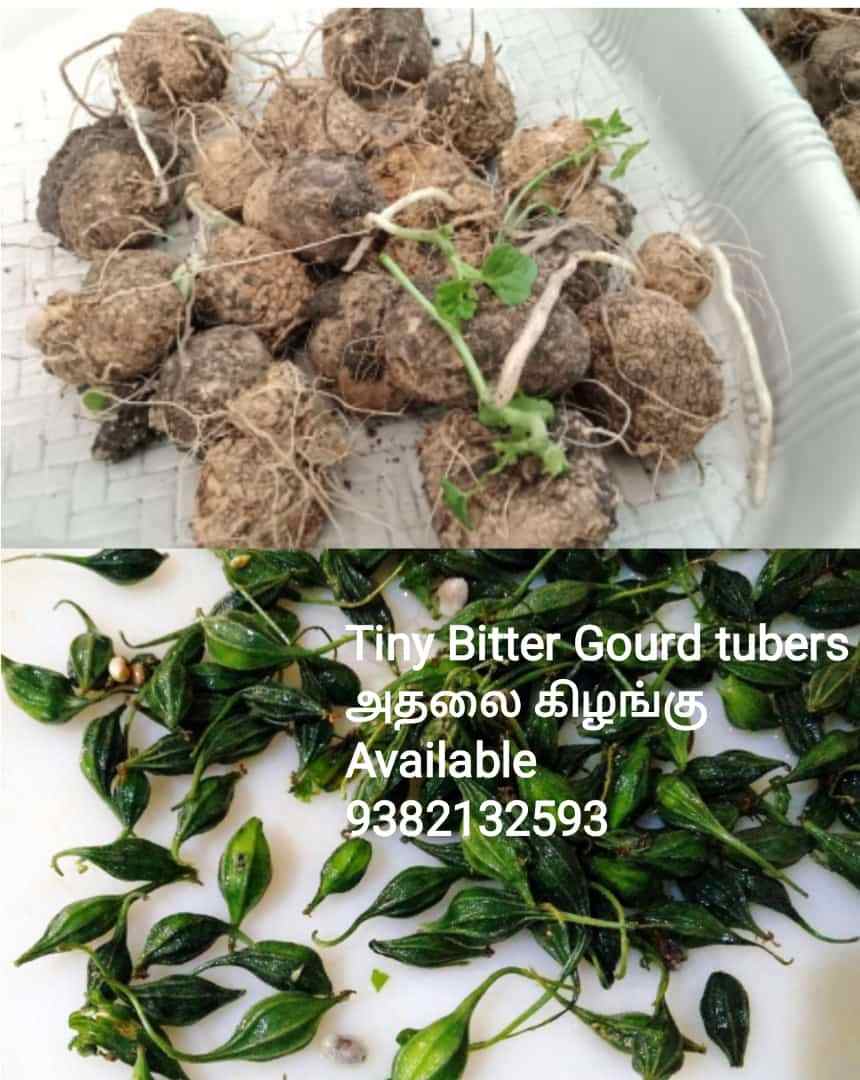 |
| 19. | Indigofera tinctoria அவுரி Neeli | இயற்கை முடி நிறமூட்டி Natural hair color | விதை Seeds |  |
| 20. | Cardiospermum halicacabum முடக்கத்தான் Balloon vine | எலும்பு வலிமை Bone Strength | விதை Seeds |  |
| 21. | Cissus quadrangularis நான்கு முகபிரண்டை Winged treebine | மூட்டு வலி குணமாகும் Cure joint pain | தாவர தண்டு துண்டு Plant cuttings |  |
| 22. | உருட்டு பிரண்டை Round Winged treebine | மூட்டு வலி குணமாகும் Cure joint pain | தாவர தண்டு துண்டு Plant cuttings |  |
| 23. | Cissus rotundifolia இலை பிரண்டை Leaf Winged treebine | மூட்டு வலி குணமாகும் Cure joint pain | தாவர தண்டு துண்டு Plant cuttings | 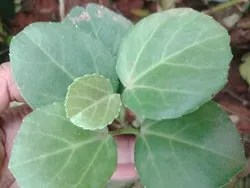 |
| 24. | Chrysopogon zizanioides வெட்டிவேர் Khus Khus | இயற்கை உடல் குளிரூட்டி Natural Body Coolant | பக்க கன்றுகள் Suckers |  |
| 25. | Ocimum Tenuiflorum கருந்துளசி Black/Purple stalked basil | ஜலதோஷம் குணமாகும் Cure common cold | விதை Seeds | 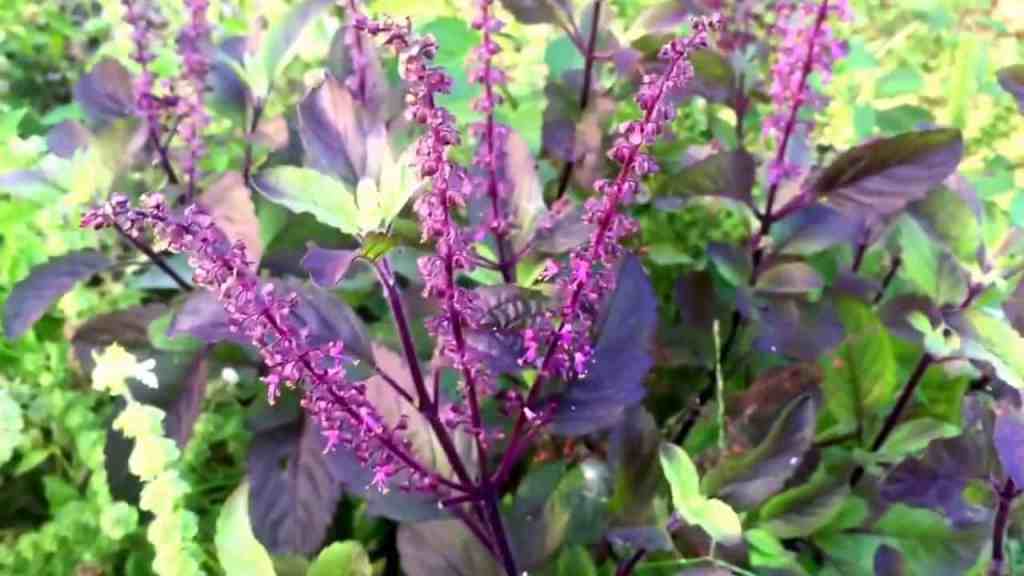 |
| 26. | Pandanus amaryllifolius ரம்பை / பிரியாணி இலை Pandan leaves | தோல் பிரச்சினைகளை தீர்க்க Solve skin issues | பக்க கன்றுகள் Suckers | 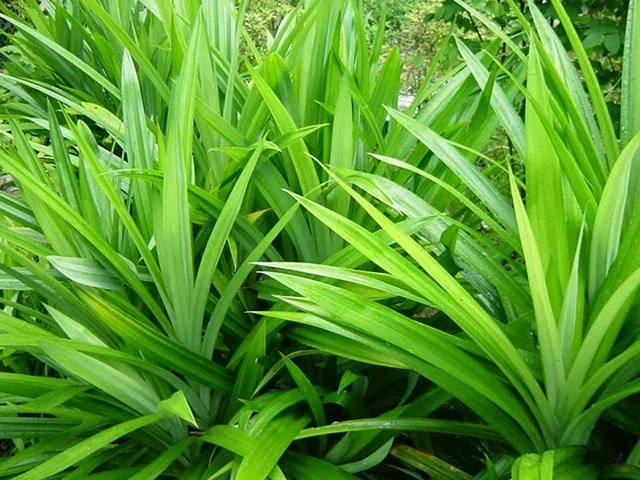 |
| 27. | Murraya koenigii கறிவேப்பிலை Curry leaf | சக்திவாய்ந்த ஆக்ஸிஜனேற்றம் Powerful antioxidant | விதை Seeds | 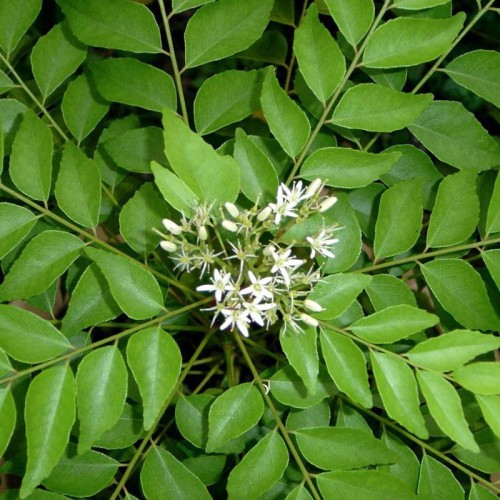 |
| 28. | Portulaca quadrifida சிவப்பு பசலை Chicken weed | வைட்டமின் ஏ & சி, இரும்பு மற்றும் கால்சியம் நிறைந்தது Rich in vitamins A & C, Iron & Calcium | தாவர தண்டு துண்டு Plant cuttings |  |
| 29. | Piper betle வெற்றிலை Betelvine | செரிமானத்தை மேம்படுத்துகிறது Improves digestion | தாவர தண்டு துண்டு Plant cuttings | 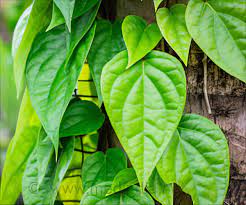 |
| 30. | Hibiscus rosa-sinensis செம்பருத்தி Hibiscus / Shoe flower | ஆன்டிஆக்ஸிடன்ட்கள் நிறைந்தது Rich in antioxidants | தாவர தண்டு துண்டு Plant cuttings | 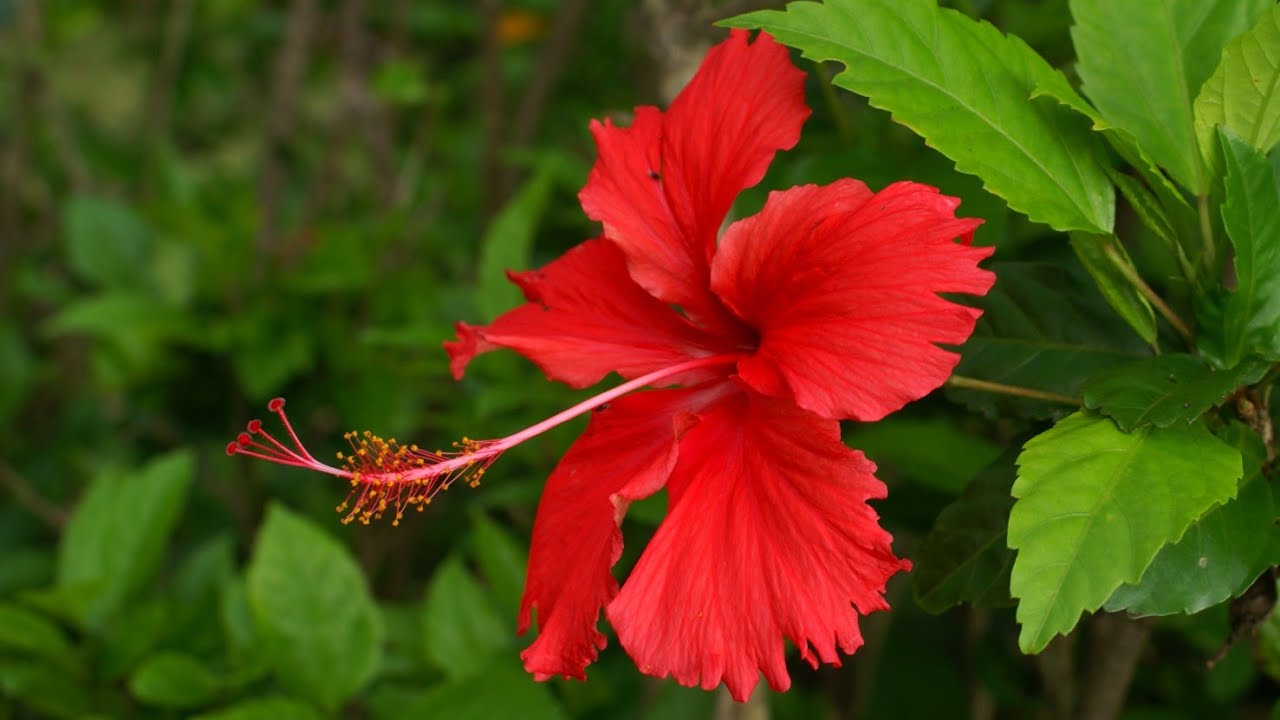 |
| 31. | Sansevieria trifasciata மருள் Snake Plants | காது வலி குணமாகும் Cure ear pain | பக்க கன்றுகள் Suckers | 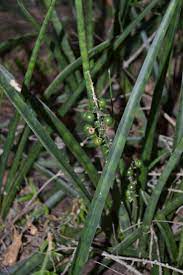 |
| 32. | Withania coagulans பன்னீர் இலை Rishyagandha | நீரிழிவு மற்றும் புற்றுநோயை குணப்படுத்தும் Cure Diabetes & Cancer | தாவர தண்டு துண்டு Plant cuttings |  |
| 33. | Lawsonia inermis மருதாணி Henna | முடிக்கு இயற்கையான வண்ணம் Natural coloring for hair | விதை Seeds | 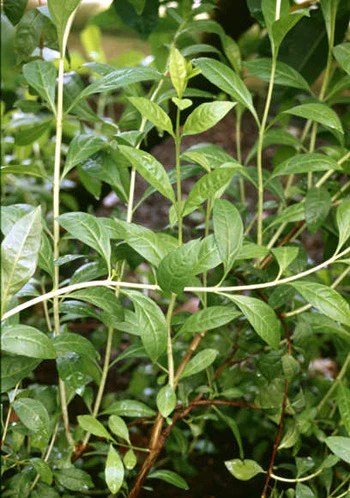 |
| 34. | Sesbania sesban சித்தகத்தி/ கருஞ்செம்பை Egyptian riverhemp | அழற்சி எதிர்ப்பு Anti-inflammatory | விதை Seeds | 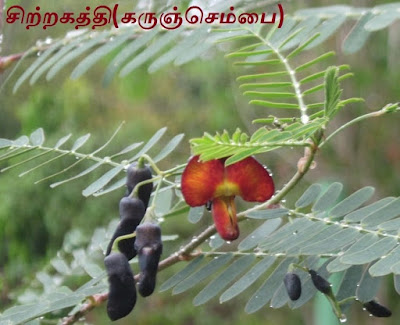 |
| 35. | Aloe barbadensis சோற்றுக் கற்றாழை Ghrit Kumari | தீக்காயங்களை ஆற்றும் Heals burns | பக்க கன்றுகள் Suckers | 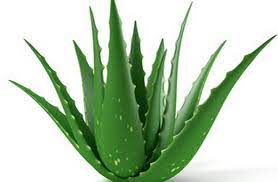 |
| 36. | Phyllanthus acidus அரைநெல்லிக்காய் Malay gooseberry | வைட்டமின் சி நிறைந்த ஆதாரம் Rich source of Vitamin C | விதை Seeds | 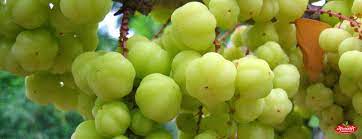 |
| 37. | Citrus limon எலுமிச்சை Lemon | வைட்டமின் சி நிறைந்த ஆதாரம் Rich source of Vitamin C | விதை Seeds | 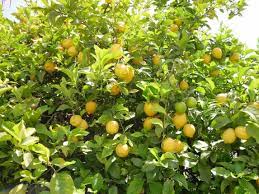 |
| 38. | Punica granatum மாதுளை Pomegranate | இதய நோய்க்கு சிகிச்சையளிக்க Treat heart disease, improves Hb | விதை Seeds | 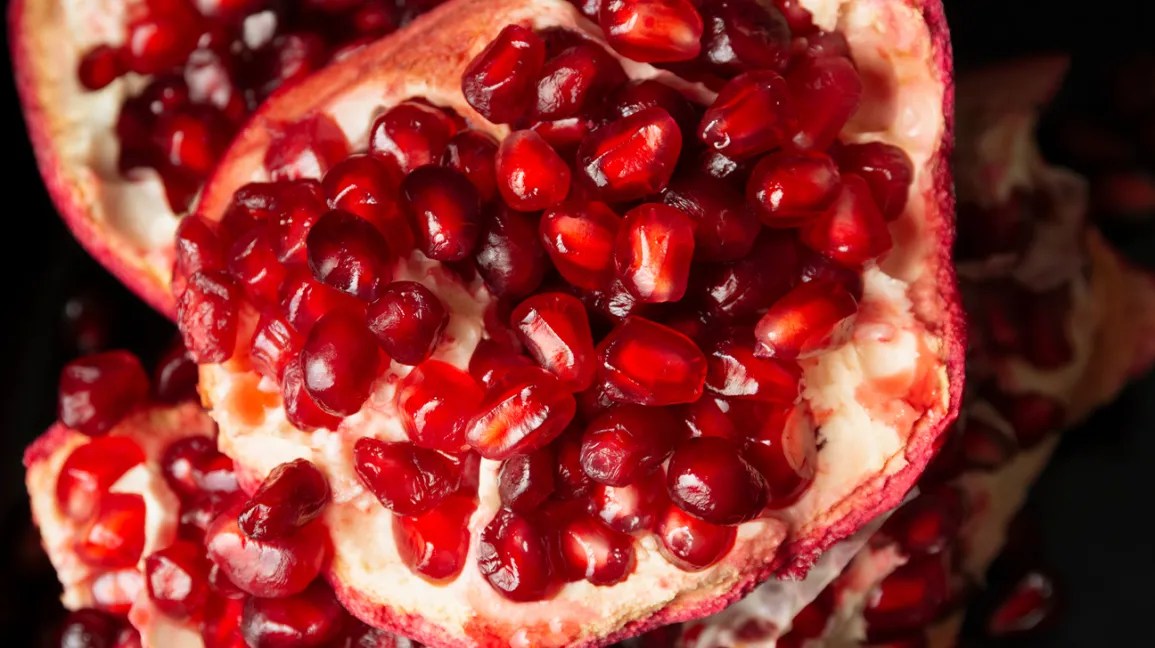 |
| 39. | Annona muricata முள் சீதா Soursop | ஆன்டிஆக்ஸிடன்ட்கள் புற்றுநோயைக் கட்டுப்படுத்துகின்றன Against Cancer | விதை Seeds | 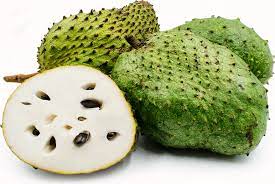 |
| 40. | Phyllanthus emblica நெல்லிக்காய் Goose berry | புற்றுநோயைத் தடுக்கிறது Prevents cancer | விதை Seeds |  |
| 41. | Clitoria ternatea சங்கு பூ வெள்ளை Aprajitha White | மூளை நோய்க்கு சிகிச்சையளிக்க To treat brain illness | விதை Seeds | 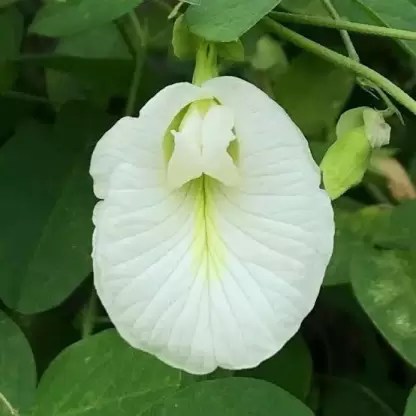 |
| 42. | Clitoria ternatea சங்கு பூ வயலெட் Aprajitha Violet | மூளை நோய்க்கு சிகிச்சையளிக்க To treat brain illness | விதை Seeds | 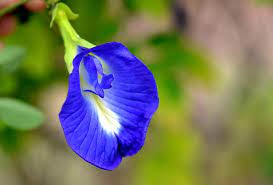 |
| 43. | Orthosiphon stamineus பூனை மீசை Kidney tea | Treating ailments of kidney சிறுநீரக நோய்களுக்கு சிகிச்சை | தாவர தண்டு துண்டு Plant cuttings | 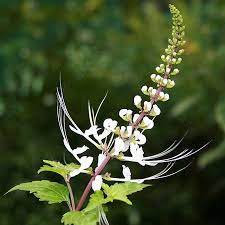 |
| 44. | Mucuna pruriens பூனைகாலி Velvet bean | விந்தணு எண்ணிக்கையை அதிகரிக்க Increase sperm count | விதை Seeds |  |
| 45. | Aloe cameronii சென்சோற்று கற்றாழை Cape aloe | தீக்காயங்களை ஆற்றும் Heals burns 22 times more powerful than common Aloevera | பக்க கன்றுகள் Suckers | 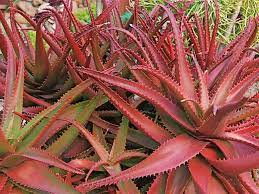 |
| 46. | Erythrina indica கல்யாணமுருங்கை Indian Coral Tree | குழந்தைப்பேறு Improves fertility | தாவர தண்டு துண்டு Plant cuttings | 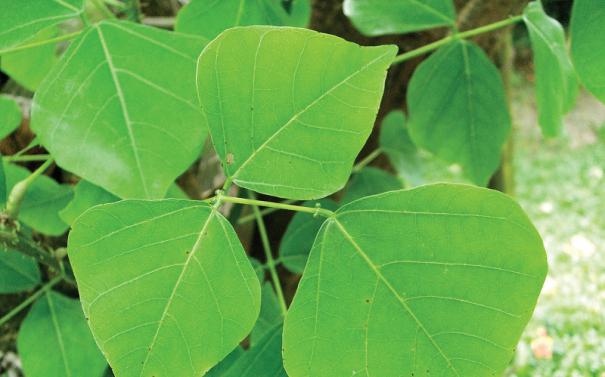 |
| 47. | Dioscorea bulbifera கொடி உருளை Air potato | வயிற்றுப்போக்கு, தொண்டை புண்களுக்கு Aid against diarrhea, sore throats | Tubers கிழங்கு | 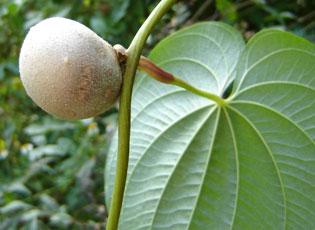 |
| 48. | Withania somnifera அஸ்வகந்தா Indian Winter cherry | நோய் எதிர்ப்பு சக்தியை அதிகரிக்க Boost the immune system | விதை Seeds | 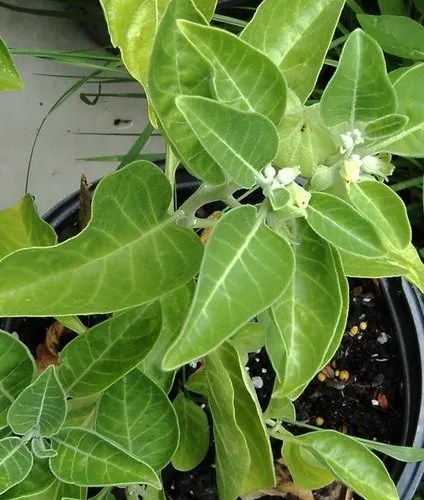 |
| 49. | மிளகு Piper nigrum Pepper | ஜலதோஷம் குணமாகும் Cure common cold | தாவர தண்டு துண்டு Plant cuttings | 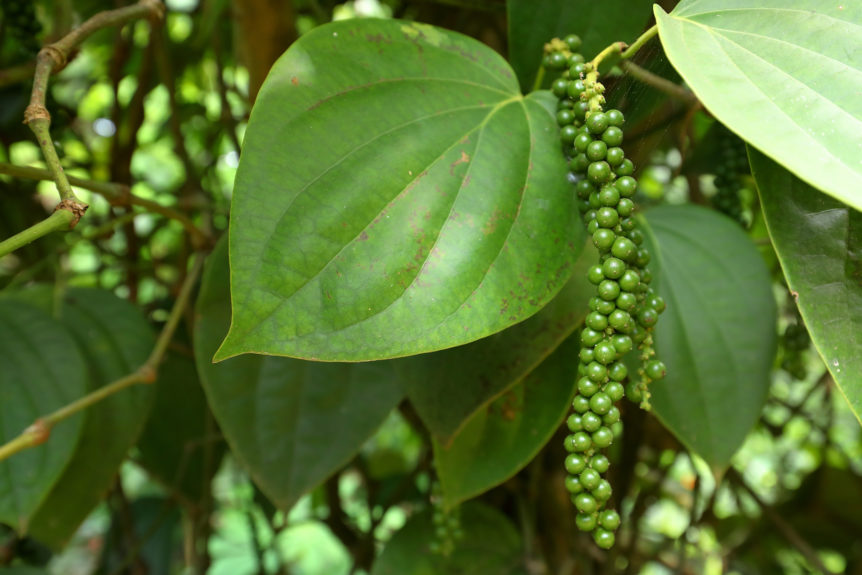 |
| 50. | Piper longum திப்பிலி Long pepper | ஜலதோஷம் குணமாகும் Cure common cold | தாவர தண்டு துண்டு Plant cuttings | 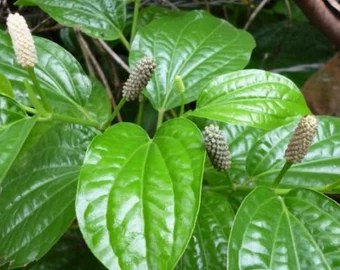 |


UGC-NET examination is conducted twice an every year (June & December) to determine the
eligibility of Indian nationals for ‘Assistant Professor’ and ‘Junior Research Fellowship
and Assistant Professor’ in Indian Universities and Colleges. Due to the outbreak of COVID-
19 pandemic in 2020 & 2021, the cycles of UGC NET were merged and conducted together.
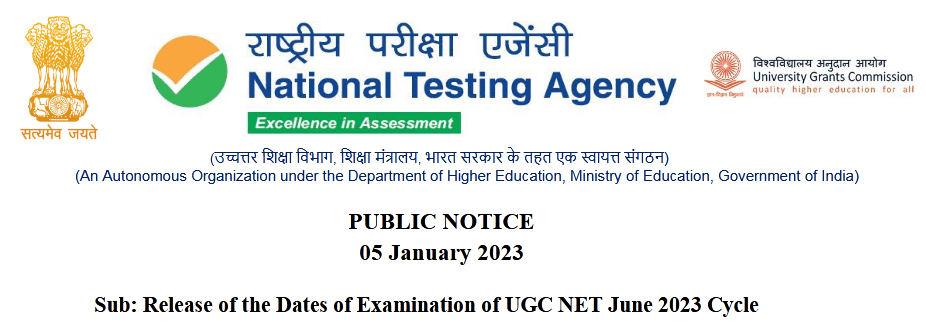
In order to regularize this current system, NTA with the concurrence of UGC is conducting UGC NET December 2022 from 21 February 2023 to 10 March 2023, as per the Public Notice dated 29.12.2022 (Just 4 days left to Submission of Online Application Form (29 December 2022 to 17 January 2023 (upto 05:00 P.M)).
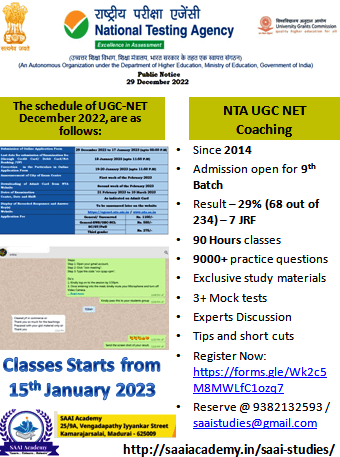
Coaching till June 2023 cycle

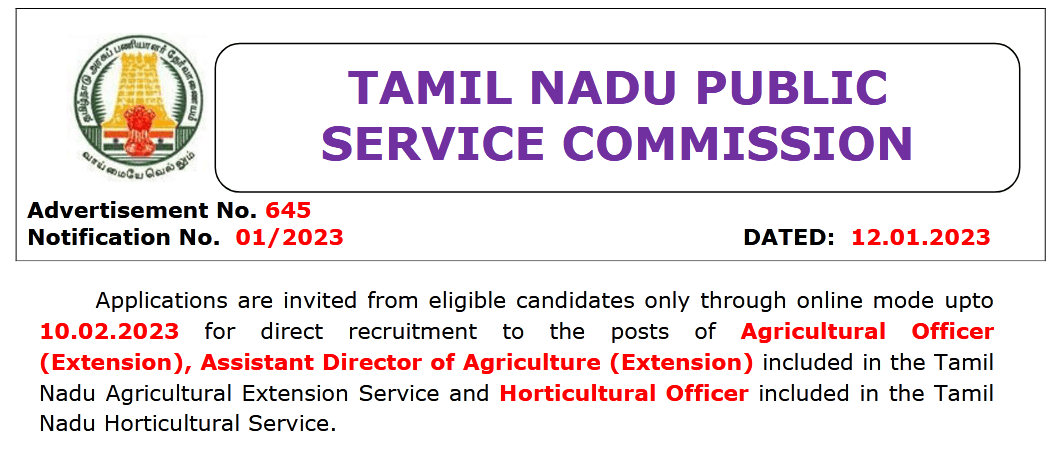
New updated Syllabus enclosed for your reference (TNPSC January 2023)
(Size of each document should be less than 200 KB in PDF format (Single page or Multiple page))
https://forms.gle/S6AbcBYtyHAtKMh66


Corrigendum JRF: Not more than 30 years as on 01.12.2022.
The NET Bureau of UGC (vide Letter No.4-1/2019 (NET/NTA) dated 02 January 2023) has requested NTA to fix the upper age limit for applying for JRF as 01.12.2022 instead of 01.02.2023.
A relaxation of upto 5 years is provided to the candidates belonging to OBC-NCL (as per the
Central list of OBC available on website: http://www.ncbc.nic.in) /SC/ST/PwD/Third gender categories
and to women applicants. Relaxation will also be provided to the candidates with research
experience, limited to the period spent on research in the relevant / related subject of post-
graduation degree, subject to a maximum of 5 years, on production of a certificate from appropriate
authority, which should be a recognized Indian university / Institute of National Importance /
foreign university which is duly approved / recognized / accredited in its own Country / Public
Sector Undertaking of Government of India / State Government in India.
The research should not have been carried out towards completion of graduation or post-graduation degree(s). Three years relaxation in age will be permissible to the candidates with L.L.M. degree. A relaxation of upto 5 years is provided to the candidates who have served in the armed forces subject to the length of service in the armed forces upto 01.12.2022. Total age relaxation on the above ground(s) shall not exceed five years under any circumstances.
Assistant Professor: There is no upper age limit in applying UGC-NET for the Assistant
Professor.
Happy Learning…


NTA UGC NET Results released on November 5, 2022. Candidates can check the result at ugcnet.nta.nic.in and nta.ac.in and ntaresults.nic.in.
The NTA UGC NET examination was conducted across the country on various dates- July 9, 11, 12, September 20, 21, 22, 23, 29, 30, October 1, 8, 10, 11, 12, 13, 14 and 22, 2022. The provisional answer key was released on October 24, 2022 and the final answer key was displayed on November 1, 2022.
Shri. Mamidala Jagadesh Kumar, UGC Chairman tweeted, “UGC-NET results will be announced by National Testing Agency (NTA) on 5th November (Saturday). The results will be available on NTA website https://nta.ac.in#UGC-NET”.
8 batches have been completed, in which, 234 professors and students participated. About 68 candidates qualified as Assistant Professors, out of 7 candidates who have cleared JRF (2015-22) in various subjects.

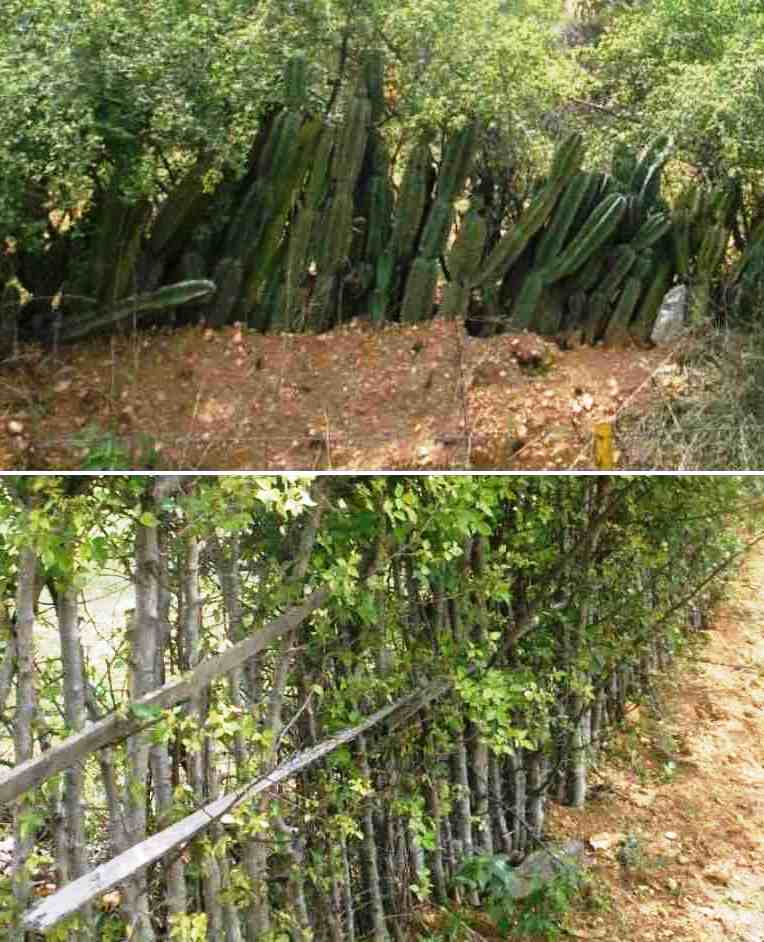
உயிர் வேலி அமைக்கும் முறை
A living fence is a system of fencing made of plants such as shrubs, herbs, small trees, etc. for protection of agriculture land or for protection around the house.
உயிர் வேலி என்பது சிறுசெடி, குற்றுச்செடி, மூலிகை செடி, சிறுமர வகைகள் முதலிய தாவரங்களை கொண்டு வேளாண்மைக்கோ அல்லது வீட்டை சுற்றி பாதுகாப்பிற்காக அமைக்கப்படும் வேலி முறையாகும்.
உயிர் வேலி நன்மைகள்
விவசாயிகளுக்கு உற்பத்தி செய்யப்பட்ட அல்லது இறந்த வேலியை விட உயிர் வேலி கூடுதல் வருமானத்தை வழங்குகிறது.

இது கரையான் மற்றும் எறும்புகளால் பாதிக்கப்படாது

இது பல்லுயிர் பெருக்கத்தை ஆதரிக்கிறது

இது எரிபொருள், பசுந்தாள் உரங்கள், தீவனம், உணவு, நார்ச்சத்து, நிழல், கட்டுமானப் பொருட்கள் மற்றும் மருந்து ஆகியவற்றை வழங்குகிறது.

பயிரிடப்பட்ட தாவரங்களைப் பாதுகாக்க இது இயற்கையான காற்று  தடுப்பானாக செயல்படுகிறது.
Plants used for fencing:
Hill mango (Commiphora caudata), Indian Coral tree (Erythrina Indica),White Gulmohar (Delonix regia (Hook.) Raf.), Dusky Fire Brand (Premna mollissima),Peacock Chaste Tree (Vitex negundo), Fence castor (Ricinus communis), Henna (Lawsonia inermis), Gliricidia (Gliricidia sepium), Vegetable hummingbird (Sesbania grandiflora), Spiral Cactus (Euphorbia tortilis), different types of cactus and Opuntia, etc.,
வேலி அமைக்க பயன்படும் தாவரங்கள்:
கிளுவை, முள்ளுமுருங்கை, வாதநாராயணன், முன்னை, நொச்சி, வேலி ஆமணக்கு, மருதாணி, சீமை அகத்தி, அகத்தி, தேர்கள்ளி, கொடிகள்ளி, திருகுகள்ளி.
1. Hill mango or green commiphora fence (Commiphora caudata)
2. Herb Fence
3. Cactus Fencing
4. Fodder Fence
வகைகள்:
1. கிளுவை வேலி
2. மூலிகை வேலி
3. கள்ளி வேலி
4. தீவன வேலி
Choose healthy hill mango branches with 3-4 cm thickness from a two-year-old tree. Then fix the sticks to a height of 1.5 m. While cutting, the lower part should be inclined and the upper part should be level.
The sticks prepared in this way should be planted in 20 cm depth of 'V' shaped pits with 10 cm spacing and covered with soil. To prevent this fence from sagging, plant Portia (Thespesia populnea) or Indian ash tree (Lannea coromandelica) at a spacing of 5 meters from the starting place of fence.
The fence is strong by planting saplings like Indian ash tree and tying it well with long sticks. Roots develop and shoots appear 25 - 30 days after planting,
இரண்டு வருடமான கிளுவை மரதிலிருந்து 3-4 cm தடிமனுள்ள நீளமான நல்ல கிளைகளை தேர்வு செய்ய வேண்டும். பின்பு அந்த குச்சிகளை 1.5 m உயரம் இருக்குமாறு சரி செய்து, வெட்டும் பொழுது அடி பாகம் சாய்வாகவும் மேல்பாகம் மட்டமாகவும் இருக்க வேண்டும். இவ்வாறு தயார் செய்யப்பட்ட குச்சிகளை 20 cm ஆழம் கொண்ட ‘ V ‘ வடிவில் வெட்டப்பட்ட குழியில் 10 cm இடை வெளியில் நடவு செய்து மண் கொண்டு மூடிவிடவேண்டும்.
இந்த வேலி சயாமல் இருக்க ஆரமிக்கும் இடத்திலிருந்து 5 மீட்டருக்கு ஒரு இடத்தில் பூவரசு, ஒதியன் போன்ற துளிர்க்கும் மர போத்துகளை நட்டு வேலியின் இருபக்கமும் நீளமான கம்புகளை கொண்டு வடம்பிடித்து (வடம்பு) நன்கு கட்டுவதன் மூலம் வேலி பலமாக இருக்கும். நடவுசெய்த 25 – 30 நாளில் வேர்கள் உருவாகி தள்ளிர்கள் தோன்றும்.
A method of fencing by combining several herbaceous plants. This method is often set up around the house. Indian Coral tree, White Gulmohar, Malabar nut (Adhatoda zeylanica), Peacock Chaste Tree, Fence castor, etc. plants should be planted in the same way as we planted hill mango before.
Plants like henna, Dusky Fire Brand, codyveli should be planted and grown as seedlings. By spreading herbs like Indian Borage (Coleus aromaticus),  winged treebine (Cissus quadrangularis), Redpea Egg plant (Solanum trilobatum),  Madras pea pumpkin (Mukia Maderaspatana) etc. on this fence, the fence becomes stronger and we also get the medicine what we need.
2. மூலிகை வேலி
பல மூலிகை தாவரங்களை ஒருங்கிணைத்து வேலி அமைக்கும் முறையாகும். இந்த முறை பெரும்பாலும் வீட்டை சுற்றிலும் அமைக்க படுகிறது. முள்ளுமுருங்கை, வாதநாராயணன், ஆடாதோடை, நொச்சி, வேலி ஆமணக்கு முதலிய தாவரங்களை முன் எவ்வாறு கிளுவை நட்டோமோ அதேபோல் நடவு செய்ய வேண்டும்.
மருதாணி, முன்னை, கொடிவேளி போன்ற தாவரங்களை பதியமிட்டு நாற்றாக வளர்த்து நடவு செய்ய வேண்டும். இந்த வேலியில் ஒமவள்ளி, பிரண்டை, தூதுவளை, முசுமுசுகை முதலிய மூலிகையினை படரவிடுவதன் மூலம் வேலி பலமாவதோடு நமக்கு தேவையான மருந்து பொருளும் கிடைக்கிறது.
Select one of these plants like different types of cactus, Spiral Cactus and Opuntia. Cut it at a height of 50 cm. Prepare a 10 cm 'V' shaped pit and plant it on a pit. This type of fence method is mostly preferred in rainfed areas.
3. கள்ளி வேலி
தேர்கள்ளி, திருகுகள்ளி, கொடிகள்ளி, சப்பாத்திகள்ளி இவற்றில் ஏதாவது ஒரு கள்ளியை தேர்ந்தெடுத்து 50 cm உயரத்தில் வெட்டி எடுத்து வந்து 10 cm ‘V’ வடிவ குழி வெட்டி அதில் வைத்து நடவு செய்ய வேண்டும். இந்த கள்ளி உயிர்வேலி முறை பெரும்பாலும் மானாவாரி பகுதிகளில் பயன்படுத்துகிறார்கள்.
Cattle breeders for its protection, fodder fence is constructed with plants like Vegetable hummingbird, Subabul (Leucaena leucocephala), Gliricidia, Hedge Lucerne (Desmanthus virgatus).  Cut 3cm thick branches from the Gliricidia and fix it to a height of 1.5 meters. These sticks should be planted at 5 meter intervals. Plant one or two Subabul seeds in the middle of these two sticks and sow Vegetable hummingbird seeds closely spaced at 10 cm intervals in between and water them once in three days.
At 45 days after planting, after the Vegetable hummingbird and Subabul grow 1.5 meters, the fence is strengthened by tying it well with long sticks.
This fodder fence provides protection to the cropping area and also fulfills the fodder requirement of the cattle.
4. தீவன வேலி
கால்நடை வளப்பவர்கள் அதன் பாதுகாப்பிர்க்காகவும் அதன் உணவுத்தேவையை பூர்த்தி செய்யும் வகையில் அமைக்கப்படும் வேலி முறையாகும். அகத்தி, சூபாபுல், கிளைரிசிடியா, வேலிமசால் போன்ற தாவரங்களை கொண்டு இந்த வேலி அமைக்கப்படுகிறது.
அமைக்கும் முறை:
கிளைரிசிடியா மரத்திலிருந்து 3 cm தடிமனுள்ள கிளைகளை வெட்டி எடுத்து அதை 1.5 மீட்டர் உயரம் இருக்குமாறு சரிசெய்து கொள்ளவும் வெட்டும்பொழுது அடிபாகம் சாய்வாகவும் மேல்பக்கம் மட்டமாகவும் இருக்க வேண்டும். இந்த குச்சிகளை 5 மீட்டருக்கு ஒன்று என நடவு செய்ய வேண்டும். இந்த இரு குச்சிகளின் நடுவில் ஒன்று அல்லது இரண்டு சூபாபுல் விதைகளை நடவு செய்து இதற்கு இடைப்பட்ட பகுதிகளில் அகத்தி விதைகளை 10 cm இடைவெளியில் நெருக்கமாக விதைத்து மூன்று நாட்களுக்கு ஒருமுறை நீர் பாசனம் செய்யுங்கள். நட்ட 45 நாளில் அகத்தியும் சூபாபுல்லும் 1.5 மீட்டர் வளர்ச்சி அடைந்த பிறகு நீளமான குச்சிகளை வைத்து வடம்பு பிடித்து கட்டுவதன் மூலம் வேலி பலப்படும். இந்த தீவன வேலி குறுப்பிட்ட இடத்திற்கு பாதுகாப்பு தருவததோடு கால்நடைகளின் உணவுதேவையையு ம் பூர்த்தி செய்கிறது.
Generally fencing should be done in July-August month. If this is the case, the fence will survive with rainwater itself. Similarly, pruning of living fence should be done in this month.
பொதுவாக வேலி அமைப்பது ஜூலை-ஆகஸ்ட் மாதமாக இருக்க வேண்டும். இவ்வாறு இருந்தால் வேலியானது பேயும் மழை நீரை வைத்தே உயிர்பிடித்துக்கொள்ளும். அதே போல் இந்த மாதத்தில் தான் கவாத்து செய்ய வேண்டும்.

இருமல் மற்றும் சளி குணமாக எளிய வீட்டு வைத்தியம்... நோய் எதிர்ப்பு சக்தியையும் அதிகரிக்கிறது...
Pandemic Covid-19 taught us many lessons about standard of living, food habits, our body immune system more over addiction towards hospital even for primary care treatment. Most of the people avoided to visit hospital during those pandemic period and managed their illness through home treatment.
வாழ்க்கைத் தரம், உணவுப் பழக்கவழக்கங்கள், முதன்மை பராமரிப்பு சிகிச்சைக்காக கூட மருத்துவமனையை நோக்கி ஓடுதல் மற்றும் நமது உடலின் நோயெதிர்ப்பு அமைப்பு பற்றிய பல பாடங்களை தொற்றுநோய் கோவிட்-19 நமக்குக் கற்றுக் கொடுத்தது.அந்த தொற்றுநோய் காலங்களில் பெரும்பாலான மக்கள் மருத்துவமனைக்குச் செல்வதைத் தவிர்த்து, வீட்டிலேயே சிகிச்சை மூலம் தங்கள் நோயைக் குணப்படுத்தினார்.
நம் முன்னோர்கள் உணவை மருந்தாக எடுத்துக் கொண்டனர்...
நாம் விஷத்தை உணவாக உட்கொள்கிறோம்...
Pretty young mothers are visiting more than 5 times in a month to the hospital to treat their kids fever, stomach upset, common cold, cough etc., Breaking of joint family chain is also main reason for this. Even though, young mothers are also not having time and ear to hear the elders word.. Because, Doctors are their god..
அழகான இளம் தாய்மார்கள் தங்கள் குழந்தைகளுக்கு காய்ச்சல், வயிற்றுக் கோளாறு, ஜலதோஷம், இருமல் போன்றவற்றுக்கு சிகிச்சை அளிக்க ஒரு மாதத்தில் 5 முறைக்கு மேல் மருத்துவமனைக்குச் செல்வது வழக்கமாகிவிட்டது. கூட்டுக் குடும்பச் சங்கிலி உடைவதும் இதற்கு முக்கியக் காரணம். இருந்தாலும், இளம் தாய்மார்களுக்கு பெரியவர்கள் சொல்வதைக் கேட்க நேரமும், காதும் இருப்பதில்லை.. காரணம், மருத்துவர்கள்தான் அவர்களின் கடவுள்..
I am mother of 4 years child who drafting this article. We never visited hospital as of to treat the above said illness. Our kitchen and terrace garden is our hospital to treat those illness.
இந்தக் கட்டுரையை வரையும் நான் 4 வயது குழந்தைக்கு தாய். மேற்கூறிய நோய்க்கு சிகிச்சை அளிக்க நாங்கள் மருத்துவமனைக்கு சென்றதில்லை. அந்த நோய்களுக்கு சிகிச்சை அளிக்க எங்கள் சமையலறை மற்றும் மாடி தோட்டம் தான் எங்கள் மருத்துவமனை.
At the same time, We are not against allopathic medicines. It is necessary to treat secondary and tertiary issues with allopathic drugs.
அதே சமயம் நாங்கள் அலோபதி மருந்துகளுக்கு எதிரானவர்கள் அல்ல. இரண்டாம் நிலை மற்றும் மூன்றாம் நிலை சிகிசைக்கு அலோபதி மருந்துகளுடன் சிகிச்சை அளிப்பது அவசியம்.
25g mixed powder packs are available for sale
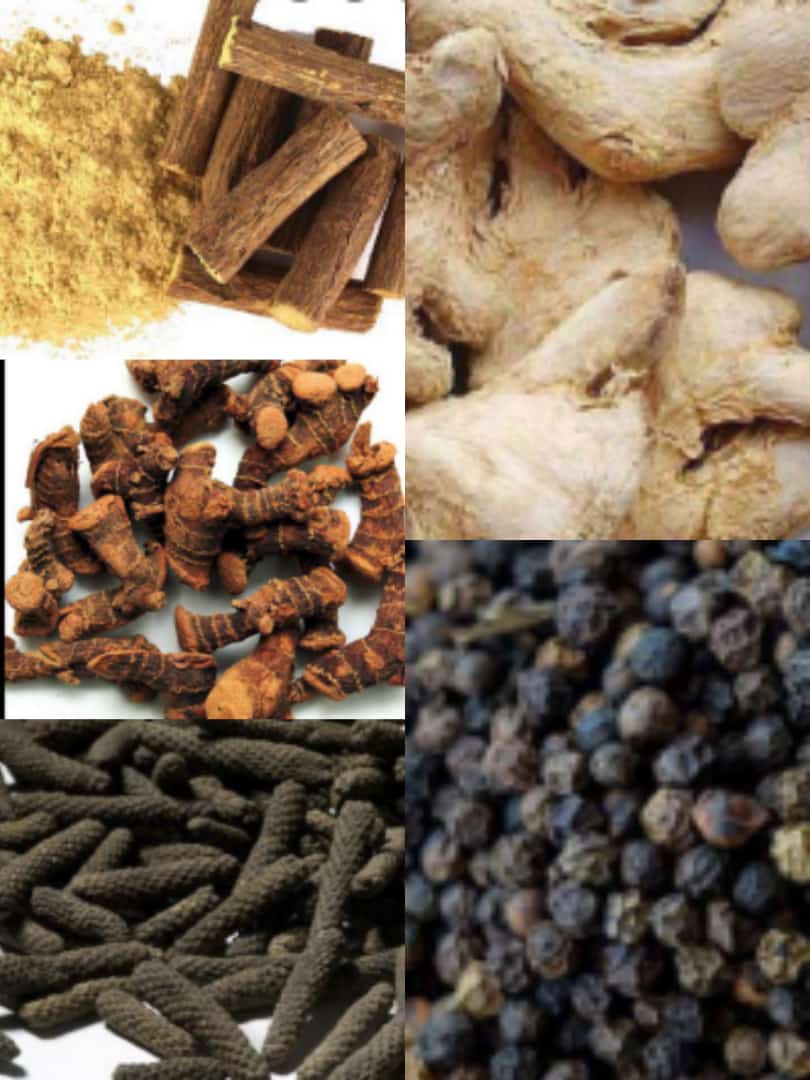
Let we see the ingredients required to prepare herbal powder to treat common Cold and cough.
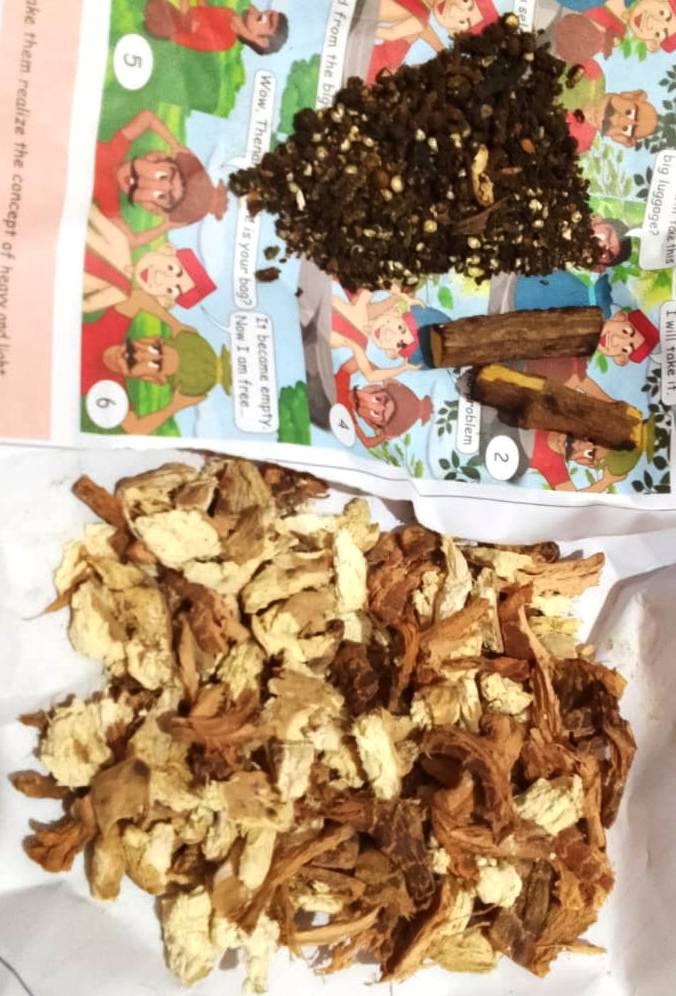
ஜலதோஷம் மற்றும் இருமலுக்கு சிகிச்சையளிக்க மூலிகைப் பொடியைத் தயாரிக்கத் தேவையான பொருட்களைப் பார்ப்போம்.
1. மிளகு (50 கிராம் - 1 பகுதி)

2. சுக்கு  (50 கிராம்- 1 பகுதி)

3. திப்பிலி  (25 கிராம் 0.5 பகுதி)

4. சித்தரத்தை (50 கிராம்- 1 பகுதி)

5. அதிமதுரம் (25 கிராம்- 0.5 பகுதி)

6. அக்கரை  (50 கிராம்- 1 பகுதி)

7. மஞ்சள்  (25 கிராம்- 0.5 பகுதி)
1. வெயிலில் காயவைத்து, ஈரப்பதத்தைத் தவிர்க்க - மேலே உள்ள பொருட்களை ஒரு பாத்திரத்தில் சிறிது வறுக்கவும்
2. சுக்கு, சித்தரத்தை மற்றும் அதிமதுரத்தை மிக்ஸியில் அரைப்பது கடினம். எனவே, அதை சுத்தியல் அல்லது கடினமான பொருள் கொண்டு உடைக்கவும்.
3. மிக்சி கிரைண்டர் மூலம் பொடி செய்து சலித்து கொள்ளவும்.
4. நன்றாக அரைத்த தூள் தினசரி உபயோகத்திற்காக காற்று புகாத கொள்கலனில் சேமிக்கலாம். தூள் நன்கு காய்ந்திருந்தால், அறை வெப்பநிலையில் 1 வருடம் வரை சேமிக்கலாம்.
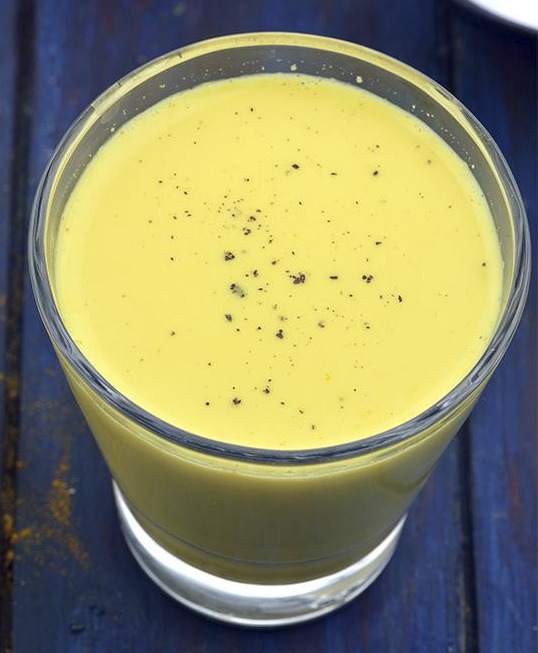
Add a pinch of above prepared powder in a glass of boiled hot milk. Add a pinch of turmeric powder and required quantity of jaggery. Mix it well and serve it for your child daily in morning or evening hours. Continue it for 48 days. You will get good result. It will improve immunity power too.
ஒரு கிளாஸ் சுடவைத்த சூடான பாலில் மேலே தயாரிக்கப்பட்ட தூளை ஒரு சிட்டிகை சேர்க்கவும். ஒரு சிட்டிகை மஞ்சள் தூள் மற்றும் தேவையான அளவு வெல்லம் சேர்க்கவும். இதை நன்றாக கலந்து, தினமும் காலை அல்லது மாலை நேரங்களில் உங்கள் குழந்தைக்கு கொடுக்கவும். தொடர்ந்து 48 நாட்கள் கொடுக்கவும். உங்களுக்கு நல்ல பலன் கிடைக்கும். நோய் எதிர்ப்பு சக்தியையும் மேம்படுத்தும்.
ஆரோக்கியமான உணர்வை பெறுங்கள்...