Growing tips of Sweet Basil, easy way to extract Sabja seeds and its usage

திருநீற்றுப்பச்சிலை வளர்ப்பு, சப்ஜா விதைகளை பிரித்தெடுக்க எளிதான வழி மற்றும் அதன் பயன்பாடு

Scientific name : Ocimum basilicum

Common name: French Basil or Sweet Basil or Thiruneetrupachilai

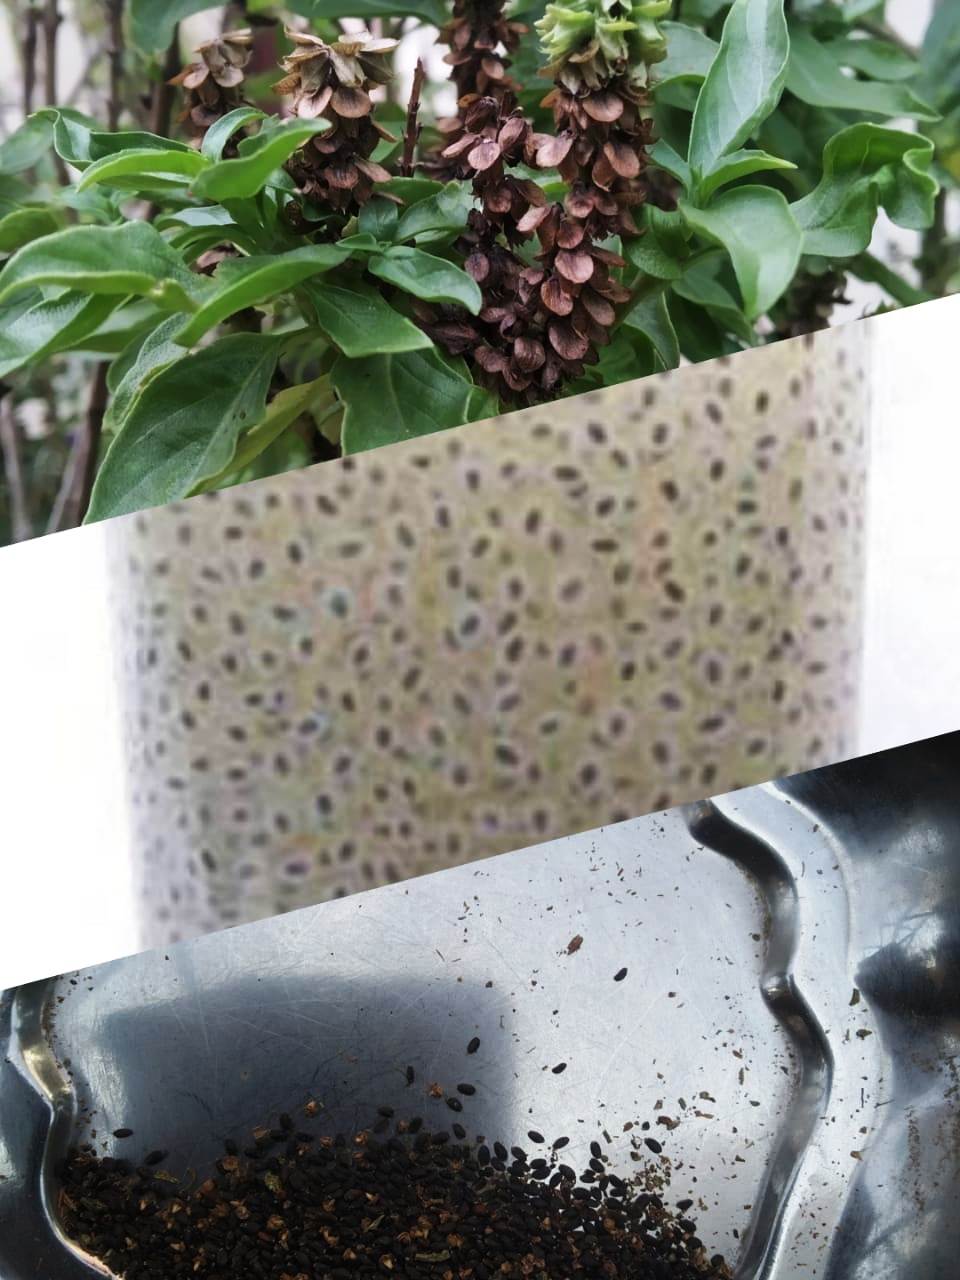
Sweet Basil is popularly known for its aromatic leaves and Sabja or Falooda seeds. Popular herb and easy to maintain in warm weather condition. It can be easily grow in ground or grow bags or even in waste small boxes. Just sprinkle the seeds on the soil or potting mix. It will start sprouting within 5-7 days and grow automatically with less care. We will get the Sabja seeds from the plant within 2 months and will get seeds continuously. Actually, Sweet Basil is perennial plant in tropical regions and as annual plant in temperate regions.

திருநீற்றுப்பச்சிலை / இனிப்பு துளசி அதன் நறுமண இலைகள் மற்றும் சப்ஜா அல்லது ஃபலூடா விதைகளுக்காக பிரபலமாக அறியப்படுகிறது. பிரபலமான மூலிகை மற்றும் வெப்ப மண்டல பகுதிகளில் பராமரிக்க எளிதானது. இது தரையில் அல்லது வளர்ப்பு பைகள் அல்லது சிறிய டப்பாக்களில் கூட எளிதாக வளர்க்கலாம். விதைகளை மண்ணில் அல்லது மண் கலவையில் தெளித்து விட்டாலே போதும். இது 5-7 நாட்களுக்குள் முளைக்க ஆரம்பித்து, குறைந்த கவனிப்புடன் தானாகவே வளரும். 2 மாதங்களுக்குள் சப்ஜா விதைகளை செடியிலிருந்து பெறலாம். தொடர்ந்து விதைகள் கிடைக்கும். திருநீற்றுப்பச்சிலை வெப்பமண்டல பகுதிகளில் பல்லாண்டு தாவரமாகவும், குளிர் பிரதேசங்களில் வருடாந்திர தாவரமாகவும் உள்ளது.

Easy to chew leaves directly. The leaves of plant contain methylchaylcol, linalol, eugenol, thymol and xanthamicrol. It has good medicinal value.

இலைகளை அப்படியே சாப்பிடலாம். இலைகளில் மீதில்சைல்கோல், லினாலோல், யூஜெனால், தைமால் மற்றும் சாந்தாமிக்ரோல் ஆகியவை உள்ளன. இது நல்ல மருத்துவ குணம் கொண்டது.

Easy way to extract Sabja seeds

  • Small white flowers grow in spikes at the ends of the stems and it will convert as seeds
  • Collect the dried matured seed stalks
  • Sun dry it for a day
  • Take out the seeds with the help of hand
  • One or two round of smooth grinding the tiny seed pods with the help of Mixer grinder
  • Sieve with large mesh
  • Seed pods and other debris will stay on the mesh.
  • Tiny black seeds and small dust would be collected in a bowl.
  • Winnowing and blowing air will segregate the small seeds
  • Collect the clean seeds and store it in container
சப்ஜா விதைகளை பிரித்தெடுக்க எளிதான வழி
சிறிய வெள்ளைப் பூக்கள் தண்டுகளின் முனைகளில் வளர்ந்து விதைகளாக மாறும்
காய்ந்த முதிர்ந்த விதை தண்டுகளை சேகரிக்கவும்
ஒரு நாள் வெயிலில் காய வைக்கவும்
கையால் விதைகளை உருவி எடுக்கவும்
மிக்ஸி கிரைண்டரின் உதவியுடன் சிறிய விதை காய்களை ஒன்று அல்லது இரண்டு சுற்று மென்மையாக அரைக்கவும்
பெரிய கண்ணி கொண்டு சல்லடையில் சலிக்கவும் 
மேலோடு மற்றும் மற்ற குப்பைகள் சல்லடையின் மேல் பக்கத்தில் இருக்கும் 
சிறிய கருப்பு விதைகள் மற்றும் சிறிய தூசி ஒரு கிண்ணத்தில் சல்லடையின் கீழ் சேகரிக்கப்படும்.
தூற்றுதல் அல்லது ஊதுவதன் மூலம் சிறிய துகள்கள் அகற்றப்படும்  
சுத்தமான விதைகளை சேகரித்து கொள்கலனில் சேமிக்கவும்

How to use Sabja seeds?

  • Take the sweet basil seeds in a bowl.
  • Remove the chaff or husks or stones if there are any from them.
  • Pour enough water.
  • They will soon begin absorbing water.
  • Soak them for 30 mins.
  • Once they absorb the water, a translucent gelatin like coating is formed around them.
  • Strain and then Use these soaked seeds in drinks, coolers, sherbets, ice creams, falooda or kulfis.
சப்ஜா விதைகளை எவ்வாறு பயன்படுத்துவது?
இனிப்பு துளசி விதைகளை ஒரு பாத்திரத்தில் எடுத்துக் கொள்ளவும்.
உமி அல்லது கற்கள் ஏதேனும் இருந்தால் அவற்றை நீக்கி விடவும்.
போதுமான அளவு தண்ணீர் ஊற்றவும்.
விதைகள் விரைவில் தண்ணீரை உறிஞ்சத் தொடங்கும்.
அவற்றை 30 நிமிடங்கள் ஊற வைக்கவும்.
அவை தண்ணீரை உறிஞ்சியவுடன், அவற்றைச் சுற்றி பூச்சு போன்ற ஒரு ஒளிஊடுருவக்கூடிய ஜெலட்டின் உருவாகிறது.
இந்த ஊறவைத்த விதைகளை வடிகட்டி, பானங்கள், குளிர்விப்பான்கள், சர்பத், ஐஸ்கிரீம்கள், ஃபலூடா அல்லது குல்ஃபிகளில் பயன்படுத்தவும்.

Health Benefits of Sabja seeds

  • Natural Body Coolant
  • Useful in Weight Reduction
  • Rich in Anti-Inflammatory & Anti-Carcinogenic Properties
  • Minimize Stress & Anxiety
  • Good for sore throats, cold and respiratory disorders.
  • Supports in digestion
  • Cure constipation.
  • Calming effect and can uplift your mood.
சப்ஜா விதைகளின் ஆரோக்கிய நன்மைகள்
இயற்கை உடல் குளிரூட்டி
எடை குறைப்பதில் பயனுள்ளதாக இருக்கும்
அழற்சி எதிர்ப்பு & புற்றுநோய்க்கு எதிரான பண்புகள் நிறைந்தது
மன அழுத்தம் மற்றும் பதட்டத்தை குறைக்கவும்
தொண்டை புண், சளி மற்றும் சுவாசக் கோளாறுகளுக்கு நல்லது.
செரிமானத்தை ஆதரிக்கிறது மற்றும் மலச்சிக்கலை குணப்படுத்துகிறது.
அமைதியான மனநிலையை மேம்படுத்த முடியும்.

Note: Avoid excess consumption. Better to avoid the intake by Pregnant women, feeding mothers and infants because of its slight narcotic effects.

குறிப்பு: அதிகப்படியாக சாப்பிடுவதை தவிர்க்கவும். கர்ப்பிணிப் பெண்கள், பாலூட்டும் தாய்மார்கள் மற்றும் குழந்தைகள் உட்கொள்வதைத் தவிர்ப்பது நல்லது, ஏனெனில் அதன் சிறிய மயக்க மூட்டும் விளைவுகளால்.

P. Dheivanai, SAAI Greens, 9382132593

Azolla (mosquito fern, duckweed fern, fairy moss, water fern) – Cultivation tips

அசோலா (கொசு ஃபெர்ன், டக்வீட் ஃபெர்ன், ஃபேரி பாசி, நீர் ஃபெர்ன்) - சாகுபடி குறிப்புகள்

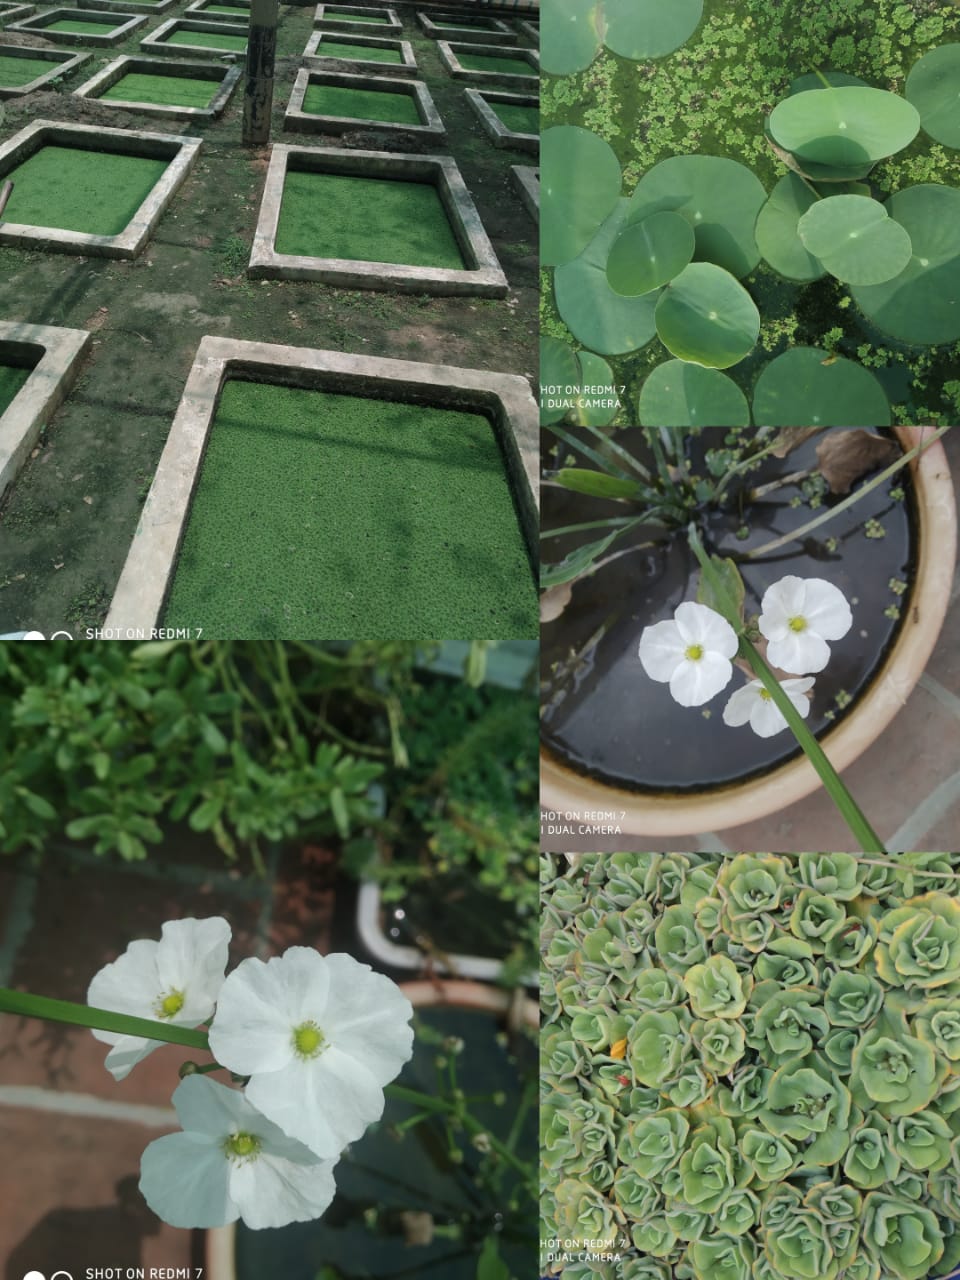
Aquatic ferns in the family Salviniaceae. Azolla used as a green manure in paddy, fixes atmospheric nitrogen and supplies N to the crop. Being an aquatic plant produces oxygen through the process of Photosynthesis. Consequently the amount of the dissolved oxygen is increased.

சால்வினியாசி குடும்பத்தில் உள்ள நீர்வாழ் ஃபெர்ன்கள். அசோலா நெல்லில் பசுந்தாள் உரமாகப் பயன்படுகிறது, வளிமண்டல நைட்ரஜனை பயிருக்கு தழை சத்தாக கிடைக்க செய்கிறது. நீர்வாழ் தாவரமாக இருப்பது. ஒளிச்சேர்க்கையின் மூலம் ஆக்ஸிஜனை உற்பத்தி செய்கிறது. இதன் விளைவாக, கரைந்த ஆக்ஸிஜனின் அளவு நீரில் அதிகரிக்கிறது.

Azolla is a potential feed substitute for livestock, sheep, goats, pigs, rabbits, poultry birds and fish. Azolla have been used to control mosquito larvae in rice fields as well as in water ponds (Lotus ponds too). Azolla is an aquatic floating fern, appears as a green mat over water.

அசோலா என்பது கால்நடைகள், செம்மறி ஆடுகள், வெள்ளாடுகள், பன்றிகள், முயல்கள், கோழிகள் மற்றும் மீன்களுக்கு சாத்தியமான தீவன மாற்றாகும். அசோலா நெற்பயிர்கள் மற்றும் நீர் குளங்களில் (தாமரைக் குளங்களிலும்) கொசுவின் புழுக்களை (லார்வாக்களை) கட்டுப்படுத்த பயன்படுத்தப்படுகிறது. அசோலா ஒரு நீர்வாழ் மிதக்கும் ஃபெர்ன் ஆகும், இது தண்ணீருக்கு மேல் ஒரு பச்சை பாயைப் போல் படர்ந்து வளர்கிறது.

Production of Azolla: Mix clean fertile soil with 2 kg of cow dung, 30 g of Super Phosphate and water. Spread the mixture uniformly in the pond. To cover the 6 feet X 4 feet pond, 1 kg of fresh Azolla culture is required. Apply this culture uniformly in the pond. Make sure to have the water depth at least 5 to 6 inches in the pond. Azolla will grow rapidly and fill the pit within 10 – 15 days.

அசோலா உற்பத்தி: 2 கிலோ மாட்டுச் சாணம், 30 கிராம் சூப்பர் பாஸ்பேட் மற்றும் தண்ணீருடன் சுத்தமான வளமான மண்ணைக் கலக்கவும். கலவையை குளத்தில் ஒரே சீராக பரப்பவும். 6 அடி X 4 அடி குளத்தை மூட, 1 கிலோ அசோலா தேவை. இதை குளத்தில் ஒரே மாதிரியாகப் பரப்பிவிடவும். குளத்தில் நீர் ஆழம் குறைந்தது 5 முதல் 6 அங்குலம் இருக்குமாறு பார்த்துக்கொள்ளவும். அசோலா வேகமாக வளர்ந்து 10 - 15 நாட்களுக்குள் குளம் முழுவதும் பரவிவிடும்.

Production of Azolla at Terrace garden: Lotus pond at terrace also can be used as container for Azolla cultivation. It reduces mosquito larvae instead fish. The mixture of 1 part of soil : 1 part of vermicompost : 1 teaspoon of phosphorus mixed with water and spread evenly in 15 cm height vs. 1.5 feet diameter plastic container. Apply handful of Azolla culture uniformly in the container. It will multiply rapidly.

மாடித் தோட்டத்தில் அசோலா உற்பத்தி: மொட்டை மாடியில் உள்ள தாமரை குளத்தை அசோலா சாகுபடிக்கு கொள்கலனாகவும் பயன்படுத்தலாம். இது மீன்களுக்கு பதிலாக கொசு லார்வாக்களை குறைக்கிறது. மண்ணின் 1 பங்கு கலவை : 1 பங்கு மண்புழு உரம் : 1 டீஸ்பூன் பாஸ்பரஸ் தண்ணீரில் கலந்து 15 செ.மீ உயரம் * 1.5 அடி விட்டம் கொண்ட பிளாஸ்டிக் கொள்கலனில் சமமாக பரப்பவும். கைப்பிடி அளவு அசோலாவினை  ஒரே மாதிரியாக கொள்கலனில் பரப்பிவிடவும். அது வேகமாகப் பெருகும்.
https://saaiacademy.in/saaigreens/

Some part of India, Azolla is using to prepare vada with dhal and consume by human beings. But, no scientific events available for it’s nutrients boosting ability with human.

இந்தியாவின் சில பகுதியில், அசோலாவினை பருப்புடன் சேர்த்து வடை தயாரித்து மனிதர்களால் உட்கொள்ளப்படுகிறது. ஆனால், அதன் ஊட்டச்சத்துக்கள் மனிதனுடனான திறனை அதிகரிக்கும் என்பதற்கான அறிவியல் பூர்வமான சான்றுகள் எதுவும் கிடைக்கவில்லை.

A mixture of 20 g of Super Phosphate and about 1 kg of cow dung should be added once every 5 days in order to maintain rapid multiplication of the azolla and to maintain the daily yield of 500 g.

அசோலாவின் விரைவான பெருக்கத்தை பராமரிக்கவும், தினசரி 500 கிராம் மகசூலை எடுக்கவும் சுமார் 20 கிராம் சூப்பர் பாஸ்பேட் மற்றும் 1 கிலோ மாட்டு சாணம் கலவையை 5 நாட்களுக்கு ஒரு முறை அசோலா குளத்தில் சேர்க்க வேண்டும்.

Slow growth of Azolla is due to phosphorous deficiency, insect/snail damage, high temperature, intense sunlight. Use insect/snail-free inoculum.

அசோலாவின் மெதுவான வளர்ச்சிகக்கான காரணங்கள் பாஸ்பரஸ் குறைபாடு, பூச்சி/நத்தை சேதம், அதிக வெப்பநிலை, தீவிர சூரிய ஒளி. பூச்சி/நத்தை இல்லாத மண் மற்றும் பிற பொருள்கள் பயன்படுத்தவும்.

For more details: P. Dheivanai, M. Sc. (Ag.) – 9382132593

E-certificate released – JRF and Assistant Professor qualified candidates – NTA UGC NET December 2020 & June 2021 cycle

The JRF Award Letters / NET E-Certificates for candidates, who have qualified for the Assistant Professor and Junior Research Fellowship (JRF) of UGC-NET June 2020 is available now. Candidate can download the E-certificate using Application Number or Roll Number of UGC-NET June 2020 and Date of Birth. For any query related to JRF Award Letters / NET e-Certificates, please e-mail to ecertificate@nta.ac.in.

Happy learning.. Best Wishes…

Mushroom Cultivation for home use / smaller scale

காளான் வளர்ப்பு - வீட்டு உபயோகத்திற்காக சிறிய அளவில் காளான் சாகுபடி

Different types of edible mushrooms are available in the world. Among that, Paddy Straw Mushroom, Oyster Mushroom, Milky Mushroom and Button Mushroom are most commonly growing species in India. Mushroom is well known for it’s health benefits and nutritional content.

உலகில் பல்வேறு வகையான உண்ணக்கூடிய காளான்கள் கிடைக்கின்றன. அதில், நெல் வைக்கோல் காளான், சிப்பி காளான், பால் காளான் மற்றும் பட்டன் காளான் ஆகியவை இந்தியாவில் பொதுவாக வளரும் இனங்கள். காளான் அதன் ஆரோக்கிய நன்மைகள் மற்றும் ஊட்டச்சத்துதிற்கு நன்கு அறியப்பட்டதாகும்.
Mushroom Spawn

Growing steps

  1. Choose pest and disease free paddy straw as medium to grow mushroom.
  2. Selection of paddy straw: 3 months to 9 months old paddy straw is the best medium for mushroom growth. Straw should be fully dried.
  3. Cut the paddy straw in to 10 – 15 cm pieces and wash thoroughly.
  4. Soak the straw in a water for 6 – 12 hours to kill eggs and larvae of the harmful insects and to minimize the phenolic content in the straw.
  5. Boil the straw for 15 – 20 minutes to kill adverse pathogens and drain the excess water.
  6. After drain the excess water (straw should contain 60% moisture), mix green gram powder with paddy straw. It will increase the mushroom yield. Place the straw in poly bags or any other air tight containers with holes. Containers should be disinfected before placing the straw.
  7. Can able to prepare 2 conical size bed by using 250-300g mushroom spawn shown in the above picture.
  8. Maintenance of the room temperature around 25 -35° C and relative humidity of 75-80 % is must. It can be maintained by hanging wet gunny bags both the sides.
  9. Sprinkle a small quantity of spawn on 10- 15 cm height filled paddy straw in the polybags nearer edge. No need to put centre portion of the bag. Follow the same process up to 5-6 layers. Never touch the spawn. Just sprinkle it with the help of same spawn bottles.
  10. Choose any corner or any undisturbed place in your house and keep the filled polybags covered with Gunny bags or any thick dark color cloths.
  11. Diffused light and good ventilation are necessary for the button development.
  12. Spray the water daily, based on the conditions of the beds two to three sprays may be needed.
  13. Never pour water on the beds, which leads to complete rotting of young developing buds.
  14. Spray water on the beds only after harvesting the mushroom.
  15. Scrap the dried buds after every harvest to ensure good yield.
  16. Use clean knife or blade to make a longitudinal cut on poly bags to get more yield.
  17. Harvest will start after two weeks. 4 – 5 harvest is possible in a weekly interval.
  18. Can harvest 1 – 1.5 kg of mushroom from a bed.

காளான் வளர்க்கும் படிநிலைகள்

பூச்சி மற்றும் நோய் இல்லாத நெல் வைக்கோலை காளான் வளர்க்கும் ஊடகமாக தேர்வு செய்யவும்.
நெல் வைக்கோல் தேர்வு: 3 மாதங்கள் முதல் 9 மாதங்கள் வரையிலான நெல் வைக்கோல் காளான் வளர்ச்சிக்கு சிறந்த ஊடகம். 
நெல் வைக்கோலை 10 - 15 செமீ துண்டுகளாக வெட்டி நன்கு கழுவவும்.
முட்டைகள் மற்றும் தீங்கு விளைவிக்கும் பூச்சிகளின் லார்வாக்களை அழிக்கவும் மற்றும் வைக்கோலில் உள்ள பீனாலிக் உள்ளடக்கத்தை குறைக்கவும் வைக்கோலை 6 - 12 மணி நேரம் தண்ணீரில் ஊறவைக்கவும்.
பாதகமான நோய்க்கிருமிகளைக் கொல்ல வைக்கோலை 15-20 நிமிடங்களுக்கு வேகவைத்து அதிகப்படியான தண்ணீரை வடிக்கவும். 
டெட்டால் போன்ற கிருமிநாசினி கரைசல் மூலம் மேற்பரப்பை சுத்தம் செய்ய வேண்டும்.
அதிகப்படியான நீரை வடிகட்டிய பின் (வைக்கோலில் 60% ஈரப்பதம் இருக்க வேண்டும்), நெல் வைக்கோலுடன் பச்சைப்பயறு பொடியை கலக்கவும். இது காளான் விளைச்சலை அதிகரிக்கும். வைக்கோலை பாலி பைகளில் அல்லது துளைகள் உள்ள காற்று புகாத கொள்கலன்களில் வைக்கவும். வைக்கோல் வைப்பதற்கு முன் கொள்கலன்களை கிருமி நீக்கம் செய்ய வேண்டும்.
மேலே உள்ள படத்தில் காட்டப்பட்டுள்ள 250-300 கிராம் காளான் வித்துக்களை  பயன்படுத்தி 2 கூம்பு அளவு காளான் படுக்கையை தயார் செய்யலாம்.
அறை வெப்பநிலையை 25-35 டிகிரி செல்சியஸ் மற்றும் ஈரப்பதம் 75-80% பராமரிக்க வேண்டும். ஈரமான சாக்கு பைகளை இருபுறமும் தொங்கவிடுவதன் மூலம் இதைப் பராமரிக்கலாம்.
10-15 செ.மீ உயரம் நிரப்பப்பட்ட நெல் வைக்கோல் மீது சிறிதளவு காளான் வித்துக்களை பாலிப்பைகளின் ஓர பகுதிகளில் தெளிக்கவும். பையின் மையப் பகுதியில் தெளிக்க வேண்டிய அவசியமில்லை. அதே செயல்முறையை 5-6 அடுக்குகள் வரை பின்பற்றவும். ஸ்பானை ஒருபோதும் தொடகூடாது.  ஸ்பான் பாட்டில்களின் உதவியுடன் அதை தெளிக்கவும்.
உங்கள் வீட்டில் ஏதேனும் ஒரு மூலையையோ அல்லது எந்த இடையூறும் இல்லாத இடத்தையோ தேர்வு செய்து, நிரப்பப்பட்ட பாலிபேக்குகளை சாக்குபைகள் அல்லது அடர் வண்ணத் துணியால் மூடி வைக்கவும்.
காளான் வளர்ச்சிக்கு பரவலான ஒளி மற்றும் நல்ல காற்றோட்டம் அவசியம்.
தினமும் தண்ணீரை தெளிக்கவும், படுக்கைகளின் நிலைமைகளின் அடிப்படையில் இரண்டு முதல் மூன்று ஸ்ப்ரேக்கள் தினமும் தேவைப்படலாம்.
படுக்கைகள் மீது தண்ணீர் ஊற்ற வேண்டாம், இது இளம் வளரும் மொட்டுகள் முழுமையாக அழுக வழிவகுக்கிறது.
காளானை அறுவடை செய்த பின்னரே படுக்கைகளில் தண்ணீர் தெளிக்க வேண்டும்.
நல்ல மகசூலை உறுதி செய்ய ஒவ்வொரு அறுவடைக்குப் பிறகும் காய்ந்த மொட்டுகளை அகற்றவும்.
அதிக மகசூலைப் பெற, பாலிபைகளில் ஒரு நீளமான வெட்டு செய்ய சுத்தமான கத்தி அல்லது பிளேட்டைப் பயன்படுத்தவும்.
இரண்டு வாரங்களுக்குப் பிறகு அறுவடை தொடங்கும். வார இடைவெளியில் 4-5 அறுவடை செய்யலாம்.
ஒரு படுக்கையில் இருந்து 1 - 1.5 கிலோ காளான் அறுவடை செய்யலாம்.

P. Dheivanai, M.Sc. (Ag.), SAAI Greens, 9382132593
Perfect way to repot Adenium plants

அடினியம் செடிகளை இடமாற்றம் செய்ய சரியான வழி

To repot desert rose during its period of active growth in the warm season – Early to mid spring. So, plants’ roots will grow faster and establish well to withstand dormancy in the winter.

வசந்த காலத்தின் துவக்கம் முதல் நடுப்பகுதி வரை - செடியின் சுறுசுறுப்பான வளர்ச்சியின் போது மாற்றுவது சிறப்பு. எனவே, அடினியம் செடிகளின் வேர்கள் வேகமாக வளர்ந்து குளிர்காலத்தில் செயலற்ற நிலையைத் தாங்கும்.

Steps to repot / அடினியம் செடிகளை இடமாற்றம் செய்வதற்கான படிநிலைகள்

  • Take half bucket of water – Mix half spoon of fungicide with the water
அரை வாளி தண்ணீரை எடுத்துக் கொள்ளுங்கள் - அரை ஸ்பூன் பூஞ்சைக் கொல்லியை தண்ணீரில் கலக்கவும்
  • Soak the seedlings for 2 hours. But Big plants, just sun dry the plants for 4-5 days. Pathogens may destroy due to sunlight. Later, just dip the plants with fungicide solution and repot it.
அடினியம் செடிகளை 2 மணி நேரம் ஊற வைக்கவும். ஆனால் பெரிய செடிகள், செடிகளை 4-5 நாட்களுக்கு வெயிலில் உலர்த்த வேண்டும். சூரிய ஒளி காரணமாக நோய்க்கிருமிகள் அழிக்கப்படலாம். பின்னர், பூஞ்சைக் கொல்லி கரைசலில் செடிகளை நனைத்து மீண்டும் நடவு செய்யவும்.
  • Take them out. Just Leave them in shade for a day
வெளியே எடுத்து, ஒரு நாள் அவற்றை நிழலில் விடவும்
  • Next day repot them
அடுத்த நாள் செடிகளை புதிய தொட்டியில் நடவும் 
மீண்டும் நடவு செய்த பிறகு, அவற்றை 3-4 நாட்களுக்கு அரை நிழலான இடங்களில் வைக்கவும். மாற்று அதிர்ச்சியிலிருந்து மீண்ட பிறகு முழு சூரிய ஒளிக்கு மாற்றவும். 
  • The roots damage easily during repotting. So, do not water the plants for a day after re-potting. Plant will adjust, heal and adopt to the new environment.
மீண்டும் நடவு செய்யும் போது வேர்கள் எளிதில் சேதமடைகின்றன. எனவே, மீண்டும் செடிகளை மாற்றி வைத்த பிறகு ஒரு நாளைக்கு செடிகளுக்கு தண்ணீர் விடாதீர்கள். செடிகள் தானாக தற்போதைய சூழலுக்கு தன்னை மாற்றிக்கொள்ளும் 

Also visit to know about the steps involved in growing adenium from seeds: https://saaiacademy.in/2022/01/13/get-98-germination-adenium-seeds-easy-growing-tips/

To prevent root rot in Desert Rose – to avoid overwatering. Soak and dry watering method is best – Water thoroughly and let the soil moisture almost completely dry before watering again.

பாலைவன ரோஜாவில் வேர் அழுகலைத் தடுக்க - அதிகப்படியான நீர்ப்பாசனத்தைத் தவிர்க்கவும். பாய்ச்சல் மற்றும் காய்ச்சல் முறை சிறந்தது - நன்கு தண்ணீர் ஊற்றவும், மண்ணின் ஈரப்பதம் முழுமையாக உலர்ந்த பிறகு, மீண்டும் தண்ணீர் விடவும்.  

P. Dheivanai, M.Sc. (Ag.), 9382132593
TNPSC Combined Civil Services Examination–II (Interview Posts / Non-Interview Posts) (Group-II Services /Group-IIA Services) Recruitment 2022 Notification, Apply Online

TNPSC Group 2 Recruitment 2022 

TNPSC Group 2 notification 2022 published on February 23, 2022, for 5529 CCSE-II vacancies. TNPSC Group 2 Application Form Start Date: February 23, 2022. Group-II Application Form Last Date: 23 March 2022 (Tentative). Date of Examination: May 21, 2022 FN (Tentative).

Visit the commission website for more details: https://www.tnpsc.gov.in/English/Notification.aspx

Hurry up… Link your Aadhar with TNPSC One Time Registration.

Join the below link for whatsapp assistance: https://chat.whatsapp.com/GB3jtldUb6NDAF4FIdKhDd or https://chat.whatsapp.com/ILeRYGCP2HO5Q2qZ76cjfb.

For more details contact: 9382132593 / saaistudies@gmail.com
Happy Learning

NTA UGC NET Result 2021-22(OUT) – Subject and Category wise Cutoff

UGC NET 2021-22 Result: University Grants Commission, National Eligibility Test has released the UGC NET 2021 Result on 19th February 2022 @ ugcnet.nta.nic.in. Candidates who appeared in NTA UGC NET  for December 2020 and June  2021 can download their results by entering their roll number and date of birth.

The commission had conducted the December 2020 and June 2021 cycle of exams together due to the COVID-19 pandemic. Around 12 lakh candidates appeared for the exam. The exams were held in three phases.

Phase 1 : between 20 November and 5 December, Phase 2 : between 24 and 27 December 2021, and Phase 3 : on 4 and 5 January 2022. The exam was conducted for 81 subjects in 837 centers across the country at 239 cities. Click the link to download your result. https://testservices.nic.in/resultservices/UGCNet-auth-2021

UGC NET Result: Re-evaluation/ Rechecking: No correspondence

RESULTS AT A GLANCE:

https://saaiacademy.in/saai-studies/

The subject wise breakup of the qualified candidates is as below

NTA UGC NET December 2020 / June 2021 Subject Category wise Cutoff percentile

NTA UGC NET December 2020 / June 2021 Subject Category wise Cutoff marks

NTA UGC NET December 2020 / June 2021 – Final Answer key

SAAI Academy is the pioneer institution in NTA UGC NET Coaching and 54 qualified as Assistant Professors, out of 6 candidates who have cleared JRF in various subjects.

Whatsapp Assistance follow us: https://chat.whatsapp.com/GTrPbe3CV8T0WJxFtePLAo

Online classes are dealing through G Meet platform. Google classroom is used to upload the virtual materials. Interested contact 9382132593 / saaistudies@gmail.com for more details.
  • Classes are handling with the experienced staffs
  • Crispy materials
  • Past 15 previous years questions discussion to explore the pattern of NET question
  • 200+ online test for paper 1 and 2
  • Doubt clearance sessions
  • 3 + mock test
  • Assignments

Happy Learning.. Crack your NET…

NTA UGC declared Answer key for UGC-NET December 2020 and June 2021

The candidates who appeared for the UGC-NET December 2020 and June 2021 Examination may login into the website https://ugcnet.nta.nic.in using their Application Number and Date of Birth. Click the link for the display of their question papers and marked responses with the provisional answer keys.

NTA UGC is inviting the candidates for the provisional answer key challenge. Challenge of Provisional
Answer Key through NTA website: https://ugcnet.nta.nic.in from 21 January 2022 – 24 January 2022 (09:00 PM).

Candidates are required to pay a processing fee of Rs 1000/- (Rs. One Thousand only) per challenged answer.

NTA UGC NET online classes are conducting through G meet platform by SAAI Academy for UGC NET exam 2022. New Batch will start soon. Interested candidates contact: 9382132593 or saaistudies@gmail.com.
You can get NTA UGC NET online assistance through the following whatsapp group link: https://chat.whatsapp.com/GTrPbe3CV8T0WJxFtePLAo

Happy Learning… Wishes for your success…

Drumstick – Production Technology (PKM 1)

செடி முருங்கை சாகுபடி

Drumstick (Moringa oleifera) is an important perennial multi -purpose vegetable grown widely in southern and western parts of India. Its tender leaves and immature or half –mature fruits are eaten. It is a delicacy in the south Indian households. It is most popular for its distinct, appealing flavoring fruits.

The flower buds are also used for culinary purposes. Besides, it has medicinal value also. Its pods are mainly used in curry making and in some areas leaves and flowers are also used for culinary purpose.

It contains good amount of minerals such as calcium (440 mg) and rich in iron (0.85 mg) and vitamin C (120 mg) for every 100 g fresh pod weight. Besides as a vegetable it is having many other uses such as; clarification of turbid water used for drinking purpose in villages in place of Alum by using dry seeds.

The juice from the leaves believed to stabilized blood pressure, the flowers are used to cure inflammations, the pods are used to treat rheumatism and the bark can be used as a digestive material. The varieties of drumstick are classified as annual and perennial ones. The annuals are short –duration crops.

PKM-1: An annual bush type drumstick, it flowers 90 -100 days after planting. It yields about 275 fruits per plant annually. The total fruit weight being 33-35 kg. The fruits are 65-70 cm long weighing 160 g. It can be ratooned for 3 years.

SOIL AND CLIMATE Normally it can be grown in any type of soil, but sandy loam soil with good drainage is more suitable for its cultivation. Water logged and heavy soils are not suitable. This is a crop of low rainfall regions. Normally the planting of seedlings coincides with the commencement of rainy season i.e. June – July.

If there is a provision or irrigation and providing little shade in the initial few days, the crop can be planted in any season of the year except very cold months when night temperatures are less than 15’C. A pH range of 6.5 –8 is ideal

Season: June –July and November-December are well suited for sowing.

Sowing: About 1.0 –1.10 kg seed is enough for a hectare. (100 g will have about 300 seeds). Pits of 45 cm x 45 cm x 45 cm size are dug at 2.5 m x 2.5 m spacing one week before planting.

The farmyard manure @ 15 kg / pit is applied. A 60 cm circular irrigation basin is made around the pit, The pits are closed. Two seeds are sown 3 cm deep in each pit in the centre. Seeds germinate 7-9 days after sowing.

Nursery raising: Raise the seedlings in 15 cm x 10 cm dimension polythene covers filled with sand, Soil and FYM in equal proportion. Sow one seed per cover, at a depth of 2 cm. The seeds will germinate within a week and seedlings will be ready for transplanting in about 4 to 5 weeks when they attain an height of about 15-20 cm. Manures and fertilizers :100 : 100 :100 kg / ha N:P2O5: K2O /ha/year. Farm Yard Manure @ 8-10 kg per plant has to be applied to the planting pit 8-10 days before planting of seedlings and 50 Kg each of nitrogen, Phosphorus and potash per ha. is to be applied at the time of planting and the same dose is repeated at every six months interval for the crop.

High density planting and fertigation in moringa PKM 1: High density planting at 1.5 X 1.0 m spacing with two plants /hill and plant population 13,333 / ha along with the application of fertilizer dose of 135 :23 :45 g of NPK / pit (150%) through drip increase the yield of moringa. In this, apply phosphorus basally as soil application. Apply N and K in the form of urea and muriate of potash through drip.

Pinching: Plants with overgrown branches cause difficulty in harvesting. To facilitate more branching, pinching of main shoots on 80th day after sowing or when they are about 75 cm in height and two times with monthly intervals are to be taken. After first pinching. This will register the highest yield of fruits.

After cultivation: Gap fill within a month. Grow short duration vegetable like cowpea, bhendi and tomato as intercrop.

Weeding: The field should be maintained weed –free for initial 2 months. As plants grow to a height of 3 feet, there is no need for weeding. If necessary, weeding can be done.

Irrigation: This crop is quite hardy and during dry season requires irrigation one in two weeks and for commercial cultivation drip irrigation can be adopted with daily application rate of 12 to 16 liters of water per tree during other seasons. Where water sources are scarce life saving irrigation or pot watering once in two weeks during dry period will sustain the crop.

INSECT PEST MANAGEMENT

Insect management

As a general recommendation to reduce pest incidence at the time of organic manure application give Neem Cake @ 500 g per plant and also enrich the FYM with Trichoderma @ 1 kg per tonne of FYM.In June-July and Jan-Feb, when plants give new flushes, spray malathion (0.2%) .

During flowering period, spray Monocrotophos @ 1 ml/L to prevent thrips. If flower webber is seen one or two sprays of carbaryl (2.5 g/L) along with Nuvan (2ml/L) can be given.

Plant protection – Pests

Moringa pod fly management: Soil application of Thiamethoxam 25 WG @ 200g a.i. / ha on 150, 180 and 210 days after planting; placement of fermented tomato fruit trap @ 25 / ha; and need based foliar spray of Spinosad 45 SC @ 56ga.i. / ha followed by Profenophos 50 EC @ 250ga.i. / h

Bud worm, leaf caterpillar and leaf webber: Dust Carbaryl 10 D @ 25 kg/ha or spray Carbaryl 50 WP @ 2 g/l. Hairy caterpillar: Use flame torch when the caterpillars settle on the tree trunk.

Disease Management: Powdery mildew and sometimes leaf spot diseases are the only diseases of economic importance which can be managed by foliar spraying of Wet table sulphur (0.3%) or Tridemorph (0.1%) or Hexaconazole (0.075%) or Dinocap (0.1%) or Carbendazim (0.1%).

Harvesting and Post Harvest Management: If there is more flower clustering on the tree then the yield is low. An individual inflorescence carries 19-126 flowers, average being 53, But it results only in one fruit. Normally 3-5 fruits / inflorescence are obtained. Fruit set ranges from 1.0-2.8 %. The percentage fruit set varies from tree to tree.

The fruit length varies from 25-100 cm depending upon the type of moringa variety. Each fruit weights around 150-230 g containing 10-20 seeds each on an average. Annual drumstick starts bearing from 6th month onward, providing 200 fruits / plant annum. Its average yield is 52 tonnes / ha.

The ratoon crop is obtained by pruning its trees to a height of 1 m after harvesting. The plants start bearing 4-5 months after heading back. Thus 2 ratoons can be taken. After rationing NPK along with 25 kg farmyard manure are applied. A number of value-added products can be prepared if its availability is in excess. They are moringa pickle, dehydrated moringa, moringa leaf powder and moringa flesh mesocarp powder.

For seeds and quarries related to cultivation

P. Dheivanai, M.Sc. (Ag.) 9382132593
SAAI Greens, Madurai

Get 98% Germination from Adenium arabicum seeds + Easy Growing tips / 98% விதை முளைப்பு திறன் + அடினியம் செடி பராமரிப்பு

Adenium arabicum is produces smaller pale pink flowers with multiple big branches and long fat seeds. Direct sunlight is preferable to ensure good plant growth. Hence, Adenium is otherwise called as Desert Rose. Less maintenance plant which requires less water to survive. Plants are found in tropical and southern African countries as succulent shrublets, shrubs or small trees.

அடினியம் ஒரு அழகு தாவரம். பிங்க், வெள்ளை மற்றும் பல நிறங்களில் அழகிய பூக்களை உடையது. பாலைவன ரோசா என்று அழைக்கப்படுகிறது. சூரியஒளியில் நன்கு வளரும். குறைந்த நீர் மற்றும் மேலாண்மை போதுமானது.

Most of the plant lovers would like to have these plants in their favorite list. Let we see the germination procedure to get 98% of success baby plants from the seeds.

பொதுவாக தாவரங்களை விரும்புபவர்கள் அடினியம் வளர்க்க ஆசைப்படுவார்கள். எப்படி 98% விதை முளைப்பதை உறுதி செய்வது என பார்க்கலாம்

  • Freshly harvested seeds has good viability than older seeds. After 3 months, the seed viability is getting reduced.
  • Soak seeds in any bio-control agents (like Pseudomonas) / fungicide water for 4 hours. Now you can easily remove husk from the seeds.
  • After de-husking the seeds, closely place them in 3 – 4 layers of wet tissue paper in the bowl and cover it with single layer of tissue paper again. Moist the pack once a day and close the bowl by lid with air tight condition. Place it in indoor. Place the container in open terrace or under direct sun light during October, November, December and January month to break seed dormancy.
  • Open the lid once daily to enter fresh air. Few seeds will take time for its germination. Hence, don’t waste it. Wait for some more days until seeds get decay.
  • There is a possibility of fungal growth in this air tight condition, So, least concentration of fungicide solution / bio control agents are recommended.
  • After de-husking you can use sand and vermicompost as growing media (1:1 ratio). Spread the mix in the bowl as a layer and place the seeds closely in the media. Sprinkle the water regularly. Close the bowl and Keep it in indoor condition.
  • Around 98% of the seeds starts to germinate in this method within 7 – 10 days.
https://saaiacademy.in/saaigreens/
  • விதையினை உடனே பயிரிடுவது சாலச்சிறந்தது. 3 மாதங்களுக்கு பின் முளைப்பு திறன் குறைய ஆரம்பிக்கும்
  • சூடோமோனாஸ் போன்ற உயிர் உரத்தில் விதையினை 4 மணி நேரம் ஊறவைக்க வேண்டும். பிறகு விதையின் தோலினை சுலபமாக நீக்கிவிடலாம்
  • தோல் நீக்கப்பட்ட விதையினை நெருக்கமாக 3 – 4 அடுக்கு கொண்ட திசு பேப்பரில் வைத்து நீர் தெளிக்கவும்.
  • விதை கொண்ட அடுக்கினை மீண்டும் 1 அடுக்கு டிஸ்ஸு பேப்பர் வைத்து மூடி ஒரு கிண்ணத்தில் வைத்து மூடி வைக்கவும். கிண்ணத்தினை அறைவெப்பநிலையில் வைப்பது நல்லது. கிண்ணத்தினை காற்று புகாதவாறு இருக மூடவும்.
விதையின் செயலற்ற நிலையை தவிர்க்க அக்டோபர், நவம்பர், டிசம்பர் மற்றும் ஜனவரி மாதங்களில் கொள்கலனை திறந்த மொட்டை மாடியில் அல்லது நேரடி சூரிய ஒளியில் வைக்கவும்.
  • தினமும் ஒரு முறை மூடிய கிண்ணத்தினை திறந்து மூடுவதால் புதிய காற்று உள்ளே வரும்.
  • காற்று புகாதவாறு இருப்பதால் பூஞ்சை வர வாய்ப்பு அதிகம். குறைந்த அடர்த்தியில் பூஞ்சைக்கொல்லி / சூடோமோனாஸ் போன்ற உயிர் உரங்கள் பயன்படுத்துவதால் பூஞ்சை மற்றும் அழுகல் நோய் வராது.
  • அல்லது விதையின் தோலினை நீக்கிய பிறகு மணல் : மண்புழுஉரம் (1:1) கலவையில் வைத்து அறைவெப்பநிலையில் வளர்க்கலாம்.
  • தினமும் நீர் தெளித்து வர வேண்டும். இந்த முறையில் 7 – 10 நாட்களில் 98% விதைகள் முளைக்க ஆரம்பிக்கும்.
  • சில விதைகள் முளைக்க நாட்கள் எடுத்துக்கொள்ளும். அதனால் பொறுமையாக காத்திருக்கவும்
  • மேல் படத்தில் உள்ளது போல் விதைகள் முளைத்தவுடன் நீர் கப்புகளில் மாற்றிவிடலாம். மண் கலவை – தென்னைநார் கழிவு : மண்புழுஉரம் : செறிவான மண் (1:1:1) : ஒரு கைப்பிடி வேப்பம்புண்ணாக்கு : உயிர் உரங்கள்.
  • நீர் கப்புகளில் மாற்றப்பட்ட அடினியம் நாற்றுகளை அரை நிழல் படும் பகுதியில் இரண்டு மாதங்களுக்கு வைத்து நீர் தெளித்து வர வேண்டும்.
  • இரண்டு மாதங்களுக்கு பிறகு பெரிய தொட்டிகளில் நாற்றுகளை மாற்றி சூரியஒளி படும்படி வைக்க வேண்டும்
  • தொட்டிகளில் நீர் தேங்காமல் வடிகால் வசதி நன்கு இருக்குமாறு பார்த்துக்கொள்ள வேண்டும். இல்லையெனில், வேரழுகல் வரவாய்ப்புள்ளது.
  • தினமும் ஒருமுறை நீர் தொழித்தல் போதுமானது.
  • 1.5 வருடங்களுக்கு பிறகு அடினியம் பூக்க ஆரம்பிக்கும்.
  • அடினியம் தாவரத்தின் அடிப்பாகம் பருமனாக இருக்க வேண்டும். ஆதலால் இந்த செடியினை தனியாக தொட்டியில் மற்ற தாவரங்கள் இல்லாமல் வளர்க்கவும்.
  • பூவிலிருந்து வரும் விதையினை பயன்படுத்தி புதிய செடிகளை வளர்க்கலாம்.

Transplant the above stage seedlings in to the small cups with the pot mix of https://saaiacademy.in/2020/09/17/pot-mixture-composition-for-vegetables-flowers-and-greens-2/. Keep the plants under semi shaded area up to 2 months.

Two month Old Batch

After two months, transplant these saplings in to the big pot as you wish and keep it under direct sun light. Avoid water stagnation. It is desert plant, so give little quantity of water in a day. Water stagnation leads root rot. So, ensure drainage in the pot. Base stem of the plant should be big, which decides the healthiness of the Adenium plants. Plant it in the separate pot.

Plants will start blooming after 1.5 years. Flowers will produce long seed pot. Seeds can be used for further multiplication.

Plant with Flowers

Fore more details:

P. Dheivanai, SAAI Greens, 9382132593